In this article, we will be discussing the different effective troubleshooting measures for resolving the multi-user error H101. We shall also learn about the various factors causing such an error. The Error code H101 is basically an H series error that can be seen when you try to switch between normal to multi-user mode. This error is encountered in different situations and can also be seen if the file configuration is incorrect and the system is unable to connect with the server.
You can also face the QuickBooks multi-user error H101 if the incoming communication blocked. To know more, go through this article till the end. Or one can also get in touch with the support team to avail of further assistance.
Why does the QuickBooks error code H101 occur?
You can end up with such an error due to the following reasons:
When QuickBooks software tries to create a connection to the company file but is unable to communicate with the server.
QuickBooks firewall ports not set up.
You can also face a similar issue if the windows firewall restricts the passage of the incoming and outgoing services to the QuickBooks files.
Damaged or incorrect file configuration can also lead to such an error.
If the QuickBooksDBXX or QBCFMonitor services aren’t running.
Inappropriate hosting configuration settings can also lead to such an error.
Adequate Methods to Resolve the QuickBooks Error Code H101
There are different solutions that can be performed tofix QuickBooks Error H101. However, different solutions can prove effective for different users due to the diversity in the sources of error. As such, it is advised to start right-away from the first step and if the error still keeps showing up after performing the steps, the user can try out the next steps.
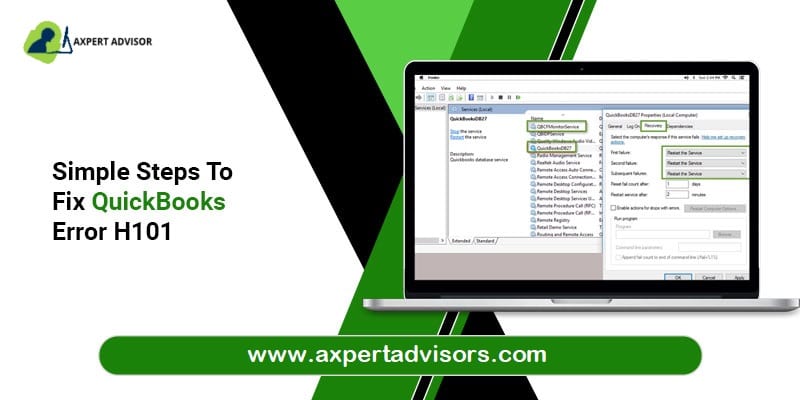
Method 1: Verify the QuickBooks services
The very first step is to hit on the Windows key + R keys to open the Run box.
After that, type in services.msc and hit the Enter key.
You should then move to the Services window, and look for the QuickBooksDBXX service.
After that make sure that startup type is set to Automatic and Service status is running.
The next step is to opt for the Recovery option.
Also, pick the drop-down menu for the first failure to choose the Restart the service option.
After that, Save the changes and hit on OK tab.
Repeat the steps for the QBCFMontiorService.
The last step is to open the software on every affected workstation in multi-user mode.
Method 2: Create a new folder for the company file
The first step is to create a new folder and share it with the hosting system.
Now, you will have to set the windows to get the entry for sharing company files.
After that copy the qbw file to the newly created folder.
Opt for the Start Scan if the location of the company file is displayed correctly.
If it doesn't, choose the company file by hitting on Browse, then choose the Start Scan option.
The QuickBooks Database Server Manager will now fix your firewall and grant you access to all workstations as needed.
Afterward, hit on Close.
Next, launch the QuickBooks Desktop software.
Afterward, hit on the File and then Switch to Multi-User Mode.
The above mentioned set of steps should be sufficient to resolve the QuickBooks Error message H101.
Method 6: Change the Firewall Setting
To display the Run dialogue box, hit on the Win + R keys.
In the text box, type Control.
Hit on the OK key.
Now, choose the option for System and Security.
Afterward, hit on the Windows Defender Firewall.
On the left side of the screen, choose to Allow an app or feature through Windows Defender Firewall.
Allow the QuickBooks software from the list of active software at this point.
Press OK to confirm.
Concluding!
The above-stated set of steps is expected to fix the QuickBooks error code H101. But if in case the user is unable to fix the issue, then in that case contacting our team professionals at 1-888-368-8874 is suggested. We are a team of technically sound QuickBooks error support professionals, who work round the clock to provide the best possible assistance. You may visit our other blogs and get all the QuickBooks error codes resolved in no time.
All that you need to know about the QuickBooks Payroll won't update error:
QuickBooks is one of the best accounting software available in the market. With the advent of this software, there has been a major shift in the way accounting is being handled. Businesses have largely benefitted through this software as it has successfully performed some of the major tasks including accounting, payroll, bookkeeping, and filing of taxes a lot simpler than before while saving time and effort.
However, even though this is a revolutionary application in the business world, users do often face errors while using it. One of the most common issues faced is the QuickBooks Payroll update not working or Won't open. This generally happens when there is no active subscription to the payroll. In order to resolve this error, it is very important to understand the causes behind it so that you can easily find its solution.
Causes Behind the QuickBooks Payroll Won't Update Error
There are several causes that may lead to the Payroll error in QuickBooks. There have been listed as follows:
The service key that is being used may be an incorrect service.
QuickBooks desktop might be showing the Invalid Number status.
The file of the QuickBooks payroll is not Updated.
When the Direct Deposit agreement is inactive, and it has more than 1 active payroll
How to Resolve QuickBooks Payroll Updates Not Working Issue?
Go through this section very keenly and master the technique to troubleshoot the QuickBooks payroll update errors and other related problems:
Method 1: Download Payroll Updates in Safe Mode
Initially, shut down your computer.
Then, start your system in the Safe mode. This requires hitting the F8 key repeatedly. This will in turn show the Advanced Boot Options.
Again, download the QuickBooks Desktop Payroll updates.
When done successfully, restart your computer in Normal mode.
Once done, again download the QuickBooks Payroll Updates.
Method 2: Reset the Settings of the Internet Explorer Browser
Firstly, open the Internet Explorer browser.
Now, head to the Tools menu that is 3 dots on the right side of the window.
Next you need to hit on the Internet Options.
Then you are required to press Advanced tab.
Now you have to choose the Restore Defaults or Reset option.
Once done with that, hit on the Apply button to apply all changes.
And then hit on the OK button to close the window.
Method 3: Repair QuickBooks Desktop Software
At the first, open the Control Panel.
Now, hit on the Programs or Programs and Features option.
You will get a list of programs.
Now you will have to choose QuickBooks.
Right-click on it then select Uninstall/Change option.
In the open-up window, hit on the Repair option.
This will help you in repairing the software.
Now, open the QuickBooks software.
if the issue pervades, jump to next method.
Method 4: Manually Resolve the QuickBooks Payroll Won't Update Error
The first thing you need to do is opt to Update the payroll Tax table.
For this, you will have to hit on the Employee’s menu.
Then choose the Get payroll update option.
After this, hit on the link which prompts you to Download the entire payroll update.
Once done, opt for the Update tab.
When the download is successful; a message will appear on the screen. The message will contain the following line 'A new tax table or updates to your payroll tax is installed on your system. Select the OK tab to read all the changes.'
Now, hit on the OK button to read it.
If the issue is still persisting then in that case you need to rename the folder by adding the old at the end of the name as CPS to CP SOLD.
After these changes, you have to Update the payroll again.
If it is not working then do turn off the User Account Control (UAC)
After the UAC is off, try to download it now.
Method 5: Install Digital Signature Certificate
Initially, open C: Drive and head to Program Files/Intuit in Windows Explorer.
Afterward, choose QuickBooks from the list of options.
Hit on Properties by right-clicking the QBW32.exe file.
Next, opt for the Digital Signature tab from the menu on the left. Check to see if intuit is selected in the list of signatures.
Choose the Details option.
Now, choose the View Certificate option.
Then, under the certificate box, opt for the Install Certificate option.
Hit on Next repeatedly until the final page shows up on your window desktop.
Next, choose the Finish tab.
After that, open QuickBooks and restart your computer before installing the latest payroll update.
Method 6: Check the System Time and Date
To start, check if the system time and date are correct by checking the right-bottom corner of the toolbar.
If the time and(or)data are incorrect, then right-click on the same and choose Adjust Date/Time.
Hover over the Change date and time tab and rectify the time and date.
Afterward, choose the correct time zone by hitting on Adjust Time Zone option.
Now, hit on OK to reflect the corrected date and time.
Now, open the QuickBooks software and check if the issues related to the payroll update got solved.
The issue must be resolved by now.
Summarizing!
QuickBooks payroll update won't update error is not that complicated. You can easily fix the issue by following the above-mentioned methods. But if you face any kind of problem while fixing the error you can always reach out to the error support service providers who are available 24/7 to assist you with all your queries. Our team is always there to assist you in every possible way. All you need to do is ring us a call and seek for assistance from our experienced team of professionals.
No matter how much you wish not to get distracted while working on QuickBooks software, some or the other error suddenly pops up and hinders the entire working process. One such error that we will be throwing light on in this segment is the QuickBooks error code 102 and 105. Well, there are specific conspicuous causes that trigger this error. This error is basically a banking error, that you might come across when your bank website lands into some type of issue or is experiencing halts due to maintenance work. You might face a similar issue if there is a server issue with information exchange between the bank’s site and QuickBooks desktop.
Overall, the error will definitely interrupt the smooth working, which makes it important to chuck it off immediately. To get a better grip on to QuickBooks banking errors 102 or 105, make sure that you stay glued to this piece of writing, or get on a call with our tech geeks using our support line, and get access to the most feasible solutions ever.
What does QuickBooks Banking Error 102 and 105 means?
QuickBooks users have faced various issues while performing banking operation in the accounting program. Most of these issues appear as peculiar error codes in the form of a comprehensive message box on the screen. Recently, users have been facing “QuickBooks Bank error 102” and “QuickBooks Bank Error 105”. While these errors mostly symbolize “server maintenance” or a back end issue from the bank’s side, there can be other reasons as well. Know all the causes and troubleshooting methods to get Banking Error 102 and 105 in QuickBooks fixed permanently.
About QuickBooks Error 102
This QBO bank error pops up when processing or downloading transactions through QuickBooks Online. The maximum probability of its occurrence can be ascribed to server maintenance by the bank. This error code appears in the form of the following message:
Warning
Description
Error 102:
QuickBooks Online is facing troubles establishing links to the bank website.
About QuickBooks Error 105
Banking Error 105 can be ascribed to a server-related problem as a result of which data cannot be transferred from the bank site to you QBO account. You might see the following error message on your computer screen:
Error
Description
Warning
We’re sorry, but we cant export your data. Unfortunately, we encountered an error uploading your data to QuickBooks Online Banking Error 105.
What triggers QuickBooks error code 102 & 105?
The following can be the triggers to QuickBooks banking error 102 and 105. Let us check that out one by one:
If an outdated or unsupported system is used to run the QuickBooks software, it may also result in such an error.
This error could be encountered due to some issues with the bank or other financial issues including alterations in the details.
If you inadvertently removed a downloaded file or some imported file, the error code 102 and 105 may pop up.
In case there is a poor internet connection.
Providing incorrect bank login information.
Having visited the chief causes leading to the error, let us now delve into the various methods for fixing error 102 and 105 in QuickBooks.
Symptoms that are related to QuickBooks Error 102 and Error 105
Different signs and symptoms give a clear indication of these errors. Some of the noteworthy signs include:
The computer slows down drastically when QuickBooks is logged in or any banking operation is performed through the accounting program.
Not able to process or download the banking transactions.
Even after recurring tries, the user is unable to establish connection with the bank.
Solutions to Fix the QuickBooks Online Banking Error Code 102 and 105
You can perform the below-mentioned rectification methods to fix the QuickBooks error 102 and 105. Check out the solutions one by one and make sure to adhere to the given sequence:
Solution 1: Update the Bank Details
Initially, head for the Update tab and further update the account after trying to run the three manual updates.
You should now ensure to go through the latest and Advanced third-party applications and tools and the system setup of the latest version.
Furthermore, Login to the bank’s site with the help of the online banking URL.
You would have to check messages, notifications with a successful login from the bank indicating that something is not working.
You will also have to ensure that the Account details, summary, history, and transactions are without any error.
Check the said things after a day, so that the bank gets time to update.
In case you continue to face the issue for more than 24 hours, then you would have to connect online customer support such as the following details, name, bank name in account setup, outside of QuickBooks online when using URL and associated with the type of account.
Solution 2: Manually update the bank updates
Initially, pick the Banking option from the left menu.
Further, hit on the Update tab in the upper right corner.
Now, choose to remove undesired accounts, only if you wish to update some of the accounts.
Choose the Update now tab.
Lastly, insert the MFA credential, if needed, and head for the continue Update tab.
Solution 3: Connect your bank accounts in QuickBooks Online
Initially, you would have to choose banking from the left menu.
Further, spot the name of the financial institution, in case you missed adding the Bank earlier.
Thereafter, pick the Add account option and look for the name of the Financial institutions.
Head for the Financial institution from the given list.
Furthermore, insert the User id/ login id and password for the Financial company website and hit on the Continue tab.
Just in case the financial institution mandates, you would have to perform all the additional security verification steps and go for the Securely connect option.
Now, choose the bank symbol on the left side of the account you wish to connect to, and also choose the account type drop-down menu to pick a bank or credit card account.
Moreover, if you don’t have the account earlier, then look for the Add new tab and also hit on it to Create a new account.
Choose both a Bank or credit card account.
The QuickBooks downloads for the last 90 days will automatically download the Banking and credit card transactions overnight when you will Connect your account.
You will now have to opt for a Shorter date range.
Once the download is over, the Banking page will pop up.
Classify and Accept QuickBooks and the Review tab will have the downloaded transactions.
Solution 4: Updating the bank connection manually
The steps to update bank connection in the manual mode are:
For QuickBooks Online users
Start by signing to QBO by using the correct credentials.
Then, head for Bookkeeping option.
And then, make a move to the Transactions tab, followed by clicking on the Bank transactions option.
Finally, hit on Update.
For QuickBooks Self-Employed users
The first step requires signing in to QuickBooks Self-Employed.
After that, click on the Profile icon.
Then, visit the Bank accounts, and go for Refresh all.
Winding up..!
Chucking off the QuickBooks banking error 102 and 105 involves the steps discussed above. In case you aren’t able to get rid of the issue even after performing the above steps, then connecting with our tech team instantly is recommended. Use our dedicated QuickBooks error support line i.e., 1-888-368-8874, and get on the line with our tech professionals.
Our dedicated team keeps crafting technical blogs on resolving the QuickBooks-related error codes. So, stay connected and keep visiting to get apprised of all the effective ways of rectifying a wide range of error codes in QuickBooks.
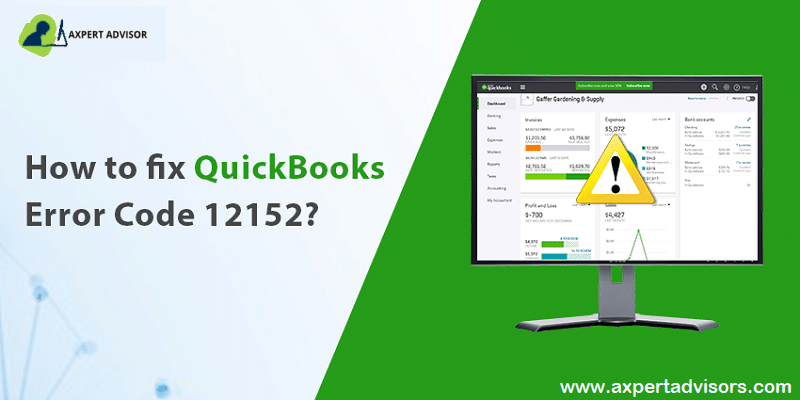
Here’s how you can fix the QuickBooks Payroll Update error 12152:
With the launch of QuickBooks, many small and medium-sized businesses have been benefited. In fact, this accounting software has changed the way accounting is done. Even many complicated tasks like bookkeeping, payroll and filing of taxes have become easier than before. What’s best is that QuickBooks is continuously evolving as every year Intuit launches new updates consisting of new and improved features.
Even though the software has made remarkable strides with the passage of time, users do face glitches and technical errors often affecting their performances. But most of these issues can be fixed easily and if users feel stuck then they can always seek assistance from our support service providers. A common error reported by users recently is the QuickBooks Payroll update error 12152 which generally occurs when there is some issue with the internet settings. Poor or incorrect settings can stop the software from connecting with the servers. In this article, we will in detail discuss this error.
Causes of QuickBooks Payroll Update Error 12152
Before heading towards the various ways of fixing error 12152 in QuickBooks, let us first go through the causes that lead to this error.
QuickBooks is not able to read/write the license data.
Windows API keys may not be functioning properly.
The error may occur if you are still using an older version of QuickBooks.
Any malware or virus invasion can cause this error.
Symptoms of QuickBooks Payroll Update Error 12152
Having gone through the various causes, you must be wondering what signs would indicate the intrusion of this error into QuickBooks. Some of the most common symptoms that a user may face are given below:
Your system might crash down while running an active program window.
Your computer starts hanging and reacts sluggishly to mouse or keyboard inputs.
QuickBooks Error 12152gets displayed on the screen of your computer.
Your system freezes periodically.
Effective Solutions to Fix QuickBooks Payroll Update Error 12152
Get the quickest ways to troubleshoot the QuickBooks error 12002 while downloading latest updates:
Solution 1: Verify Your Internet Settings
The first step that you need to take is to Verify the settings of your Internet Connection.
Once done with that, hit on the Windows Start menu and type 'Control' within the Search bar.
Now, hit on Internet Settings once the Control Panel window will open.
Once done, hit on the Advanced option.
Lastly, opt for Advanced reset. Once accomplished, head to QuickBooks and inspect if the error 12152 got fixed.
Solution 2: Verify if the Date and Time are Correct
Firstly you have to do is view the toolbar and then check if the Date and Time are correctly set.
If In case they are incorrect, then you need opt for the Adjust date/time option.
And then Correct the time and date by hitting on the Change Date and time tab.
Once done, make an exit from the Date and Time window.
In the next step, check if the time and date show up correctly now.
Towards the end, restart your system and check whether the error 12152 still exists or got completely resolved.
Solution 3: Opt for System Restore
Initially, Login as an Admin to your system.
After that, hit on the Windows Start menu.
And then proceed to the All Programs and then System Restore.
Now, you will come across a new window wherein you are required to choose to Restore my computer to an earlier time.
Once done you have to hit the Next button.
After that, pick the Latest System Restore Point and then click on the Next tab.
Thereafter, a confirmation window will display and again you have to click on Next tab.
Once the process is successfully completed then try to reboot your computer and then verify if the error is resolved or not.
Solution 4: Use the Registry Editor
In the beginning, hit on the Windows Start button.
Then, type 'Command' in the Search field.
Now, hit on the Ctrl + Shift keys simultaneously followed by hitting on the Enter key.
You will now get a User Dialog box displayed on your Windows screen and then hit on Yes.
After that, a black box will appear with a blinking cursor.
And now you have to type 'Regedit' followed by hitting Enter key.
Once done, the next step is to choose the keyword related to QuickBooks Error 12152 within the Registry Editor just like Internet Explorer or Google Chrome.
Now, proceed to the File menu and pick the option Export.
After that, store the IE backup key or Google Chrome in your folder.
Provide a name to the created folder.
Now ensure that you choose the selected Branch.
Once you are done with the above steps then hit on the Save tab.
Finally, in order to complete the process, verify the file has been saved with the .reg file.
Solution 5: Uninstall & Reinstall the QuickBooks Desktop
If none of the above solutions provide respite against the error code 12152, it is recommended that you opt for a fresh installation of the QuickBooks software. Just you need to follow the brief procedure given below:
First step is to uninstall the QuickBooks software from the Control Panel.
Second, visit the Control Panel from the Start menu to uninstall QuickBooks software.
After that, head to Programs and features. You need to choose QuickBooks from the list and hit on Uninstall.
Once the software has been cleared from your system, you need to reinstall it using the license and product keys.
At the end, you are required to launch the QuickBooks software and check to see if the error 12152 got rectified.
Wrapping-up.
In case QuickBooks Payroll update 12152 still persists then in that case you should seek assistance from the QuickBooks error support team by dialing 1-888-368-8874 that are available all through the day. Our team is always available to hear your queries and get them resolved on a timely basis. So, without hesitating, get on a call with our technical support team and allow us to get your QuickBooks error sorted out.
All the information that you need to know about QuickBooks payroll error 17337
Over the past few years, the QuickBooks desktop has emerged as one of the best accounting software available in the world today. Many small and medium scaled businesses are largely dependent on this software as it has made a host of complicated tasks like accounting, payroll, bookkeeping, etc. have become a lot simpler and hassle-free than before. To make this accountancy software more efficient, Intuit, the creator of QuickBooks keeps rolling out new updates and upgrades. Another great thing is that whenever users face any errors or have queries, they can easily connect with the support experts for any kind of guidance.
Since QuickBooks is just another software, encountering errors on it is quite a usual thing. QuickBooks users face innumerable errors while working with this software. QuickBooks payroll error 17337 is one such error that often hinders the functioning of the software. This issue crops up when you try to download or install payroll updates.
Error Code 17337: Common Symptoms behind the error code
Below are the mentioned common symptoms of this error.
The program window crashes frequently.
Windows running slowly or lagging.
The program reacts very sluggishly to the mouse and keyboard inputs.
What are the Causes of QuickBooks Error 17337?
Although there are a wide range if different factors that may incite the error code 17337, the most common cause that provoke the error have been mentioned below:
Internet Explorer properties not synced with QuickBooks desktop.
The SSL application settings might not be correct.
When the third parties applications or firewall is restricting QuickBooks access.
The setting for a few websites is not right in Internet Explorer.
Solutions to Resolve the QuickBooks Error 17337 When Downloading a Payroll Update
In order to troubleshoot the QuickBooks error code 17337 follow the below-given steps:
Solution 1: Configure Internet Explorer’s SSL Settings in QuickBooks
The very first thing to do is launch the QuickBooks software and then head to the Help tab and then proceed to the Internet Connection Setup.
After you have chosen the right Internet Connection, hit on Next.
Once done, hit on the Advanced Connection Settings (If this is not present as an option then go on with the step that follows this one in order to configure the SSL settings in Internet Explorer.
Now, move to the Advanced tab.
You will now need to choose the SSL 2.0 and SSL 3.0 checkboxes.
You also have to hit on the Apply tab. To close the Internet Connection Settings windows, choose the OK button.
Thereafter you will have to hit on Done to close the Internet Connection Setup.
Also, close any open tabs of Internet Explorer, if there are any.
The next step is to Close and Reopen QuickBooks
Once all the previous steps have been performed, Download the QuickBooks Payroll update.
Solution 2: Configure Internet Explorer’s SSL settings outside of QuickBooks
You are initially required to Open Internet Explorer.
Once it is open, choose Tools and then Internet Options.
After this hit on Advanced tab.
Thereafter, under Security, choose the SSL 2.0 and SSL 3.0 checkboxes.
The final step is to click on Apply and then close the Internet Options window. Finally, hit on the OK tab.
Solution 3: Launch the File doctor tool in the QuickBooks tool hub
Start with downloading the QuickBooks File Doctor from the official website.
After opting for the 'Check File Damage Only' option, hit on Diagnosis.
After entering your admin password, tap on OK.
Now you are required to hit on Open File in Newer Version or Existing Version after that.
Then, adhere to the rest of the directions displayed on your computer screen.
Towards the end, restart your computer.
Hopefully the problem will be resolved, allowing you to download the payroll.
Solution 4: Add the QuickBooks Desktop to the exception list in the Firewall
Proceed with the following walkthrough to add the QuickBooks software to the list of exceptions in the Firewall.
Visit the Start menu.
In the search field, type in "Windows Firewall," and then double tap on the "Firewall" option.
Following that, advance to the Advanced Settings from the following box.
Pick Inbound Rules from the menu.
Choose Program after hitting on the New Rule button.
Tap on Next.
Choose This Program Path before tapping on Next.
Choose one from the list of executable files on the following screen and tap on Next.
Make an exception now for every single one of these files.
Next, Hit on Allow the Connection.
Verify that every profile is marked if the system offers you with a list of them.
Afterward, tap on Next.
Once generated, save this rule with the name "QBFirewallException."
The same way, establish an "Outbound Rule."
Run QuickBooks Desktop software once more and switch to multi-user mode.
That brings us to the end!
Fixing the QuickBooks Error 17337 is not that complicated. All you need to do is ensure adherence to the two solutions mentioned above. However, if you get stuck while performing the procedure or have any queries regarding it you can always seek assistance from the QuickBooks payroll error support service providers by dialing 1-888-368-8874.
We comprise of experienced and certified professionals who are available 24/7 to make sure that all your issues pertaining to QuickBooks get resolved. No matter how adept you are at technical skills, there may still be a chance that you may require professional assistance. So, we recommend you reach out to our expert team.