As every software, no matter how good is QuickBooks but is also comes with some technical errors that the user has to face. Today we are going to discuss one of the common error that has been reported by many users. According to sources, QuickBooks error code 404 generally appears on your screen when it is unable to complete any update or when this software fails to sync with the Intuit server. This sort of error is often seen while working on the system. It is basically a runtime error that shows up due to many reasons such as any interruption or failure in internet service or data file is too long to respond etc.
This error comes with an error message stating, “Error 404: QuickBooks has encountered a problem and needs to close. We are sorry for the inconvenience.” If you are also facing such an issue, then in that case, read this article till the end. You can also get in touch with our technical support team and ask our professionals to resolve the error on your behalf. Our experts will ensure to provide you with immediate technical assistance.
What is QuickBooks Error 404?
QuickBooks error code 404 is related to network access. Therefore, the software cannot connect to the Intuit server. This error can be seen due to various factors, which include if the software is not installed properly or something gets infected or deleted or corrupt files in your QuickBooks database. This error message might show up on the screen, and it might close the Windows as completely shut down or start up. Therefore, we have given a detailed explanation of this error ahead.
Some similar errors are
Service Message Error #404
Intuit Error 404
QuickBooks Error 404 Page Not Found
QuickBooks Update Error 404
QuickBooks Runtime Errors 404
Operating system information:
This errormight be seen in the following Microsoft Windows operating systems:
Windows 11
Windows 10
Windows 8
Windows 7
Windows vista
Windows XP
Windows ME
Windows 2000
What are the causes of the QuickBooks Error 404?
Some of the most common causes for the QuickBooks Error 404 are listed below-
The software is corrupted or incomplete.
If a third-party program maliciously deletes the company access files for security reasons.
The system’s Windows registry gets corrupt just because of changes like installation or uninstallation of QuickBooks software.
The page or server doesn’t sync
Also, the Windows registry has become corrupted due to changes made to the QuickBooks installation.
System and bandwidth latency are the kingpins causing Error 404.
Your system is under malware attack, which is corrupting system files.
Common Signs and Symptoms of the QuickBooks Error Message 404
Identifying the error becomes easy with the signs and symptoms listed below:
Followed by opening the company file and starting the tasks interrupted by QuickBooks error.
In case the error persists, then
Press the Windows + R keys together.
Type ‘Appwiz.cpl’ in the box and press Enter.
Then select QuickBooks software from the list of installed programs and click on Repair.
Now check if the error code 404 is resolved or not.
Method 3: Rectifying the Internet Settings
Another method is to change the internet settings by carrying out the steps:
Initially, go to Internet Explorer > Tools and click on Internet Options.
After that select Security tab and hover over Trusted Sites, and click on OK.
Here, add the official website of QuickBooks and Intuit as trusted websites.
After that, close the tab by pressing OK.
Now log out from the company file and close QuickBooks.
Finally, reopen the software and company file. Start working from where you left to check if the error appears again.
Method 4: Verify Your Internet Speed
Open Internet Explorer and visit a website to check your connection.
And then, if you find an issue opening the URL, then in that case refresh the internet settings and try again.
If you still see the “Page cannot be displayed” message, then switch off and on the wireless router and open the URL again.
If the same issue appears, then reboot the system and try again.
Make sure Internet Explorer is set as your default browser.
Finally, restart the system and open the QuickBooks software to check if the error has been resolved.
If the issue still remains, then contact the internet service provider for further assistance.
Method 5: Check the Network connection
Open the default browser and browse frequently visited websites.
If the URLs are inaccessible, the user must refresh the Internet settings.
If users are getting a prompt like “No Internet Connection,” they need to turn their router off and on.
Now restart your system and try these methods again to fix the error.
Method 6: Review your Firewall and Antivirus settings
To start off, click on start button, then open Control panel.
After that, select ‘Firewall Settings’ from the list of options.
Then click ‘Allow a program through firewall’ option.
Now add the QuickBooks program to the exceptions list via the ‘Add a program’ option.
And restart your computer and checkout your error is resolved or not.
Method 7: Update your Windows to the latest version
Click on the “Start” menu.
After that, move to Setting and type Update in search bar.
Once done, tap on Check for updates button.
Conclusion!
We conclude the article over here, with the hope that the above information might be enough to resolve the QuickBooks error 404. However, if the error continues to trouble you and you need any sort of technical assistance, then in that case, feel free to call us at 1-888-368-8874. As our QuickBooks error support experts and certified Axpert Advisors professionals will ensure to provide you with immediate technical assistance.
QuickBooks accounting software can be game-changing software for the majority of businesses. However, it comes with a major drawback, which is the error codes and warnings that the user might come across when working on this software. One such commonly witnessed error is the QuickBooks error C=9, which doesn’t allow QuickBooks to read substitute files during the operation. This error creates a complete disturbance while performing important tasks. Such an error can also damage the company files and copy the data file to another disk or drive. Therefore, its resolution seems pertinent.
To get a better insight into QuickBooks error message C=9, make sure to read this article till the end. This article encapsulates all the relevant and authentic information pertaining to the QuickBooks error C=9, However, in case of any query, you can talk to our professionals.
Causes Leading to QuickBooks Error Code C=9
The following constitute the major causes that may incite the error code from intruding into the QuickBooks software.
Using a damaged/scratched CD for installation the QuickBooks software.
Unsuccessful installation of the QuickBooks software.
Failure of the QuickBooks to read the auxiliary file.
Consequences of QuickBooks Error C=9
The following can be the consequences of this error. These consequences include:
This problem can result in data damage.
Also, in case there is any inability of QuickBooks to read from an auxiliary file at the operating system level.
Convenient Steps to Get Rid of QuickBooks Error C=9
The QuickBooks error C=9 can be resolved using the steps below. Let us check them out:
1. Use QuickBooks Auto Data Recovery Tool
Making use of the data recovery tool can be helpful in fixing the QuickBooks error C=9. Let us explore the steps to be performed, to make the best use of the data recovery tool and try to get rid of this error.
The very first step is to create a backup of the company file.
Users will then have to ensure that QuickBooks has an appropriate transaction file that includes QuickBooks software.
Followed by, downloading the QuickBooks data recovery tool from the manufacturer’s website.
The next step is to head to the download list.
Right-click on the .exe file of the downloaded data recovery tool file and choose Run as administrator. Install the same.
Lastly, users need to run the tool after the installation.
2. Use QuickBooks Install Diagnostic Tool
In order to resolve QuickBooks error code C=9, we recommend you to download and install the QuickBooks tool hub for Windows.
First, close your QuickBooks desktop.
Download the QuickBooks tool hub program from here.
After that Install and run the tool in the system.
In the next step open the tool hub by hitting on the Icon.
Visit the File menu tab and opt for the Utilities tab.
Choose the Verify data option.
When the verification concludes, once again visit the Utilities option.
Now, you need to run the rebuild data tool by choosing the corresponding option.
Again access QuickBooks to see if the issue got solved.
Conclusion
With this, we come to the end of this article, where we hope that the information shared above might have helped you in getting rid of the QuickBooks error C=9. However, if you are unable to get rid of the issue even after performing the steps above, then feel free to call our technical professionals via our toll-free number i.e., 1-888-368-8874, and let our technical team work for you.
Are you facing QuickBooks error 30114 and unable to come up with a proper solution? Well, we can help you in that case. This article is written to provide the best possible fixes to the QuickBooks payroll error 30114. This error mainly appears on the screen with a pop up message (Direct Deposit bank account verification error 30114) that can appear in the middle of the program installation and can happen when shutting down of windows, or between the operation system of Windows installation.
The QuickBooks error 30114 problem can also be seen in between the operating system or Windows installation. If you want our team of professionals to fix the issue for you, then in that case contact us 24X7.
What Leads to QuickBooks Error Code 30114?
You can end up with this error due to the following reasons:
Incorrect QuickBooks software installation and corrupted.
If the run time issue appears.
Also, if there is any virus infection or malware.
Another reason can be if there is any corruption in the Windows registry.
In case the files related to the QuickBooks accounting software are missing.
Symptoms of QuickBooks Error Code 30114
One of the major signs of this issue can be when QuickBooks error 3014 appears, and the active program window crashes.
Another sign can be if the system crashes frequently after an interval of time when running the same program.
The system freezes periodically.
Steps to Fix the QuickBooks Error Code 30114
The below steps can help in fixing the QuickBooks error 30114. Ensure to follow these steps in sequence:
Method 1: Performing clean malware scan of the system
The first step is to Clean system junk files.
And update the System device drivers.
The next step is to use the Windows system restore and undo the recent changes to the system.
After that, Uninstall the QuickBooks and install the program related to the this error.
Later on, run the file checker.
And install all the Windows updates that are available on the web.
The last step is to perform a fresh Windows installation.
Method 2: Create a backup file of the QuickBooks related registry section
First step is to hit on the Start tab.
And then enter the Command option in the Search bar.
After that, press Ctrl + shift and Enter tab.
Now you will see a permission window.
Click on the Yes tab.
And also a squinting cursor will appear.
The user will then have to enter regedit and press Enter tab.
Select the error associated key into the registry editor window.
You should then select the Export tab from the File menu.
Now, select the desired folder too save the Backup key of QuickBooks.
Enter the name for the backup file in the file name window.
Ensure that selected branch is marked into the Export range window.
After that click on Save.
The file will be saved with a reg extension.
Lastly, you will get the backup of the QB related registry section.
Method 3: Delete Junk files
Excessive accumulation of junk files on your system can also evoke the QuickBooks error 30114. To clear off this junk, follow the steps:
Hit the Win + E keys to pop up the File Explorer.
When the explorer window is displayed, move to My Computer.
Now, right-click the C hard drive and jump to Properties.
Herein, inspect the free space.
Observe whether the space available is at a minimum of 2.5 GB as it is mandatory for QuickBooks.
In case the space is too less, move to Disc cleanup by using the directions below:
Press the Win + R keyboard buttons to show the Run Window.
Now, write ‘cleanmgr’ in the Run window and then tap the Enter key.
Pick the drive and opt for OK to proceed with the cleanup process.
Method 4: Clean Install the QuickBooks Desktop
If the above methods did not assist in solving the problem, then go for the final resort- uninstall and reinstall the QuickBooks software. This can also be done using the QuickBooks Clean Install Tool. But, herein, we shall discuss the manual procedure:
At the first, move to the Control Panel (from the Start menu) and then sail to the Programs and Features.
Here, search for the QuickBooks Desktop application and then, hit on Uninstall tab.
Re-install the QuickBooks application and see if the error vanished. [Note that during the install process, you will require the product and license keys]. Further, you can install the software either through the installation disc or through the .exe file, downloaded from the Intuit website.
Wind up
By now, the user might be able to fix the QuickBooks payroll issue 30114 successfully. But if the error persists for some reason, then in that case, contact our Axpert Advisors team via our helpline i.e., 1-888-368-8874 and they will ensure to provide you with immediate tech professionals.
Learn how to troubleshoot QuickBooks Error H303 when switching to multi-setup hosting:
The QuickBooks Hxxx series of error codes has been a source of botheration for users. This series subsumes a plethora of error codes which are generally linked with the technical problems existing while using the multi-user mode. These errors generally transpire while opening the company file in the multi-user mode.
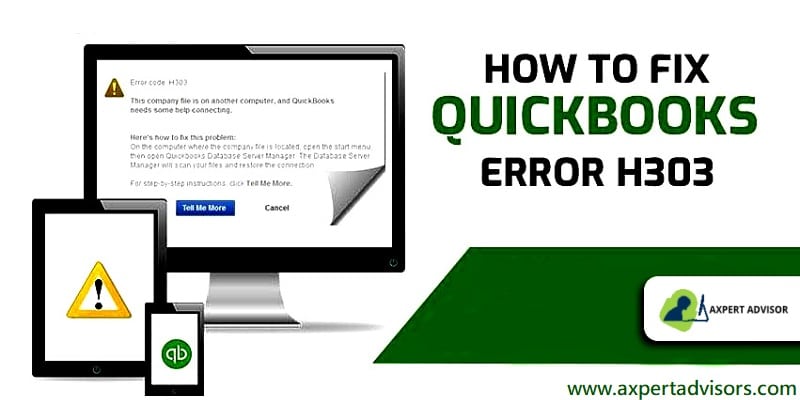
QuickBooks Error code H303 is one such error which becomes visible when opening the Company files in the multi-user mode. This article endeavors to get rid of this error by highlighting the various viable troubleshooting strategies that can fix the HXXX series of problems. You might see this issue with an error message that states:
Problem
Description
Error code H303:
Problem with Multi-user Hosting Setup “This company file is on another computer, and QuickBooks needs some help connecting”.
In this particular segment, we will be discussing in detail the factors triggering the QuickBooks error H303, along with the measures that you can take, so as to shun off the error successfully. Thus, make sure to read this segment with much care, or you can also consult our team of professionals using our dedicated support line.
What Triggers Error Code H303 in QuickBooks?
The following factors can be the major triggers behind this problem.
You can bump into this issue if the company files are hosted by the server, and as a consequence of which, the software is unable to acquire the company files.
If the hosting configuration settings are incorrect or if there is an improper system network.
You might also come across this error if there is an improper system network.
Viable Methods to Fix QuickBooks Error H303: An issue with Multi-User Hosting
You can perform the below-mentioned measures, so as to tackle the QuickBooks H series errors. Let us have a look:
Method 1: Configuring the Firewall Settings
This method can be opted, so as to get rid of the QuickBooks company file error H303. The steps involved in configuring firewall settings are as follows:
Start off by heading to the Control Panel and choosing Firewall settings.
Opt for Allowing a program through the firewall.
You would then have to Add programs and Add QuickBooks 20XX in the exception list.
In last, reboot the software and verify whether changes are done or not.
Method 2: Rename .ND and .TLG Files
At first, advance to the QuickBooks folder.
Follow up by searching for the files having the .ND and .TLG extensions.
The next process is to rename the files and then add .old at the end of the names of the files.
Once done, restart QuickBooks and try accessing the Company file once again in the multi-user mode. This should exterminate the ongoing issue.
Method 3: Installing the QuickBooks File Doctor Tool
If the above methods didn’t work for you, then you can simply install QuickBooks file doctor. The steps involved here are as follows:
Once you are into the tool hub, visit the Company File Issues and choose the Run QuickBooks File Doctor option. (This can take more than a minute to launch the file doctor tool)
Scan the file using the File Doctor tool to diagnose and fix a multitude of technical errors, including Error code H303 that malign the company file.
Method 4: Check the QuickBooks Settings
Just in case you are still unable to tackle the issue, then you are suggested to check the QuickBooks settings. Perform the steps below to check the QuickBooks settings linked with the Multi-user.
You would first have to launch QuickBooks in the multi-user mode.
Choose the files on both PCs and move to Files > Utilities > Stop hosting multi-user configuration.
Turn on hosting on any of the computers and move to Utilities > Host multi-user configuration.
The last step is to Start QuickBooks software on both computers and check if the error is resolved.
Method 5: Bypassing the restriction imposed by the Firewall
The initial step requires clicking on the Windows search bar, and then searching for Firewall.
Now, proceed by opening the Windows Firewall.
Head to the Advanced settings and then proceed by right-clicking on the Inbound rules.
Now, tap on the option to create a new rule and incorporate the following ports:
8023: For QuickBooks 2023
8021 and 8022, For QuickBooks 2021 and QuickBooks 2022
8019: For QuickBooks 2020 and QuickBooks 2019.
8019, 56728, 55378-55382: For QuickBooks 2018.
8019, 56728, 55378-55377: For QuickBooks 2017.
The user now needs to click on Allow the connection and proceed by clicking on Next.
Follow up with the creation of a new rule, name it, and finally tap on Finish.
Repeat the same set of steps for the Outbound rules.
Summing up!
That was all you need to know about the QuickBooks multi-user switching error H303. As always, if you have any queries, comments, or concerns, call to QuickBooks enterprise support team at 1-888-368-8874 to get a feasible solution for your problems. Our team will be happy to provide you a top-class and matchless assistance for fixing the error.
As a QuickBooks user, you must be well aware of the fact that QuickBooks software is prone to several types of errors and technical glitches. Amongst the innumerable errors encountered in the QuickBooks software, QuickBooks error code 14106 constitutes one of the common errors troubling users.
It can be seen when the user tries to use an older company file with a newer version of QuickBooks. As a result of this, the file and program aren’t in sync and in turn instigate this error. The following error appears on the screen with an error message that states:
“QuickBooks error -14106, 0: Company file not updated successfully”.
There can be a couple of factors causing this type of issue which we shall be discussing in this article. However, if for some reason you need any technical assistance related to the QuickBooks error message 14106 or other issues pertaining to it, then contacting our technical support team would work for you.
What Leads to QuickBooks Error Code 14106?
When users upgrade from an older version of QuickBooks to a newer version, the company file also gets upgraded. In case users try to open the company file created using the old version, then this error can be encountered.
Methods to Fix the QuickBooks Error Code 14106
The foregoing sections must’ve given you a brief impression of the Error code 14106. Being aware of the preliminaries of this error, it is time to go through the various steps that will rectify this error. You can perform the below-stated methods to fix the QuickBooks error code 14106:
Method 1: Convert QuickBooks to Two Medieval Versions
Step 1: Initially, Upgrade QuickBooks
You should initially ensure that no one is operating QuickBooks currently.
The next step is to access the updated version of QuickBooks.
Afterward, tap on the File tab.
Once into the File menu, choose the open or restore company.
Subsequently, hit on the open a company file.
Afterward, choose the current company file stored on your device.
Next, opt for the open tab.
Also, use the admin login details to access the company file.
Now, opt for the update now tab.
Once the process ends, the user should tap on the Done tab.
Step 2: Switch to QuickBooks Desktop 2022
Step 3: Perform a QuickBooks Data Conversion
In certain cases, you will have to switch to a different version of QuickBooks and this can happen when you upgrade or downgrade to a different version of QuickBooks. Then in that case you might need to perform data conversion.
First, close all company files and QuickBooks desktop software.
After that hit on the Start button on your Windows.
Now, look for QuickBooks Desktop. Right-click on the icon to choose the Run administrator option.
While you are on the No Company Open screen, head to the Help menu, and choose the Update QuickBooks Desktop option.
Navigate to the Options tab and choose Mark all.
Now, opt for the Save tab.
Next, tap on the Update Now tab, and then choose the Reset Update check box.
Once you are ready, hit on Get Latest Updates.
Also, close the QuickBooks Desktop after the update finish.
Choose Yes to install the updates.
After the installation gets completed, restart your computer.
Method 3: Regress Your File to The Backup File
Shut down all running programs and launch the QuickBooks Desktop.
Choose the Open or Restore Company option from the File menu.
Hit on the Next button after choosing the Restore a backup copy option.
Tap on Local Backup again, choose Next, and look for your backup file (company file name.qbb).
When saving the file, choose a folder. The location where your original file is kept shouldn’t be this one.
Hit on Open, then choose the Save option.
A few overwriting prompts will appear on the screen; carefully follow them and provide your consent.
Restart your PC and launch the QuickBooks Desktop software once more.
Winding up!
After performing the steps mentioned above, it might become manageable for the users to fix the QuickBooks error code 14106. But if in case they aren’t able to fix the issue, then contacting our Axpert Advisors team is suggested.
We are a team of professionals who work round the clock to provide the best possible support services. We provide assorted support services and endeavor that the QuickBooks software is free of any errors.
Here’s how you can fix the QuickBooks error 12007:
QuickBooks is one of the most employed accounting software, especially by small and medium-sized businesses. This new age application is packed with many powerful features like bookkeeping, payroll management, tracking of financial transactions, generating reports, etc. Even though QuickBooks is very beneficial for businesses, its users do face technical glitches at times and one of the common errors faced is the QuickBooks payroll update error 12007. There are several reasons behind this error and even more methods for troubleshooting the issue. In this article, we shall be dealing with all of those methods, and we assure you that by the end of this article, the error won’t even exist.
If you want our certified professionals to fix the QuickBooks error message 12007 for you, then all you need to do is call our helpline. Our experts will make sure that the error gets rooted out from your computer.
What is QuickBooks error 12007 and What Leads to it?
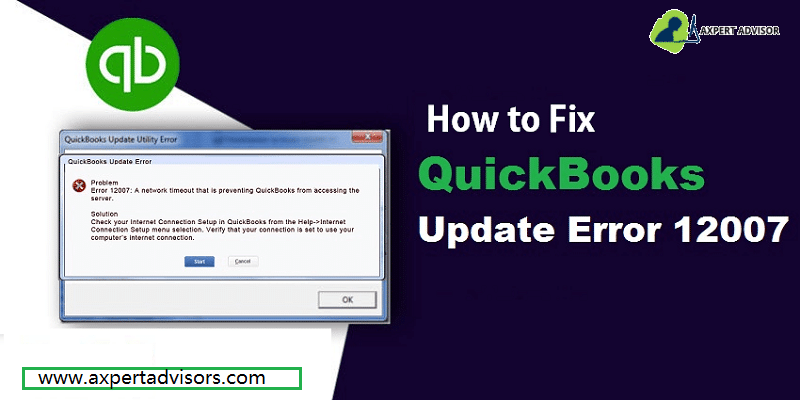
The QuickBooks error 12007 generally occurs due to misconfigured files or when a user is downloading a payroll or QuickBooks Desktop updates. This is a common issue that QB users may face at the time they try to update the QuickBooks Desktop or make any kind of alterations in the QuickBooks Payroll Service function. The following error message might appear on your computer screen upon the arrival of this error:
Problem
Error 12007: A network timeout that is preventing QuickBooks from accessing the server
Solution
Check your Internet Connection Setup in QuickBooks from the Help > Internet Connection Setup menu selection. Verify that your connection is set to use your computer’s Internet connection.
What Factors Cause the Error 12007 in QuickBooks?
Before troubleshooting the QuickBooks error message 12007 it is essential to understand what causes the error code to occur. So, below are some of the most possible causes of this error:
System unable to connect to the internet
Internet Explorer is not set as the default browser
Due to network issues, QuickBooks is unable to access the server
The firewall blocked the connection
From the Internet Option, the SSL checkbox option may have been removed.
Easy Solutions for Fixing the QuickBooks Error Code 12007
Below we have mentioned viable solutions to rectify the QuickBooks error message 12007. So, let us go through each of the solutions elaborately.1
1st Solution: Check your Internet Connection Configuration to Fix Error 12007
Firstly, on the top right corner of Internet Explorer hit on the Gear icon and pick the Internet options from the drop-down menu.
Now, head to the Connections tab and then hit on the LAN Settings.
After that, check-mark the box beside Automatically Detect Settings and make sure that all the servers are blank while updating QuickBooks.
Once done, apply the Changes and then jump to the Advanced tab.
Now, find the SSL 2.0 and SSL 3.0 and place a Checkmark on the respective boxes. Uncheck the box against the Check for publisher’s certificate option.
Subsequently, on the same tab, scroll down to verify that TLS 1.2 option is not checked. Ensure that the box next to TLS 1.1 is checked.
2nd Solution: Reset the QuickBooks Update Settings
The first thing to do is restart the computer.
Now Reset the QuickBooks updates and try to download an update.
Afterward, you have to launch the company file in Single-user mode.
Once done download the Latest QuickBooks update and install it.
3rd Solution: Check for Issues in Internet Explorer
Firstly, hit on the Windows + R simultaneously and type ‘sfc/scannow in the provided box.
Now, hit on OK and follow the instructions displayed on the screen carefully to complete the File Checker Process.
Now restart the Windows after the completion of the file repairing process and then verify if the QuickBooks error code 12007 is resolved. If not, go to the next method.
4th Solution: Make Internet Explorer your Default Browser
Firstly, open Internet Explorer and then hit on the Tools menu.
Now, choose Internet Options.
After that, you have to opt for the Programs tab.
Choose the Make default option and hit on OK.
finally, close Internet Explorer.
5th Solution: Fix Internet Explorer’s Installation Issues
Initially, all running applications running in the background need to be closed
Afterward, hit the Win + R to open the run box and type ‘inetcpl.cpl’ , and tap on the OK button.
Once the Internet Options box appears head to the Advanced tab.
From the Reset Internet Explorer options choose the Reset option twice.
Check-mark the Delete personal settings option and from the Reset Internet Explorer Settings window choose the Close option
Once done, restart QuickBooks and check if the error is now resolved.
6th Solution: Update QuickBooks Desktop
If the solutions illustrated above couldn’t fix the error code 12007, we highly recommend you update your QuickBooks software to the latest release. For doing this, follow the steps provided below:
Initially, make an exit from the QuickBooks software.
Subsequently, press and hold the Ctrl key when you double-click on the QuickBooks icon to bring up the No Company Open window.
Additionally, check the Reset Update box and choose the Get Updates.
After the update is complete, close the window.
7th Solution: Go for a Clean Installation of the QuickBooks Desktop
By now the error should be sorted out. However, if the issue seems bleak and pervades even after confirming the above-mentioned solutions, it is advised that you go for a clean installation of the QuickBooks software. You can either do it manually through the control panel or opt for the Clean Install Tool. It is a comprehensive utility that aids in the complete wipe out of the QuickBooks software from your system, and also helps in reinstalling the software without any hassle.
Steps to Opt for a Clean Installation Using the Clean Install Tool
In the inception, download the QuickBooks Clean Install Tool from the Intuit website and save it to some convenient destination.
Afterward, double-click on the downloaded ‘.exe’ file to initiate the installation.
Upon completion of the installation process, launch the tool by double-tapping on it.
Utilize the tool for uninstalling the QuickBooks software from your system.
Once completed, re-install the QuickBooks software (make sure to keep your license and product keys along with you).
Steps to go for a Clean Installation Using the Manual Procedure
Head to the Control Panel from the Start menu.
Afterward, move to Programs and Features. Pick QuickBooks software from the list and subsequently, hit on Uninstall/change button.
Choose Uninstall to start the process.
Once the uninstallation concludes, restart your computer and re-install the QuickBooks software.
Hopefully, the issue must be resolved by now. Verify the same by opening the QB software and inspecting if error 12007 vanished.
Concluding on a Supportive Note!
We hope that you could comprehend and implement all the points to resolve the QuickBooks error 12007 pretty easily. Our experts have made every attempt to make it easy to understand for everyone.
However, if still you are stuck anywhere or the problem still persists, then don’t panic as our Axpert Advisors team is there to assist you. Our professionals have vast experience in the field and will make sure that the error gets fixed.

? 1")
? 2")
? 3")
? 4")
? 5")
? 6")
? 7")
? 8")
? 9")
? 10")
? 11")
? 12")