Learn the easy and effective ways to resolve the QuickBooks Online error 350 smoothly:
QuickBooks is an impressive, yet intricate accountancy software that occasionally encounters unique error codes and related technical snags. However, it is quite common, and resolving these errors is a cakewalk if you are well aware of the technical knowledge to fix the issue. QuickBooks Banking Error 350 is one such error that can be easily resolved by adhering to a few basic walkways. This error might be seen when you attempt to connect with the bank or credit card server. The software enables you to connect to the bank or credit account and download the recent transactions automatically. When such an error pops up on the screen, you might not be able to use this particular feature.
To know about all the possible causes and fixes for the QuickBooks online banking error 350, make sure to scroll through the segment carefully till the end. For further technical assistance, contact our technical support team using our dedicated customer support line. If you find the walk though too complicated to implement, we can do it on your behalf. All you need to do is ring at 1-888-368-8874 and our team will be there to assist you in every possible way.
Causes Leading to QuickBooks Error Code 350
The error code 350 may be quite exasperating, particularly this issue can be encountered due to several reasons. The most prominent reasons behind the error constitute the following:
Another conspicuous reason may be if the QuickBooks online may be unable to connect to the bank due to some reason.
The size of the company file may be surpassing the prescribed limit.
Abrupt system shutdown.
If the damaged data file is present.
The company file that you are accessing may be damaged.
Corrupt/Erroneous transactions may be providing impetus to the QuickBooks error code 350.
Easy Methods to Fix the QuickBooks Error 350
After going through all the principal causes leading to the error, it will be easier for you to go through the troubleshooting methods contained in this section for resolving error 350 in QuickBooks online. We assure you that the error would show up the next time if you follow each of the methods listed below with keen attention and careful implementation. Let us explore each of the methods one by one:
Method 1: Diagnose and Recover Damaged Data
It should be noted that when facing QuickBooks online error 350, you might not be able to download the bank transactions automatically. The corrupted data file can be of the major contributory factors causing such an error. To know more, check the steps given below:
At the first, launch the QuickBooks online and hit on the File menu.
Afterward, choose Utilities and Verify data.
In case you see a message on the screen, then Your data has lost its integrity. It means that the company file got damaged and needs recovery on an immediate basis.
You can rebuild the file, then you would have to head to the File menu and choose the Utilities tab.
Next step is to hit on the Rebuild data option to start repairing the damaged data.
Choose the OK tab and afterward opt for a Preferred location to save the recovered company file.
After the backup is created successfully, the damaged data will get rebuilt.
After the rebuild data utility finishes recovering the corrupted company file, then you would have to restart the QuickBooks online and check if the problem persists.
Method 2: Reconnect your Bank Account with QuickBooks
If the preceding walkway didn’t solve your issue, then perform the steps below and attempt to reconnect the bank account with QuickBooks:
Initially, navigate and open the Banking menu on QuickBooks online.
Choose the Account in which you are facing the issue.
Hit on the Sign-in option.
Afterward, enter the banking credentials to log into the banking website.
Choose the account in which you were trying to Download the recent bank transaction.
Now you need to opt on the Continue tab and then choose the Update tab. This will update the recent transactions to the QuickBooks online.
Method 3: Manual Diagnosis of the Corrupted Data
You need to initially hit on the F2 tab on the QuickBooks homepage.
The Product information page will show on your display. You need to hit on the F3 tab to reach the Tech help section.
Afterward, find the QuickBooks log file also named qbwin log. This file contains all the necessary information related to various issues, and it would help you reach the root cause.
When you see the log file, then hit on the Open tab.
Look for QuickBooks online error 350 or any other corrupted data that might be the cause of the issue.
Method 4: Make Use of the Verify and Rebuild Tool
Verify and Rebuild tool can be used to rectify damaged file(s) in QuickBooks. It’s a holistic tool that can help you recover your company files. You can use this tool to get rid of the QuickBooks error 350 by following the easy procedure listed below:
Launch the QuickBooks software, then choose Utilities from the File menu.
You are subsequently required to opt for the Verify Data option.
If your data is destroyed, you need to run the Rebuild Data. In such a case you will see the message ‘Your data has lost its integrity.’
Now, head back to the File menu and choose Utilities.
Follow up by hitting on OK and the choose Rebuild Data to create a backup of your company file.
Afterward, choose a suitable location for data backup and hit on OK.
After backing up your file, the tool will reconstruct the corrupted data to fix the QuickBooks error code 350.
Method 5: Clean Your Browser of Any Cache
Initially, Launch Internet Explorer from the Start menu.
you are then required to hit on the Gear icon and choose the Internet Options button.
Afterward, hit on the Delete button in the Browsing history section.
Make sure to check-mark the Temporary Internet Files option and the Cookies and website data check boxes.
Follow it up by hitting on Delete.
Now, perform your usual QuickBooks operations and check if the error gets fixed.
Method 6: Reconnect your bank or credit card account in QuickBooks
To reconnect QuickBooks with your bank account, follow these steps:
Log in to QuickBooks and navigate to the Banking tab.
Find the account you want to reconnect and click on the Edit icon next to it.
In the Account details screen, click on the pencil icon next to the Bank Account section.
Choose the option to “Disconnect this account on save“.
Click on Save and Close.
Once the account is disconnected, go back to the Banking tab and click on Add Account.
Now select the blue bank square for the account you need to reconnect.
If prompted, enter your User ID and Password credentials and follow the authentication process.
Next, the user need to choose the accounts that he/she want QuickBooks to download transactions from.
Hit a click on Continue.
Once the account is connected, QuickBooks will start downloading transactions from your bank account.
Categorize the transactions in QuickBooks and make any necessary edits.
When you’re ready, choose the Update option to get the latest transactions from your bank.
That’s it! Your QuickBooks account should now be reconnected to your bank account.
Concluding!
That was all you need to know about getting rid of the QuickBooks online error 350. However, if you still face the issue on your software or you have any other queries or concerns, please feel free to call us at our QuickBooks error support number i.e., 1-888-368-8874!
We are a hub of technical experts who have proficiency in the QuickBooks software and are diligently involved in rectifying a plethora of error codes encountered while using the software. We work round the clock to provide the best possible support services. So, do not hesitate in calling us anytime and seeking for assistance!
As the QuickBooks desktop 2022 is already out in the market, the majority of you might be trying to replace your QuickBooks desktop 2021 with the newer one, simply to stay on top of the updates. While most systems should be able to install the QuickBooks 2022 pro without any issue, a few might face some strange issues, which include the QuickBooks 2022 installer keeps forcing reboot or won’t install.
This has been reported at large by many users and can be resolved by simply downloading the QuickBooks tool hub. The QuickBooks tool is designed in a way to successfully diagnose and fix common issues within the software.
This article is going to brief you on the appropriate set of steps to be performed. Reading this segment will surely help you in getting rid of QuickBooks 2022 installer keeps forcing reboot and won’t install error. However, if you are unable to proceed with the troubleshooting steps, if interested, you can get on a call with our tech professionals, and ask them to eliminate the issue from its root cause.
Symptoms that show up upon the arrival of this error
The following signs indicate the QuickBooks desktop 2022 installer forcing reboot, won’t install error. In order to get a firm grip over the technicalities involved in the troubleshooting methods, it becomes imperative that you visit the various signs and symptoms of the error. This shall make life easier as you would get aware of the appropriate methods to choose. So, explore the below pointers before you jump on to the rectification steps.
Initially, run the installer(in .exe) after downloading from the QuickBooks, and run the same as an admin.
Proceed ahead by installing VC9, vc_redist x86/x64.
An error message might pop up, and almost immediately request the system to reboot.
Hitting on the yes tab might lead to such an error popping up on the screen. Following this error, the system reboots as normal.
The installer starts again on its own, and repeats the process over and over again.
When trying to opt for No on the prompt to reboot and restart manually, the system claims that the install was interrupted and you need to start from scratch.
It doesn’t detect the current QuickBooks 2021 installation and try replacing it.
QuickBooks desktop 2022 install issues: Perform these easy Methods to troubleshoot the error
The error might seem quite difficult to handle, but can be controlled by performing the set of steps listed below.
Method 1: Run the computer in the Selective Startup mode
In order to assure that no other application is hindering the process, switching to a selective startup mode is recommended.
Initially, hit the Windows + R keys to open the Run command window.
Once the window opens on the screen, type in ‘MSConfig.’
Hit on the OK tab to reveal the System Configuration window,
In this window, hit on the Selective startup mode in the General tab.
Also, choose Load system services.
You now have to proceed to the Services tab and also Hide all Microsoft services.
Now, choose the Disable all option.
Furthermore, uncheck the Hide all Microsoft services checkbox.
Ensure that the Windows installer checkbox is marked from the list of services.
If not, then place a checkmark in the checkbox.
Hit on the OK tab.
Moreover, hit on the Restart button in the system configuration window.
Try installing QuickBooks software again. Once the QuickBooks is installed successfully, switch back to the normal startup. The process of switching to the Normal mode is quite easy and requires you to perform the following steps:
Hit on the Windows + R keys to access the Run command.
Enter MSConfig and also hit on the OK tab.
Now, in the General tab, choose the Normal startup option.
Subsequently, hit on the OK tab.
Finally, in the system configuration window, opt for the Restart option.
Method 2: Make use of the Quick fix my program featureto fix Quickbooks 2022 installer keeps forcing reboot issue
Before proceeding with this process, close QuickBooks.
Summarizing the write-up, it is highly expected that you should be successful in installing the QuickBooks 2022 installer. On the contrary, if the error continues to hinder the process, or in case there is a need for immediate expert assistance, then contacting our QuickBooks error support technocrats using our helpline i.e., 1-888-368-8874 is recommended. Our tech personnel will get back to you and resolve your query as soon as possible.
Updated Solutions to Resolve QuickBooks File Doctor Crashes or Not Working
QuickBooks file doctor majority of the time acts as a savior, especially when there is any sort of error in the QuickBooks desktop. However, have you ever thought about what would be the situation when even the tool itself crashes. There can be times when this error might crash and fail when fixing the issue in QuickBooks. Along with crashing, the QuickBooks file doctor tool hangs or shows an exception. You might bump into such an error due to a handful of factors, which we will be discussing later in this segment. Just in case the application is hanging due to some repair process, then the file doctor tool might stop.
To unleash the causes and fixes of QuickBooks file doctor not working error, make sure that you stick around this piece of information. You can also connect with us, and let our professionals handle the situation for you.
What Instigates the QuickBooks File Doctor Crashing or Not Working Error?
QuickBooks File Doctor comprises the “QuickBooks 2014 R4” program and other newer versions. Intuit developed this program so it could fix QuickBooks errors and other small bugs. Some customers, however, have reported “the program stopped working, crashed, got stuck, or showed an error.” Whenever this occurs, an error message says, “File Doctor is not working.”
This issues may be fixed by following the steps outlined in this article. Here are some possible causes of QuickBooks File Doctor not working or won’t open error:
Large company files or damaged company files can cause QuickBooks File Doctor to not work properly. In such cases, you may need to use other tools or methods to fix the company file.
Just in case, the files are corrupted, misplaced, or damaged, then this issue could be seen.
File Doctor tool requires a stable network connection to work properly. Check your network settings and make sure that you have a stable internet connection.
Converting the old version of the QuickBooks company file over a network can also trigger this error.
When you try to access the incorporated files, then such errors could be seen.
Your firewall settings may be blocking QuickBooks File Doctor from accessing the internet or network. Make sure to add QuickBooks File Doctor to your firewall’s exceptions list.
If in case, you are missing out on a few QuickBooks company files during the installation process.
An outdated version of File Doctor can cause the tool to not work properly. Make sure that you have the latest version of QB File Doctor installed on your system.
QuickBooks File Doctor relies on the .NET Framework to run. If you encounter any issues with file doctor, you may need to repair or reinstall the .NET Framework on your system.
Methods to Fix QuickBooks File Doctor Stopped Working Error
You can try out the below methods, so as to fix the QuickBooks file doctor crashing error. Go through the below procedures one by one:
Method 1: Turn off Hosting Mode and Install an Antivirus Program
To make sure your QuickBooks file doctor software works, deactivate hosting mode. So, you may adjust the Security Firewall level to enable remote connections.
Just in case you are using McAfee software, then you would have to launch the software.
Next, hit on Web & Email Protection.
Head to the Firewall and opt for Ports and System Services and then Hit Add tab.
You can also type eMule in the services name.
Type the QuickBooks TCP data in Local TCP/IP ports.
Type TCP data under QuickBooks Local UDP Port.
Choose All PCs under Open ports.
Finally, hit on Save tab and also start the system again.
After these steps, you can properly configure the antivirus software. These solutions will fix the “QuickBooks File Doctor not working“ Error.
The backup of error-free files is always saved in Auto Data Recovery.
The backup File remains in Auto Data Recovery for 12 to 24 hours or until QuickBooks opens.
If the error persists after trying Auto Data Recovery, try the following option.
Method 3: Restoring the Backup of Corrupted QBW Files
QuickBooks file doctor crashes because of harmful files. So, the program displays an error. You can recover damaged or corrupted data from a backup in this circumstance.
Herein, you would have to first backup all the files that are damaged. Furthermore, these file backups will assist in replacing the corrupted files.
Later on, Start QuickBooks, hit on Open or Restore Company, and pick the File.
You may now choose ‘Open or Restore a Backup Copy‘ and process the file backup by hitting on Next.
Further, tap on the next tab.
Choose Local Backup and push the Next tab.
Click the drop-down menu to explore choices and pick the Backup file location.
Choose the file with the QBB file extension and hit on open and then Next.
In the drop-down menu, opt for Save. Choose the location where to recover the files.
After that, you must specify a filename. After that, the ‘Save as‘ field pops up with QBW.
Lastly, hit on the Save tab to finish the restoration process.
It should fix the “QuickBooks File Doctor not operating” error. If restoring the file backup doesn’t work, try Auto Data Recovery. Look at the next solution.
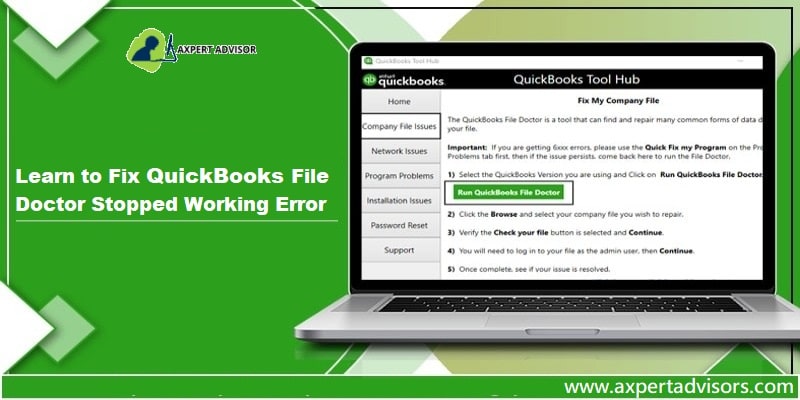
After that, open the tool hub and launch the QuickBooks file doctor tool.
Open the file doctor and wait for some time till the No company open window.
Head to the File option and also choose Utilities tab.
Hit on Repair file and Network problems.
Tap on the OK tab and after this the QuickBooks file doctor will restart with admin rights.
Now, hit on the Yes tab.
Hit the Wrench icon in order to launch the QuickBooks file doctor tool.
Proceed forward by hitting the Continue tab.
Enter the User credentials to get logged into the account.
Head to the Advanced settings tab and choose File diagnosis only.
Hit Next tab.
Tap next and, if prompted, open the File to see if the error remains.
When the system suggests, open the file and Check if the issue is rectified or not.
Method 5: Repair .NET Framework
To repair .NET Framework, follow these steps:
Initially, close all running programs.
After that go to the Windows Start menu and select “Control Panel“.
In the Control Panel window, click on “Programs and Features” or “Add or Remove Programs“, depending on your version of Windows.
Now in the list of installed programs, locate and choose the .NET Framework.
Next, hit a click on “Change” or “Modify” to begin the repair process.
Follow the prompts to repair .NET Framework on your system. The repair process may take some time depending on the size of the files that need to be repaired.
Once the repair process gets finish, restart your computer to ensure that the changes take effect.
After restarting your computer, try running QuickBooks File Doctor again to see if the issue has been resolved.
Method 6: Temporarily Disable Antivirus
Your antivirus program may be preventing file doctor from running properly. Temporarily disable your antivirus software and try running the toll again.
Winding up!
We hope by using these techniques, you may simply fix the QuickBooks file doctor crashes Error. If you still face the error, you can contact our QuickBooks error support assisting team. Our team of accounting experts will provide your business the right support that it needs to eliminate errors and QuickBooks related glitches, ensure success and save some serious money.
Are you another QuickBooks user who is looking for an ideal solution to the QuickBooks error code 6010 -100? Well, this error message indicates that the error is caused at the time of installation of QuickBooks software, and requires a re-install of the application. This type of error could be seen, when any antivirus program interferes or prevents the QuickBooks accounting software.
You can go through the article till the end to find the ideal solution to fix this error code 6010. Whereas another solution for the same is that you can get in touch with our QuickBooks desktop support team and allow them to solve the issue.
Brief into QuickBooks error 6010, 100
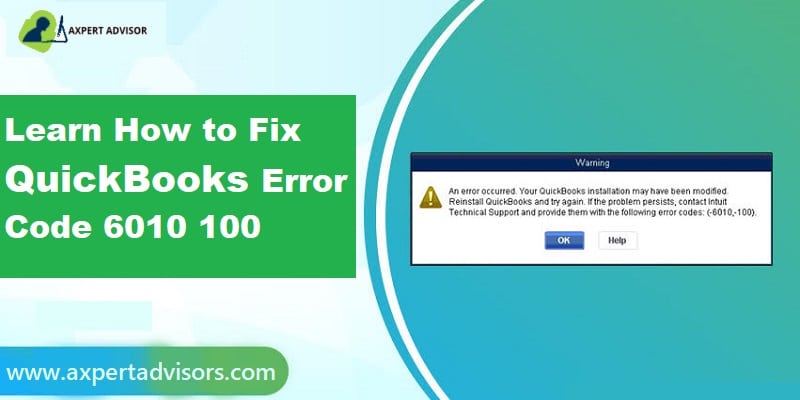
According to the Intuit, QuickBooks error code -6010, -100 indicates that either the anti-virus with the firewall function is interfering or the other case may be that you have run a registry cleaner that has modified the windows registry. This error message pops-up on the screen suddenly with an error message.:
Error -6094, 0 (6010, 100) An error occurred when QuickBooks tried to start the database
Reasons inciting the QuickBooks Error 6010, 100
Let us first stroll past the various causes that may lead to the error code 6010, 100 in Quickbooks Desktop.
This error could be seen, if the .ND files i.e. Network Device files are detached from QuickBooks and then log files.
Another cause for the same can be when the system’s framework demands cleaning.
There are chances when the crucial registry files are deleted by any third-party application that has been downloaded on Windows.
If the antivirus programs are hindering the QuickBooks access to the network.
The error could also be seen when you closes or re-opens the accounting software.
In case when you are running NOD32 Antivirus software with Internet Monitor (IMON) enabled on the system that has the QuickBooks data file, the error -6010, -100 can be seen.
Signs of QuickBooks error code 6010
You can spot the QuickBooks error code 6010 100with the help of the below signs:
The error message itself displaying on the screen can be one of the major signs.
Another sign can be if you aren’t able to access the company file.
Spotting this error becomes easy if the company file is operational in host system.
Techniques to fix QuickBooks error code 6010, -100
The fixes to the QuickBooks error code 6010 -100 are not restricted to a single technique, which means that you can opt for more than one method to get rid of this error. Let us check out some of the most effective techniques to fix this error.
Technique 1: Rebooting QuickBooks database server manager
To end the process, you are required to open QuickBooks once again.
Technique 3: Switching to Single-User mode
The first step is to exit the QuickBooks application and then reboot the system.
Once done with that, it is required to press and hold down the CTRL key and then hit the QB icon and open the software.
The next step is to hit the Utilities option, under the File tab, and then opt for the Stop Hosting Multi-User Access.
Moving ahead, for confirming that, it is required to click on Yes and then move to the last step.
And finally, reboot the application.
Technique 4: Renaming Network Device (.ND) File
Under the QuickBooks directory on the system, it is required to look for network device file with .ND extension, which is having the same name as the company file.
After that, rename the file and then add (OLD) at the end of the name.
And later on reboot the QuickBooks application.
Technique 5: Restoring QuickBooks company file
The basic step in this process is to access the folder that has the company file.
After that, find the file with .QBW extension.
And then, right-click the file, followed by hitting on Copy.
Next step in the process is to move to the desktop and make a right-click, along with opting for the Paste option.
Moving ahead, launch QuickBooks while holding the Ctrl key, which will redirect you to No company open option.
After that, tap on the Open or restore an existing company option.
And finally, open the company file and find out whether the issue continues or not.
Technique 6: Blocking multi-user access
This next technique that one can follow to fix the QuickBooks error code 6010, -100. The steps involved in this process are as follows:
First of all, select file from the QuickBooks application menu.
And then, move to the Utilities option, followed by selecting Stop hosting multi-user access option.
Once done with that, you are required to close and re-open the QuickBooks.
Now, disable the Internet Monitor feature from the program settings and reboot the system, in case you are using ESET NOD32 Antivirus software program on the system.
Technique 7: Alter the filenames of the ‘.ND’ and ‘.TLG’ files.
Changing the names of the network and transaction log files will assure that the next time you lunch the QuickBooks software, these files aren’t accessible to the software. As a way out, what the software does is that it automatically creates new files with the original names. Seemingly, those files would be free of any technical issues. To follow up with the process, perform the steps
To begin with, right-click the desktop icon of QuickBooks desktop and hit on Open File Location.
Subsequently, in the QuickBooks folder, locate the ‘.ND’ and ‘.TLG’ files of your company file.
Rename these files. All you need to do is introduce ‘.old’ at the end of the filename.
Now, re-launch the QuickBooks software and check if the error code 6010 got fixed in Quickbooks.
Winding up!!
This drives us to the end of this blog post and we hope that you might found this article a bit helpful in fixing the QuickBooks error 6010 -100. Though the methods listed above would be effective in fixing the issue, but it might happen that none of the work in your favor, in such a case you can get in touch with our QuickBooks error support team via our helpline i.e., 1-888-368-8874. Our professionals will help you in dealing with the errors without any hassle.
Experiencing errors in QuickBooks is pretty much common, as it involves a bunch of algorithms. One such error code is payroll error 15101. This segment is drafted in a way to provide the best possible assistance to troubleshoot the QuickBooks error code 15101successfully that too from its root cause. This error is often experienced when you try to update QuickBooks desktop or payroll tax tables. When trying to get the latest release for the QuickBooks, an error might appear on the screen stating that the update process can’t be completed. This error is basically a run-time error that can be experienced due to a handful of reasons. You might experience such an error when trying to run payroll updates to download the latest tax tables.
To get a better grip on QuickBooks payroll error 15101, reading this write up would surely make sense to you. However, if you aren’t interested in performing the set of steps manually, then connecting with our tech geeks using our dedicated helpline is recommended.
What Instigates QuickBooks Error Code 15101?
This particular error can be experienced due to a handful of reasons, which include:
Just in case the digital signature certificate isn’t installed properly or is corrupted.
Your computer’s firewall or antivirus software can sometimes interfere with the QuickBooks update process. It may block QuickBooks from accessing the internet, which causes the update to fail.
An outdated version of QuickBooks may also cause this error. The software needs to be updated to the latest version to avoid such issues.
Another common reason can be a third-party application interfering with the QuickBooks causing an issue in the payroll update process.
In case the internet explorer is erroneous and interrupting payroll update.
In case the QBWebconnector.exe program doesn’t run in a proper manner.
Signs and Symptoms of QuickBooks Error Code 15101
Below signs and symptoms can be of great assistance in spotting the error with much ease.
One of the basic signs can be if the software or payroll update gets hindered by any error message.
Every time you attempts to download a payroll update fails and error message appears on the screen.
System freezes every now and then.
The system slows down and doesn’t really respond to the keyboard inputs.
Methods to Implement to Rectify QuickBooks Error Code 15101
You need to implement the below measures, so as to chuck off the QuickBooks error code 15101:
1st Process: Start the System in Safe Mode
Remaining in safe mode ensures that the windows operating system has the lowest number of drivers needed to work. In case you are using windows and are also attached to the internet with a high-speed link, then you would be able to restart the system in the safe mode setting with networking mode.
Choose Safe mode with networking and go for the option related to the operating system you want to use to restart.
Hit Enter tab.
Choose a Login and go for the System admin, which will give you access to all the system programs.
Next, enter the Admin password.
Now choose the yes tab when specific to work in a safe mode setting.
Open the QuickBooks software and try to perform the same task and check if the issue is resolved.
Reboot the system and you are done.
2nd Process: Checking the Internet Explorer Settings
If the first process failed to work for you, then implementing the below steps might work.
Initially, you need to open run windows and type in INETCPL.CPL on the open box and hit the OK tab.
You then have to choose the General tab and also click on the Delete tab and choose Temporary internet files and website files.
Delete again.
Choose the Connections tab and also click on LAN settings.
Look for settings and hit the OK tab.
Move to the Advanced tab and scroll to the Security section and check if TLS 1.2 is checked and TLS 1.0 and TLS 1.1 is unchecked.
3rd Process: Installing the Digital Signature Certificate
Under this process, one needs to download and install the digital signature certificate in the system.
Look for and spot the QBW32.exe file
Being a Windows 7 user, you can head to the Windows search bar.
Click on more results in Windows search.
Hit a click on the Computer icon.
Type QBW32.exe that has a type of application.
Right-click on QBW32.exe and choose the Properties tab.
Choose the Digital signature tab and ascertain that you have selected Intuit inc. from the signature list.
Now hit a click on the Details tab.
Pick View certificate in the Digital signature details window.
Head to the certificate window and pick Install certificate option.
Hit next until you get a dialog box with Finish option.
Also click on the Finish tab.
Now reboot the system and open QuickBooks.
Concludingly, download the update once again.
4th Process: Running Reboot.bat Files
You need to close QuickBooks
Later on, right-click QuickBooks and choose the Properties tab.
Head to the shortcut tab and also click on the Open file location.
Look for a Reboot.bat or Reboot file from the list on the screen.
Right-click the Reboot.bat file and choose Run as admin.
You now have to hit on the Yes tab to get user account permission.
CMD window will open and display a different file scrolling.
Reboot the system.
Open the QuickBooks desktop and click on Install to download the latest updates.
5th Process: Check Windows Firewall settings
Click the Windows icon, then choose Settings.
Enter Firewall in the Search box.
Hit on Allow an App or Feature Through Windows Firewall when the Windows Firewall window displays.
In the Allowed Apps window, hit on the Change Settings option.
Check the boxes next to any applications on your computer that you want to be able to communicate with the Internet without the Firewall interfering.
Additionally, you may choose whether you want secure networks and public or non-secure networks to be able to communicate by checking the Private and Public checkbox.
Afterward, hit OK then choose Close to exit the Windows Firewall window.
If the QuickBooks Error Code 15101 cannot be resolved by following this guide, try installing the digital signature certificate (walkthrough provided in the following method).
6th Process: Make Internet Explorer the Default Browser
By default, QuickBooks employs Internet Explorer as the default browser. However, inadvertently, the browser may have been changed, in turn instigating the payroll error code 15101. To set I.E as the default browser follow the short walk-through given below:
Launch Internet Explorer and pick the Gear icon in the upper right of the window.
Hit on the Internet Options from there.
Now, hit on the Make Default icon under the Programs tab.
Finally, to for OK to save the changes at the end.
7th Process: Verify the date and time on your computer
Verifying the date and time on your computer is an important step. Here are the steps to verify the date and time on your computer:
On your Windows PC, hit a right-click on the Clock in the bottom right corner of the screen.
Select “Adjust date/time” from the drop-down menu.
In the Date and Time settings window, verify that the date and time are correct.
If the date or time is incorrect, click on the “Change” button and update the date and/or time as necessary.
Once the date and time are correct, click on the “OK” button to save the changes.
Restart QuickBooks and attempt to update again to see if the issue has been resolved.
8th Process: Rename the QuickBooks Update folder
Renaming the QuickBooks Update folder is another step that can help such errors in QuickBooks. Here are the steps to rename the QuickBooks Update folder:
Initially, close your QuickBooks if it is open.
After tat open the Windows File Explorer and navigate to C:\ProgramData\Intuit\QuickBooks (or C:\ProgramData\Intuit\QuickBooksxx, where “xx” is the version of QuickBooks you have installed).
Now locate the “Update” folder and right-click on it.
Also select “Rename” from the drop-down menu and change the name of the folder to “Update.old“.
In the next step you need to reboot your QuickBooks and attempt to update again.
QuickBooks will create a new “Update” folder automatically during the next update process.
By renaming the QuickBooks Update folder, you are essentially forcing QuickBooks to create a new folder and start the update process from scratch.
Winding up!
Tackling through the QuickBooks payroll error code 15101 becomes a little easier, once the above-stated set of steps is performed easily. Whereas, if you aren’t sure about the steps mentioned in this piece of writing or if in case you have any queries when fixing the error, then connecting with our QuickBooks payroll error support team using our support line is highly recommended. Our tech personnel will ensure to cater to you with the best support services instantly.
QuickBooks users, while trying to concentrate on some important tasks, suddenly get bumped into the QuickBooks install error 1712. Well, that is pretty common these days. This particular error is usually seen at the time of installing the QuickBooks desktop into the main or primary server system. You might see a warning message associated with this error that states as:
Message
Description
Error
“We’re sorry! Something went wrong with your installation. Error 1712: One or more of the files required to restore your computer to its previous state could not be found. Restoration will not be possible now”.
Get in full depth with the information, by reading this segment. You can also give us a call at the helpline number, and let our team handle the situation for you.
What Activates the Error 1712 in the QuickBooks Desktop?
When you know the root causes of an error, it becomes a little easier to handle it. Below are some of the basic causes due to which such an error could be seen.
You might face similar issues if there are some malicious software like adware, spyware, and viruses attack.
If there are some registry errors or corruption in your software.
What are the Signs of the QuickBooks Installation Error 1712?
By going through the various signs below, you can identify the QuickBooks error code 1712 easily and will also know the appropriate step to take for ousting it from your system.
If you see a blue screen appearing on the screen, it is one of the major sign of this error.
If your system isn’t working in a proper manner.
You can also spot this issue if there are shutdown issues.
If your software freezes abruptly.
HTTP error can also be a sign of such an error.
Rectification Steps for the QuickBooks Install Error Code 1712
You can check out the below rectification methods to chuck off the QuickBooks error code 1712.
Method 1: Use Quick Fix My Program From The Tools Hub
Under this method, you would have to close the QuickBooks software and then download the QuickBooks tool hub file
Save the file on the system where it can be accessed with much.
Later on, open the file that you downloaded in the previous step.
Pay heed to the on-screen prompts and install the tool.
After you have installed the tool properly, open it.
Choose the Program problems option in the tool hub and further select Quick fix my program.
You need to find I am having problems installing QuickBooks and choose OK tab.
Lastly, reboot QuickBooks software.
Method 5: End All Processes in The Task Manager
This is a basic process, where you need to tap on the Ctrl + Delete keys.
And further, choose the Processes tab.
Choose the End process in the Task manager.
Finally, reboot the system.
Method 6: Make a New User Possessing Admin Rights
By tapping the power button in the Start menu, hit on Settings, and then tap on the Gear symbol.
After that choose Accounts in the Windows Settings.
Pick the menu item marked Other People.
Now choose for the Add another user to the computer option.
If prompted, you don’t have to enter your email address.
In a similar vein, you can skip entering your sign-in details by selecting I don’t know this person’s sign-in information.
Opt for this option after adding a user who does not have a Microsoft account.
Choose a New username & password for the new user.
Hit on the Next button to proceed further.
After that, opt for a Local account and make a fresh local account with administrator privileges.
Final words.!
Fixing the QuickBooks installation error 1712 is a little easy, with the steps that we have jotted down in this segment. As always, if you have any queries, comments, or suggestions, contact us via our helpline i.e., 1-888-368-8874!
We are a hub of technocrats, who work round the clock to provide the best possible QuickBooks desktop support services. So, do not hesitate in calling us anytime and seeking for assistance!