Learn keyboard shortcuts for QuickBooks Desktop for Windows and Mac
Bookkeeping and accounting, while critical for any organization, can often be time-consuming and prone to error. Imagine if you could speed up these essential tasks and minimize mistakes. The good news is, you can!
QuickBooks, the leading accounting software, offers a robust set of keyboard shortcuts designed to dramatically expedite common and crucial operations. By leveraging these shortcuts, you can significantly reduce your reliance on the mouse, saving both time and effort, and ultimately boosting your productivity.
This comprehensive guide will delve deeper into all the relevant and essential QuickBooks keyboard shortcuts, empowering you to breeze through your accounting tasks with unparalleled efficiency. Master these shortcuts and transform the way you work in QuickBooks!
Note: Inside a transaction, any underlined letter is a shortcut to a tab between fields. You can use those shortcuts by just pressing Alt+ the letter that is underlined.
Keyboard Shortcuts for QuickBooks Desktop for Windows
Check out the shortcuts keys to operate your QuickBooks in a seamless manner.
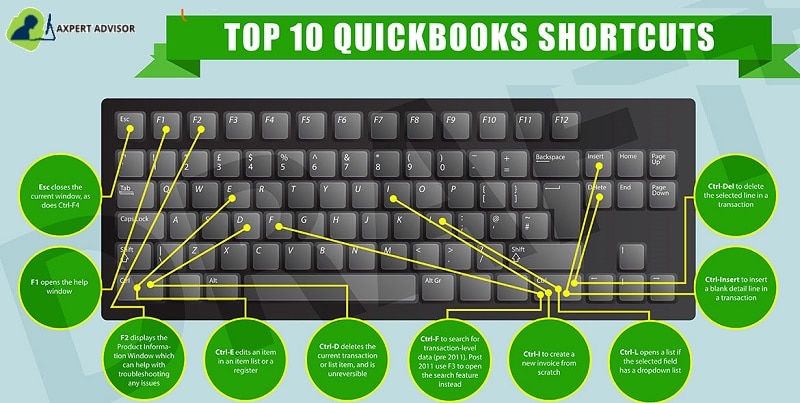
Shortcuts to Edit Transactions in QuickBooks
Keys
Action
Ctrl+Del
To delete the selected line in a transaction
Ctrl+Ins
To insert a blank detail in a transaction
Ctrl+Alt+Y
To copy a line in an invoice
Ctrl+Alt+V
To paste the copied line to the appropriate row in the invoice
Ctrl+N
To create a new transaction or list item
Ctrl+D
To delete the current transaction or list item
Ctrl+E
To edit an item in an item list or in a register
Ctrl+O
To check in the write checks/checks windows/check register: Use Ctrl+O to copy the check and then use Ctrl+V to create a copy of that check in case you are in the check register.
F5
To refresh a list. This shortcut will only be available if you are in multi-user mode and have a list open. This key will force QB to go back to the database server and retrieve the latest copy of the list. If the list is being edited by multiple users, this may be useful. Please remember that the lists open at the same time should be refreshed.
Ctrl+H
Transaction History (used inside a transaction)
Shortcuts for Opening Windows List
Keys
Action
+
Increase the number in a form, such as a check/a check number or invoice number
Alt+S
To save transaction (s)
Alt+N
To save transaction (s) and go to the next transaction
Alt+P
Go to the previous transaction
Tab
Go to the next field
Shift+tab
Go to the prior field
Up arrow
Go to the previous line/row in a form
Down arrow
Go to the next row in a form
Page up
Move, in a form area or report, to the previous page
Page down
Move to the next page
Ctrl+page up
Move to the first item in a list/register
Ctrl+Page down
Move to the last item in a list or register
Ctrl+Enter
Record
Shortcuts for Maneuvering
Keys
Action
+
Increase the number in a form, such as a check/a check number or invoice number
Alt+S
Save transaction
Alt+N
Save your transaction and go to the next transaction
Alt+P
Go to the previous transaction
Tab
Go to the next field
Shift+Tab
Go to the prior field
Up arrow
Go to the previous line in a form
Down arrow
Go to the next line in a form
Page up
Move, in a form area or report, to the previous page
Page Down
Move, in a form area or report, to the next page
Ctrl+Page Up
Move to the first entry in a list or register
Ctrl+Page Down
Move to the last entry in a list or register
Ctrl+Enter
Record
Shortcuts for Opening & Closing QuickBooks
Keys
Action
Ctrl
Hit Ctrl to start QuickBooks without opening a company file
Alt
Tap on this key to suppress or avoid opening the desktop Windows while opening a file
Alt+F4
Exit
Date Shortcuts
Keys
Action
+
Proceed to the next day
-
Previous day
T
Today
W
First day of the Week
K
Last day of the Week
M
First day of the Month
H
Last day of the Month
Y
First day of the Year
[
(left bracket) Same day in the previous week
]
(right bracket) Same day in next week
;
(semi-colon) Same date last month
'
(apostrophe) Same date next month
Alt+Down arrow
Shortcut to open calendar for date selection (a small date calendar)
Keyboard Shortcuts for Memorized Transactions in QuickBooks
Keys
Action
Ctrl+M
Remember the current transaction
Ctrl+T
Open the list of Memorized transactions
Misc Keyboard Shortcuts for QuickBooks
Key
Action
Ctrl+P
Give Prints
Ctrl+R+P
In order to register in QuickBooks, you will have to enter a “validation code.” Open QuickBooks, choose Help, and then About QuickBooks. Press Ctrl+R+P keys when the product splash screen appears where you can enter your validation code.
Ctrl+K
QuickBooks Service Keys (Payroll)
Ctrl+Alt+Y
Set up YTD Amounts. Open QuickBooks, choose Help and tap on About QuickBooks which opens the splash screen with license and other info. Now, press Ctrl+Alt+Y keys and enter year-to-date amounts for payroll.
F2 and Ctrl+B+Q
Export to QuickBooks Desktop Online. Tap on F2 and then Ctrl+B+Q. Hit on OK or close the Product Information screen.
Standard Text Editing shortcuts
Keys
Action
Ctrl+Z
Undo
Ctrl+X
Cut
Ctrl+C
Copy
Ctrl+V
Paste
Del
Delete characters to the right
Backspace
Delete characters to the left
Home
Shortcut to go to the first character in the field
End
To the last character in the field
Ctrl+Right arrow
Go to the next word in a current text field
Ctrl+Left arrow
Go to the previous word
Shortcuts for Quick Reports
KEYS
ACTION
Ctrl+Q
To open a Quick report
Arrow Up/Arrow Down
Go up / go down a line
Enter
To show item detail and QuickZoom on a report
Ctrl+A
Hide/ show header
Ctrl+P
Print report or (ALT+T)
Alt+D, then down arrow
Change Date Range of Reports
Alt+I
Email report as Excel or PDF
Shortcuts for Managing Invoices
KEYS
ACTION
Tab or Shift+Tab
Jump to next / go to previous invoice field
Alt+a
Save and close
Alt+s
Save and New
Shortcuts to Access Main Functions / Windows
EYS
ACTION
Alt+C
and Enter
Company > Home
Alt+U
and Enter (or Ctrl+J)
Customer Center > Customers & Jobs list
Alt+O
and Enter
Vendor Center
Alt+Y
and Enter
Employee Center
Alt+R
and Enter
Report Center
Ctrl+I
Customer Center > Create Invoice
Ctrl+R
Use Register > select account
Ctrl+W
Write a new check
Ctrl+T
Open memorized transaction list
Ctrl+Y
Open transaction journal
Ctrl+A
Open Chart of Accounts
Esc
(or ctrl+f4)
Close active window
Ctrl+Tab/Ctrl+Shift+Tab
Jump to next / the previous Window while multiple sub-windows remain open
Charts of Accounts
KEYS
ACTION
Ctrl+A
Open Chart of Accounts
Arrow Up/Arrow Down
Go up one line / down one line
Home/End
Go to beginning / go to the end of the account list
A…Z
Type name of the account to select automatically
Ctrl+R
Open Register (for asset, liability and equity accounts)
Ctrl+Q
Open Quick Report for item
Ctrl+E
Edit Account
Ctrl+U
Use Account
Ctrl+D
Delete Account
Shortcuts for QuickBooks Desktop for Mac (for USA only)
Action
Keyboard shortcut
Open the Help window
Command +?
Minimize current window
Command + M
Open Preferences
Command + , (comma)
Open the Product Information window (Product and License number, company file location, etc)
Command + 1
Open the Find Transaction window (Transactions, invoices, etc)
Increase or decrease the check or form number by one
+ or –
Delete the character to the left
Delete
Date Fields on Forms
Action
Keyboard shortcut
Advance a day
+
Back a day
–
Go to today
T
Go to the first day of the week
W
Go to the last day of the week
K
Go to the first day of the month
M
Go to the last day of the month
H
Go to the first day of the year (Jan 1)
Y
Go to the last day of the year (Dec 31)
R
Forms and Transactions
Action
Keyboard shortcut
Add a new transaction line
Command + Y
Delete selected transaction line
Command + B
Open the full list for the selected dropdown menu (product, service, customer, etc)
Highlight the ▼ dropdown menu, then press Command + L
Move between pages on forms and reports
FN + ↑ or ↓
Print form (or list)
Command + P
Memorize current form and its transactions
Command and + (plus)
Open transaction history (for current form)
Command + U
Lists (Customer center, Account Register, Item List, etc.)
Action
Keyboard shortcut
Create a new item on a list (account, customer, product or service, etc.)
Command + N
Edit an item on a list (account, customer, product or service, etc.)
Command + E
Delete an item on a list (account, customer, product or service, etc)
Command + D
Open an Account Register
Command + R, then select an account
Start a New Task Anywhere in QuickBooks
Action
Keyboard shortcut
Create a new invoice
Command + I
Create a new check
Command + K
Open the transaction journal
Command + T
Open the Chart of Accounts
Shift + Command + A
Open the Customer Center
Shift + Command + J
Open the Employee Center
Shift + Command + E
Open the Item list
Shift + Command + I
Open the Memorized Transactions list
Shift + Command + M
Open the Vendor Center
Shift + Command + V
Wrapping-up.!
With time and practice, you can easily learn the uses of QuickBooks desktop shortcuts keys. They save time and help you be more productive. In case you need any assistance, you can connect with our QuickBooks desktop support team and speak to our certified experts. As a team of professionals, we endeavor to make the QuickBooks accounting software free from any technical hindrances that pop up in the form of error codes and glitches. Our professionals work diligently toward resolving these issues in your favorite accounting software.
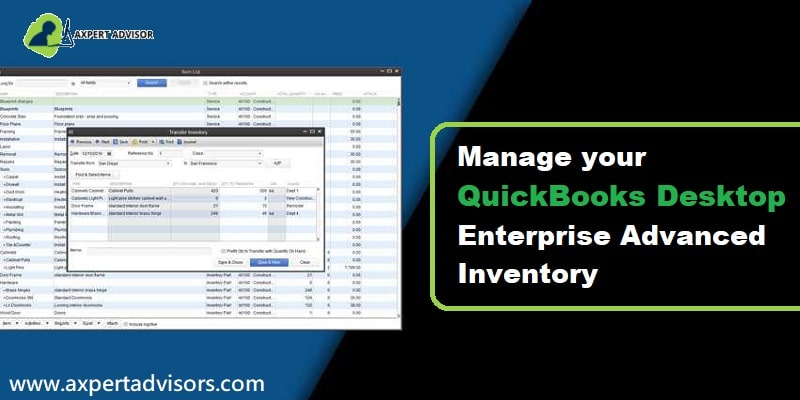
Simple Tips & Tricks to Manage QuickBooks Advanced Inventory Like a Pro
Are you looking for a simpler way to manage your inventory within QuickBooks Enterprise? You've landed in the right place! This guide provides an easy-to-follow walkthrough that will make managing your QuickBooks Advanced Inventory a breeze. Your focused attention while going through these steps is all that's required.
QuickBooks Enterprise offers the flexibility to integrate powerful add-ons, and Advanced Inventory stands out as a brilliant, time-saving feature for business owners and entrepreneurs. This particular functionality empowers you to manage your inventory across various online platforms with greater efficiency. With access to real-time inventory quantities and other crucial information, leveraging this added feature in QuickBooks will significantly save you time, money, and effort. Dive in to unlock the full potential of your QuickBooks Enterprise inventory management!
How do We Manage Advanced Inventory?
First, make sure you are using QuickBooks enterprise with Advanced Inventory switched on your devices from which you are running QuickBooks Enterprise.
Review the settings to track your inventory on the Version of QuickBooks Enterprise installed. It is possible that you have several items that you wish to group; you can select the option of Categories to find the details of the products you want to purchase quick.
Furthermore, you can sort your categories for reports that are specific to your products for a variety of business needs such as quantity control, investment and financial purposes, and more.
In case you want to add new categories to the already existing bunch, here’s what you need to follow through:
Head to Settings and proceed to Product & Services
Then, head to Manage Categories
Now, tap on New Categories.
Finally, add the name of the category or subcategories you want to create—fitting your current business needs.
You can create subcategories up to four levels.
After creating the aforesaid categories, you can
begin adding the name of the products under these categories manually with the
other information related to the product like the cost, quantity, sales
description, sales price, etc.
Moreover, you can upload the image of every product you wish to for better reference in the future whenever you are in a hurry.
Benefits of Availing the Use of QuickBooks Desktop Advanced Inventory
Here are some of the benefits of this multipronged feature:
You shall be able to manage your budget order in a timely manner.
This feature is able to create an organized list of your items that can be very useful in the event that you have a large number of SKUs in your product and have less time to write the creation of a high-quality report.
The inventory quantities are constantly updated with the passage of time, and also when you purchase or sell the items.
Your accounting and financial statements are completed in the right date.
You can also keep track of the information about your suppliers.
Images of your customized products can help you remember more information about the sort of stock available in the store.
You'll be able run your business more efficiently and efficiently. By using this function, you will be able to know the amount you spend on your sales and purchases. You also get an idea about the costs associated with it.
If you are able to utilize this feature in a responsible manner, you can beat your competitors on the marketplace. This is possible through the best pricing, from the most reliable suppliers at the right moment, and having a good understanding of the items you're selling.
Extra Benefits for Managing the QuickBooks Enterprise Advanced Inventory System
It is easy to track the products that you sell in multiple locations, regardless of geographic borders. This is a massive and better chance to be a nationally-known seller within a short period of time.
Everything that is involved in the management of inventory is managed in one location. It includes packing, shipping storage warehouses, the items to be ordered, quantity and selling, and much more.
Barcodes are like the cherry on top of the cake. barcode is as if it's the cherry on top of the giant cake! When you scan the barcodes will allow you to modify or review the information in the shortest time possible. Your time won't be spent searching for the right report in the midst of numerous.
It is easy to get clear information to determine what quantity of orders is stored in your house. You also get an idea about the items that are ordered in the future.
After you've mastered the importance in Advanced Inventory and its management Let's shift our attention on the primary goal.
What's Next
Another advantage to the management of Advanced Inventory is that you can upload a file of data on the product. You need to update an additional set of products that need to be updated within QuickBooks Enterprise. But, you should ensure that the data file you've uploaded, or plan to upload is in the format required.
To learn the format required to understand the format, download the file sample from software to use as a source of information.
In this way you will save a lot of time will be saved in the process of updating every product. If you are a startup or a mid-sized business this add-on could be an opportunity for you. If you're dealing with a large number of SKUs or, in other words, stock Keeping Units, then you are sure to be grateful for this feature for making it live for QuickBooks Enterprise.
To purchase and selling, you could also get a purchase request from the vendors whom you deal directly. Once the goods are received, you may enter the information into the electronic purchase order, and then print it out or email it back to the seller later should you need to.
If you have receivables, or payments received You can make sales receipts in QuickBooks Enterprise advanced inventory and then the quantity of the items will decrease by increasing the cash on hand or in the bank.
Reports that you generate using your Advanced Inventory options let you determine what you're selling best or when it is being sold quickly. It also helps you identify the best time to sell any product if you're this industry for the first time. Additionally, summary reports will help you organize your inventory for the future better.
Final Words..!
All in all, QuickBooks Enterprise with Advanced Inventory is an unique example of how you can manage your business and run it like never before. This feature gives you the possibility of integrating all of your inventory in one place. Through this you will be able to manage your prices competitively among vendors as well.
You can reap the benefits of this software's innovative features with adequate training and assistance. If you have any questions or experience any issues when using the software you can reach us 24x7 QuickBooks desktop support line. Our technicians are certified and have years of experience and knowledge of state-of-the-art technology.
Learn how to fix data damage and resolve basic QuickBooks company file issues:
Encountering data issues or company file problems in QuickBooks can be incredibly frustrating, often preventing you from accessing your critical financial information. While these errors can feel sensitive and complex, the good news is that most company file issues are resolvable with the right approach.
This comprehensive guide will walk you through a series of effective steps designed to help you fix QuickBooks company file errors and regain access to your data. Whether your file won't open, or you're experiencing other data corruption symptoms, our solutions aim to restore your financial records.
If you prefer not to manually perform the troubleshooting steps, or if you require immediate expert assistance, our dedicated support professionals are readily available via our helpline to guide you through the process. Don't let data issues hold your business back – let's get your QuickBooks company file back on track!
Steps to Resolve Common QuickBooks Company File Issues
Below we have shared a few methods to resolve the most common QuickBooks desktop company file issues.
Solution 1: Open the QuickBooks company file
When you find that the issues you are facing with QuickBooks continue to grow, at that time, moving Company File to Windows Desktop can help with folder permission problems.
1stStep: In QuickBooks, go to File and Open or Restore the Company.
2ndStep: Find the correct radio button for the file you are opening.
Final Step: Browse to the file location and open it.
Note: You will get a notification of where you want to restore the file if you are opening a .QBX, .QBB or .QBM file.
Solution 2: Preventing QuickBooks desktop windows from opening automatically
An error occurs wherein when you try to open the company file, many windows open. In this case, you can follow the steps below:
Choose the company file on the No Company Open window
Click and hold the ALT key and Open QuickBooks.
Note: If you get a login window, enter your password, tap and hold the ALT key, and hit on the OK button. Till the time the company file starts completely, or the error text pops up, do not release the ALT key. If the company file opens and no error pops up and proceed with the steps below:
Head to Edit > Preferences
Tap on the Desktop View > Don’t Save the Desktop
Hit on the OK button.
Solution 3: Rename .TLG and .ND extensions on the QuickBooks company files
If you find that the TLG and ND files are corrupt, then you can stay up to the old ones. This will now help you open your file.
1stStep: Access the folder where the QuickBooks company file is saved.
2ndStep: Right-click on the transaction log file and rename to OLD.qbw.TLG
Final Step: Open the company file, this will enable QuickBooks to build new .TLG and .ND files.
Note:
When you delete.TLG files, then you are not assisted as they can recover your lost data.
Copy the transaction log file with the company file so that error does not take place again.
Solution 4: Copy QuickBooks Company File to New Location
If you notice that your company file is placed in a network drive, then you must copy it to the local drive. If the local file opens, then resolve your network configuration. Also, try to download and run the 'file doctor' as it can help you out.
1st Step: Create a new folder in C: drive
2nd Step: Open the folder housing the company file.
3rd Step: Tap and hold the Ctrl key. Choose the company file and the corresponding .TLG of the company file
4th Step: Right-click and hit on the option to Copy.
Final Step: Open the new folder, Right-click, and hit on the Paste option.
2nd Step: Once the tool is installed on the system, it will open up automatically.
3rd Step: Next step is to hit on run QuickBooks file doctor. It can take up to one minute for the file doctor to open.
4th Step: In QuickBooks file doctor, you need to opt for the company file from the drop-down menu. In case you are unable to spot the company file, then it is recommended to choose browse and search to find your file.
5th Step: After that, you need to check the file and then hit the option to continue.
Final Step: The last step is to type in the QuickBooks admin password and then push the Next tab.
Solution 6: Repairing the company file using Rebuild Data Tool
The last yet effective approach to troubleshooting company file issues in Quickbooks requires users to take the aid of the Rebuild data tool, an integrated tool, which is usually run in consonance with the Verify tool. While the verify tool inspects any issues within the company file, the rebuild tool rectifies those issues.
Head to the File menu and proceed to the utilities tab
After that, you need to choose the rebuild data option,
Hit on OK on the QuickBooks information window
Perform the onscreen steps to save a backup
Let the tool fix the file. This might take some time
QuickBooks might seem stuck, but as long as you can move the mouse, the tool is working
Once the tool finishes, choose the ok tab
Now, visit the File menu and hover over the utilities tab
Finally, choose the verify data option.
Let the tool check the file for any sort of issues
In case there are no issues, then choose the ok tab and continue using your company file.
Or else opt for the rebuild now option if QuickBooks finds an issue with the company file.
Major causes leading to QuickBooks Company File issues.
Some of the major causes that may result in company file issues in QuickBooks are given as follows:
A damaged or corrupted company file may be one of the major causes of this error.
The file extension of the company file may be wrong.
You may be using a QuickBooks version that does not show compatibility with the version of your Windows Operating system.
You may be trying to access a company file that may have been deleted accidentally in the past.
Some Important points.
Points to consider before you start troubleshooting the QuickBooks Company file issues:
First of all, ensure the issue has occurred with the Company File and not the program. Also, make sure that the QuickBooks application has been updated so that it can function better. You can do this in this way:
Click and hold the 'Ctrl key' and double-click the 'QuickBooks Desktop icon.'
If the program is not starting, then try another method.
Note: When you are doing this, ensure that you do not release the Ctrl key until the No Company Open window opens
Ensure that the company file is hosted by only one computer. If it is being hosted by other computers as well, turn it off. You can do the same by following the steps:
In QuickBooks, go to 'File > Utilities'
Now, choose to 'Stop hosting multi-user access
Note: If you see anything else apart from Stop hosting multi-user access, that means that multi-user hosting has already been turned off.
In the worst case scenario, if the above-discussed steps are unable to assist you in the process to resolve basic QuickBooks desktop company file issues and errors still keep pervading, then in that scenario, you can speak to our QuickBooks error support team at the helpline 1-888-368-8874. Here you can connect with our experts, share your concern, and find answers to all your QuickBooks-related queries.
Simple Steps to Fix 'This is a Corrupted or Damaged QuickBooks Database' Error
Encountering a corrupt or damaged QuickBooks database error can be incredibly frustrating and disruptive, potentially jeopardizing your essential company files and the seamless operation of your accounting software. However, every QuickBooks error has a specific solution, making recovery possible if you know the right steps.
This common issue, often displayed as "Error: This is a corrupted or damaged QuickBooks database," can affect all versions of QuickBooks. Its repercussions can be severe, highlighting the critical need for an effective resolution.
This guide provides the precise measures you can take to fix this QuickBooks database error. By carefully reading through this segment, you'll gain the knowledge to troubleshoot this issue effectively. Should you have any questions or require further assistance, our dedicated support team is just a call away.
Steps to Locate Corrupt Files on QuickBooks Desktop
Locating the corrupt file, which is a source of the error pop-ups is one of the most important steps take. The complete process of locating the damaged file is quite complex, thus, it is advised to contact a professional. Here are the instructions that you need to follow:
The very first step is to shut down the QuickBooks desktop and after that try to save or delete a transaction.
Then you need to check for any missing transaction from the list of entries.
Next, notice any delay or breakage in the operations in QuickBooks.
At the end, check whether or not the negative balance of the transaction history is popping up.
If you follow these steps in the right manner, you can easily spot the reason for the error report you are being showered with.
Fixing Corrupted or Damaged Database Error in QuickBooks Desktop
As of now you know other aspects that you need to have an idea about while dealing with this error. Here are the points that you need to go through in order to fix the issue:
If the corrupted file is stored on the network drive, then just copy that file to a local drive.
Next, head for the QuickBooks Desktop and make sure to unhide items such as Accounts, customer names, etc.
Once done with that, proceed to the QuickBooks File menu and then opt for Utilities
In the next step, run the Rebuild utility
You also need to launch the Verify data utility.
When Error: This is a Corrupt or Damaged QuickBooks Database" Occurs?
As we all know, QuickBooks is a network-based software, that allows one or more users to access and work on a database server simultaneously. As the sheer size of the virtual space is impressive, it is common to get errors occasionally, especially the Corrupt or Damaged QuickBooks Database error.
This error leaves you to face some puzzling situations where you are not able to use the database to get the information. Although, the database remains completely fine and it's just an error that says otherwise. So, if you have encountered this issue, or even if you have not then stay with us till the end as we will offer you the perfect solution to fix this error once and for all.
Major Causes Behind the Database Error in QuickBooks
Despite the fact that there is a change wherein the database is actually failing to respond, most of the time this error is displayed for no reason whatsoever. One of the basic reasons behind this is that the database manager of QuickBooks is quite complex from the end of service providers and thus, it is hard for them to offer a precise factor that is causing the error. There can be situations when the error occurs due to a network problem. In such circumstances, you need to follow the steps below:
Opt for the close company/log-off option in QuickBooks.
Make sure to run the verify data utility.
You can look for this option in the QuickBooks file menu.
This is why one of the best solutions to this problem is to simply run the QuickBooks File recovery solution. Apart from this, one of the many reasons that you are receiving this error message can be the local drive or network issue. Also, corruption of the file can be another case as well.
Conclusive lines!
This will make the file just as it is meant to be by assisting you to fix This is a corrupt or damaged QuickBooks database error withoutharming your data, network, or QuickBooks. If the issue still keeps reiterating, you can contact our 24x7 QuickBooks error support team. Our certified technicians are trained in solving all sorts of QuickBooks-related issues. All you need to do is ring us a call.
This article explains how you can repair your damaged files and network issues with QuickBooks File Doctor:
As a QuickBooks user, encountering company files and network-related problems is a common experience. While these issues can seem daunting, many are surprisingly simple to resolve. This guide introduces a powerful, one-stop solution for these pervasive QuickBooks errors.
Have you guessed it? We're talking about the indispensable QuickBooks File Doctor Tool. This miraculous tool acts as your personal IT expert, designed to diagnose and fix a wide array of company file and network-related issues. It works by first detecting the root cause of the problem and then implementing targeted solutions to get your QuickBooks back on track.
Before we dive into the incredible capabilities of the QuickBooks File Doctor and how it helps resolve various system errors, it's crucial for QuickBooks users to understand the specific types of company file and network errors it addresses. Let's unlock the power of this essential diagnostic tool!
What is QuickBooks File Doctor? A Brief Overview
With this fantastic tool at your disposal, you don't need to bother much about the missing and degraded company files or network issues. QuickBooks File Doctor was developed and evolved to analyze and fix up troubles that prevent the sharp functioning of the software. It is an easy file repairing tool that enables you to repair the kind of important company files, data, and other data conspiracy, windows trouble, network issues, and several others problems.
A wide range of issues that appear at the time of opening a company file, entirely busted firm files, network issues such as Error H101, H202, H303, H505, and error code -6000 (-6000, -82, -6000, -305, -6147. This tool was included in 2014 R5 and later versions. The tool can also be downloaded, installed, and run to remove the network and data problems.
Know how to use the QuickBooks file doctor tool
Now, let us move on further and get to know the ways in which the QB users can utilize the File Doctor tool to solve all the errors arising:
Following are the steps to fix all the issues that arise:
Step 1: First of all, the user needs to download and install the QuickBooks Tool hub
To do this, the user must first begin with shutting down the QuickBooks software.
Thirdly, the user must then save the default location of the file. The default file location is Downloads. (Note: The user may also choose the default file location as they wish to.)
Next, in the succeeding step, when the download of the QuickBooks Tool hub program gets complete, the user must then navigate to File Explorer.
After that, the next destination of the user is the Downloads folder.
Next, the user needs to locate the file which has been downloaded.
The user, after that, has to double-click on the file to start the installation.
After the process of installation gets completed, the user must then navigate to the Windows Desktop.
At last, the user has to double-click on the QuickBooks Tool Hub icon to open it.
Step 2: Next, the user has to run Quick Fix My File
At the fore most, the user has to access the Tool Hub.
In the next step, from the options that appear on the screen, the user has to select the Company File Issues option.
Next, the user needs to further proceed and click on the Quick Fix my File that is present on the company file Issues drop-down menu.
After that, all that the user needs to do is to click on OK button to run the Quick Fix my File tool.
At last, when the process of the Quick Fix my File tool gets completed, the user then requires to open or access the QuickBooks application on the computer system.
Step 3: Lastly, the user must run the QuickBooks File Doctor Tool
At the first step, navigate into the QuickBooks Tool Hub program.
After that, from the options which are available, the user must select the option which says Company File issues.
Next, the user must choose the Run QuickBooks File Doctor tool option in order to set the tool in pace for efficient functioning.
This process opens up the tool on the system screen.
Next, the user needs to choose the company file from the drop-down menu that appears on the screen. This is the one causing numerous issues in the QuickBooks account of the user.
In case, if the file is not visible in the drop-down menu that opens up on the screen, the user must then click on the Browse option.
Next, the user need to search the options in order to locate the file.
After that, the user needs to select the file to open up the QuickBooks File Doctor tool.
In the succeeding step, the user has to opt for the Check your File option on the computer screen.
Then, hit a click on the Continue.
(Note: It is mandatory for the user to mention the password of the admin of QuickBooks.)
The user, next, has to click on the Next button. This will process and scan the file. (Note: This process of scanning the file entirely depends on the data consisted in the file.)
Upon the completion of the file, the indication happens to appear that the process of scanning is complete and it has attempted fixing the issues that have been arising.)
At last, to ensure smooth error-free functioning of QuickBooks, the user must try reopening QuickBooks all over again as well as the company file to cross-check for errors and dysfunctions.
Steps to Use Built-in Version of QuickBooks File Doctor tool
This holistic and robust built-in spots errors and starts fixing them automatically. Click "Start" when a QBFD window opens and let the tool work to fix the issues. The rest of the selections will be similar to stand-alone File Doctor instructions.
At first, the user need to open QuickBooks (without opening the damaged company file).
After that open the File menu and hit on Utilities option.
Moving ahead, hit a click on Repair File and then Network Problems to launch QBFD.
Now Hit a click Browse and find the company file that requires a diagnosis.
Also, hot a click on Repair and then choose the Open option.
In the next step select the type of fix you want your file to undergo from the Show Advanced Settings drop-down.
After that click on the Next option.
Enter the Admin ID and password for the company file and select Next option.
Actions to perform after the tool completes repair and diagnosis:
Once the tool finishes diagnosis, you need to close File Doctor tool.
As per the screen instructions, try to open your QuickBooks file again to verify that the issue has been resolved.
Limits of using the Tool
The requirement of QuickBooks Company File size is smaller than 2GB.
A strong internet connection is necessary to download and upload the file.
Log-in/Sign-up as an Admin.
Network connectivity analysis and restoration options don't precisely function if you've various QuickBooks versions placed on a sole desktop or computer.
How User-Friendly is the QuickBooks File Doctor Tool?
QuickBooks file doctor has evolved QuickBooks built-in device for QuickBooks Desktop 2016 and later. This tool functions nicely with every QuickBooks desktop for Windows version. This is not usable with any other version of QuickBooks for MAC.
When to use QuickBooks file doctor tool?
QBFD tool comes in handy in solving many of the common accounting issues. In fact, we recommend you to run QBFD as the first solution whenever you receive any issue with your QuickBooks accounting software. Use it whenever you receive any issue when opening a company file, have completely damaged company files, network errors. The errors that can be fixed with the help of this tool are as follows.
The list:
Here’s a list of errors caused by hindrances related to company files and network server:
This tool can be genuinely excellent in resolving network issues.
It makes resolving the QuickBooks error -6000 series extremely simple.
An additional advantage of this tool is that it enables you to repair complicated errors such as H101 to H505.
In that matter the client has failed to get some significant database, then the file doctor tool can assist them in resolving the problem.
If you attempt to get the company file in one network system stored in another system, then the File Doctor tool can function in such circumstances.
In case when the files and data get damaged, the file doctor tool can be a savior.
Important Facts about QuickBooks File Doctor
Always uninstall the existing QBFD tool before downloading the latest version of File Doctor.
All QuickBooks versions post 2015 come equipped with QB File Doctor and it’s advisable to install and run an external file doctor tool to fix complicated QuickBooks errors.
The tool has no compatibility issue with any Windows Versions of QuickBooks Desktop.
File doctor tool doesn’t work with QuickBooks for MAC.
This tool may pop up itself in case of a few errors. All you are required to do in those cases is to click the start button and let it finish its work. You can open and run QBFD by following the below-mentioned tips if it doesn’t show up automatically.
Significant things to know about the QB file doctor tool
Here are some significant aspects of remembering about the QB File Doctor tool.
Just before downloading the new version, you must uninstall the QuickBooks File Doctor tool from old version.
It's instructed to utilize an external file doctor tool. However, all QuickBooks new versions post 2015 appear with an inbuilt File Doctor.
This comprehensive tool is friendly with every QuickBooks desktop for Windows versions.
The tool does not function with QuickBooks for MAC.
Here are two categories of the File Doctor tool:
QuickBooks File Doctor tool has two types:
Built-in file doctor, which is available in all QuickBooks 2016 and later versions.
QuickBooks File Doctor stand-alone version, which can be easily downloaded from the internet.
The File Doctor tool possibly comes on its own in matters of some omissions. You need to press the Start button and enable the device to perform its task.
Conclusion
The errors related to company files and network services are considered to be common technical glitch occurring in the QuickBooks application. But, there’s no need to worry. Every problem has a solution. So, just like any other QuickBooks error, the issue mentioned above is also quite easy to solve.
We, as a team of professionals are there for help to every user. Feel free to reach us at 1-888-368-8874 for immediate QuickBooks error support assistance. We are there for your service 24*7 at your convenience. Accounting related issues are nothing when we are there to help you out at each step. Still feeling stuck? We, along with our team of professionals are just one call away to help you out from every difficulty.
What are the system requirements that needs to be fulfilled in order to download & install the QuickBooks File Doctor tool for proper usage?
There are some of the system requirements which are essential in order to download, install and run the File Doctor Tool: 1) The user must ensure that they login as System Administrator in the Windows system. 2) Other tool used for fixing errors or technical glitches must be uninstalled first for proper functioning of the QuickBooks File Doctor Tool. 3) The user must ensure the installation of the .NET system of the work network. 4) The user must crosscheck if the QuickBooks hosting is turned on or not.
What are the Causes of QuickBooks Error H303?
1) Collapsed/Damaged/incorrect .ND folders. 2) Inaccurate functioning of the system network. 3) Inappropriate hosting configuration. 4) Restricted communication due to authentication of Firewall. 5) Inaccessible company folders. 6) Due to computer network issue, disallowed file transfer within the system. 7) Failed initiation of components like QuickBooks Database Server Manager Services or QBFC Monitor.