Learn the Possible ways to resolve QuickBooks error code 1935:
QuickBooks is an comprehensive software for small to mid-sized businesses, offering the most amazing features and functionalities that streamline accounting and financial management. Despite its advanced design, users may occasionally encounter technical issues, such as QuickBooks Error Code 1935.
This error can disrupt your workflow and prevent crucial installations or updates. Understanding its causes and effective solutions is key to maintaining seamless business operations.
In this guide, we'll dive deep into the reasons behind QuickBooks Error 1935 and provide you with clear, actionable steps to resolve it. If you need further assistance or have lingering questions, our dedicated customer support team is always ready to help clear up any confusion.
What is QuickBooks Error Code 1935 & Why Does it Occur?
QuickBooks Error code 1935 takes place when your system is installed and turned off while running a program. The major reason behind this error is that Microsoft component, .NET Framework, is missing or not working. While trying to install the QuickBooks desktop or Microsoft .NET Framework on Windows, you may see one of the following error messages on your computer screen:
Error 1935: This setup requires .NET Framework
Error 1935: An error occurred during the installation of assembly
Solutions to Resolve the QuickBooks Error Code 1935
There can be a list of solutions that can work in order to get rid of QuickBooks Error 1935, out of which a few are listed below along with the steps to be followed in each of the procedures:
Solution 1: Download and Install QuickBooks Install Diagnostic tool
The first thing is to “Restart” your computer.
Next step is to log in to the system as “Administrator”.
Then connect the system to an internet connection.
Now double-tap on the “QBInstall_Tool_v2.exe” file and then close all the open programs which are running in the system’s backend.
Once the system’s diagnostic has completed, then all you need to do is “Reboot” your computer system.
The final step is to “Install” your QuickBooks software.
Solution 2: Repair or Reinstall Microsoft .NET Framework
In this method, the very first step is to access the “Run” window and then tap on the “Windows + R” keys on the keyboard.
Fill in “Control Panel” and hit the “OK” option.
Next step is to tap on the “Uninstall” option.
Now tap on “Turn Windows feature ON or OFF.”
After that, turn on .NET Framework 4.5 if not enabled. Also, close the Windows feature window and then reboot the computer. Now, press "OK" to repair the .NET Framework simply by unchecking the box and also rebooting the computer. Re-enable .NET Framework if already enabled, and reboot.
In this step also, you have to check ".NET Framework 3.5", by simply clicking the box.
Finally, opt for "OK" if not enabled, and then reboot the computer. Also, repair the .NET Framework just by clearing out the box and rebooting the computer.
Solution 3: Install the Latest Windows Updates
In this method, visit the “Start” button.
After that, type in “Update” and then hit “Enter”.
After this step, the Windows update dialogue box will appear.
Hit the “Install Updates” button if any updates are available.
Solution 4: Disable your Antivirus and Install QuickBooks
In this method, the first step is to restart the computer that has QuickBooks install error 1935 and then perform the installation process.
Make sure to stop the anti-virus program.
Install QuickBooks and .NET framework, in case if not present already.
When the QB and .NET Framework are successfully installed, restart the antivirus program.
Solution 5: Manually Repair the Microsoft .NET framework
First step in this method is to refresh the Microsoft .NET framework.
Tap the Windows + R keys and type 'msconfig', followed by hitting the enter tab.
Choose the normal startup in the general tab. Hit on OK.
Conclude the process by rebooting the PC.
What are the Symptoms Indicating QuickBooks Error 1935?
When it comes to the various signs indicating the onset of the Error code 1935, they can be diverse. A few of the most common factors are listed below:
The very first symptom is that the computer periodically freezes for a few seconds.
QuickBooks encounters a problem, and a message stating, “We apologize for the inconvenience” appears on the screen.
Error 1935: This setup requires .NET Framework to appear every time.
In your system the .NET Framework component is not installed, is damaged, or a third-party program is preventing the QuickBooks desktop installation.
Windows runs sluggishly and also responds slowly to keyboard as well as mouse input.
Corrupted system file entries, or there are few damaged Windows System Files.
Factors Leading to the QuickBooks Error 1935
You might wonder why this error actually happened. Thus, to answer your question, we have come up with some of the most common reasons. There can be numerous causes of QuickBooks Error code 1935; out of the huge list, we have enumerated below some of the most common factors.
The very first factor that may lead to this kind of error is when the Microsoft .NET Framework is not installed.
An outdated Microsoft .NET Framework.
Even the corrupted Microsoft .NET Framework software may end up causing such an error.
Incomplete installation of QuickBooks is another commonly encountered cause.
Also, this error can be detected when the QuickBooks Software that you downloaded is corrupted.
When some other program accidentally deletes QB files.
Even in the case of a virus or any technical infection affecting the Windows or any other software files.
These were a few of the factors that may end up in this kind of error. Let us now find out the solutions to tackle this error.
Wrapping up! Facing trouble? We are always there to assist!
We have discussed the effective and easy ways to flee away from the QuickBooks error code 1935 in the best possible way. Hopefully, the above-suggested solutions will definitely rectify the error for you. However, in case you are unable to resolve the error, simply get in touch with our QuickBooks enterprise customer support team.
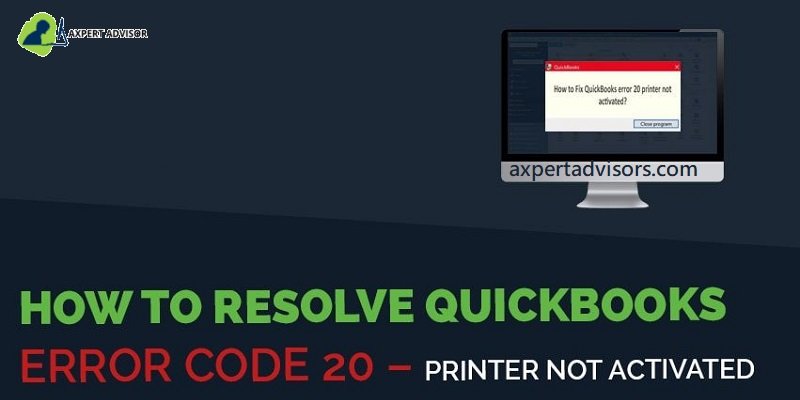
Learn how to fix QuickBooks error 20 while printer activation:
Are you encountering the frustrating QuickBooks "Printer not activated error 20"? This common issue often arises when there's a mismatch between your QuickBooks version and your operating system, or due to outdated software components.
This comprehensive guide will walk you through the solution of QuickBooks printing problems, specifically addressing QuickBooks Error Code 20. We'll delve into the technical compatibility issues that frequently cause this error, such as running older QuickBooks versions (e.g., QuickBooks 2009) on modern operating systems like Windows 10, where automatic updates may no longer be functioning optimally.
While Windows 10 receives frequent updates, QuickBooks' self-updating mechanism for older versions. This disparity can lead to the "Printer not activated error 20."
Reading this blog post till the end, will help you to learn the simple procedures to get rid of this QuickBooks printer not activated error 20. However, for further details, you can reach out to our tech professionals using our support line. Our team of certified professionals will help you to fix the bug in no time.
Solutions to Fix Printer Not activated (Error Code -20) in QuickBooks Desktop
First of all, you need to ensure that you do have the administration access in your desktop, otherwise, the solutions explained below will not be able to fix the QuickBooks printer not activated error 20.
1st Solution: Create a Registry Backup and System Restore Point
Go to the Search tab and type 'Regedit' and right-click it to hit the option Run as Administrator.
After that go the Computer section, click the file, and save it.
Now to create a System Restore Point in your Desktop (These steps majorly work for Windows 7, 8, 10 and the other versions of the latest windows.)
Once done with that, hit a right-click on This PC icon on your desktop window screen and then select Properties.
You now have to opt for System Protection from the left pane on the screen of the Properties popped-up window.
In the next step just choose the System Protection divider on the new pop up window and you will then see the option to Create new restore points. Then click on it.
Type in the Description of the desired restore point and again click Create. It will take merely a minute or two, depending upon the network connection and the processing speed of your operating system.
2nd Solution: Use Configuration of User Permission
Follow the same procedure as earlier, and find Regedit on the search option on your Windows PC.
After opening it with the Run as Administrator option, double-click on the HKEY_CURRENT_CONFIG folder on the left side window pane under the drop-down menu of the computer section.
Now, right-click on the Software folder to find the Permissions option to choose from the given menu.
When the window pops up, allot “Full Control” to the “Users” if in case it’s not already assigned and after doing so, simply click OK to move ahead.
3rd Solution: Check the QuickBooks PDF Capabilities with QBprint.qbp File & Repair It
Search the Control Panel from the Windows search and go to Programs and Features under it.
Scroll down the list of the programs installed on your desktop and find QuickBooks.
Right-click it to select Change option and initiate the repairing only to follow the lead by the given set of instruction to the end.
After the QuickBooks Repair, restart the computer device. Let the updates take place at a faster speed.
Now, try printing a document or save it as a PDF from the QuickBooks software you have installed or have been using till now. This probably will solve the notorious QuickBooks printer not activated error code 20 that hampers seamless printing of your important documents on time.
4th Solution: Check and Configure Print Spooler Service
Hit the Windows + R keys at the same time and type MSC in the window that pops up named Run Box.
Try the right-click option on the Print Spooler Service from the list of services shown to select the option of Properties later on.
Click on the Stop button to stop the Print Spooler Service.
Wait a few seconds and then pick the Start button to initiate the services again.
Close all the window pop-ups now and try printing a document or saving a PDF to print directly from the QuickBooks. Hopefully, QuickBooks Error Code 20 resolved.
5th Solution: Update Your Windows or/and Install QuickBooks Once Again
First of all, keep a note of your QuickBooks license and product number before carrying the steps mentioned below.
Go to the Control Panel and hit on the Programs and Features option.
Scroll down the list of the programs installed that you see and find QuickBooks amongst them.
Tap on Uninstall QuickBooks
Follow the remaining instructions while the uninstalling procedure runs.
Now, you have to download and install the windows updates, after which you will need to restart the computer.
After all that is done, insert the CD in the system or find the already installed extension file of the QuickBooks software to initiate the installation of QuickBooks again.
Follow any steps mentioned. You would need to follow these steps while you are re-installing the QuickBooks software. Also, keep in mind it will take a few minutes. So avoid running any other applications in the background.
Finally, when you should be able to print the necessary files after your software has been reinstalled as it resolves many errors automatically with the re-installation.
6th Solution: Checking the Microsoft Document Writer (Windows Pre-Installed Component)
Microsoft Document Writer facilitates Windows capabilities to support QuickBooks in saving information in any format like PDF. However, if this window component is not found, you will face trouble like QuickBooks Error Code 20 when you want to print a document from the QuickBooks software installed on your desktop. Here’s how you ensure you don’t face that problem:
Find the QuickBooks icon on your main window screen and right-click it to choose Open File Location.
Get to the Temp folder and look out for the folder matching the version of your current QuickBooks software.
Browse the cursor along that folder to further open the Third-Party folder inside.
Find the Exe file, double click it for installation.
Now, head back after the installation is done. Go to the main QuickBooks software and open it to register the license.
Though, if any case, the installation stops in the middle, you can start it again, there’s no issue with that.
Once everything said is done, try printing your desired documents from QuickBooks itself. You wouldn’t be facing the QuickBooks Error Code 20 anymore.
Solution 7: Fix Microsoft Document Writer
First of all, right-click the QuickBooks icon and then opt for Properties.
Hit on the Find Target option.
The next step is to double click the Install Application, or exe, to install the PDF converter.
Now, hit ok after the installation process finishes.
Moving ahead, tap on the Windows Start button and then choose Run or search.
Then, enter the Control Printers, pick the printers window, and hit OK.
Next step in the process is to right-click the Amyuni Document Converter and hit on print properties if you are a windows 7 user. Or Windows XP users can tap on the Amyuni Document converter and then hit on Rename.
The last step in the process is to depend on the QuickBooks version and release installed, followed by entering the correct name and hitting Enter.
8th Solution: Allow the Usage of Powershell Script
You need to update the registry key editor manually by offering authority to use the PowerShell script.
Tap on the start tab and type in cmd.
Choose the run as admin tab and hit on cmd.
Type in PowerShell in the command prompt and hit enter tab.
Ascertain to copy and paste the code in the command prompt.
The printer device itself isn’t working to support the QuickBooks printing system.
Issues, grown from the QuickBooks Windows Registry.
Your Application Key needs to be the latest and updated, which it’s not.
Winding up!
This article is created after consulting certified experts to help you troubleshoot the QuickBooks Printer not activated error 20. If in a rare case, none of the solution tasks mentioned above work, you must contact a professional for assistance. Our QuickBooks 24/7 error support experts boast years of experience and cutting-edge tools and technology in fixing a wide range of QuickBooks-related issues. You can contact us and expect quick and precise solutions for your accounting-related issues.
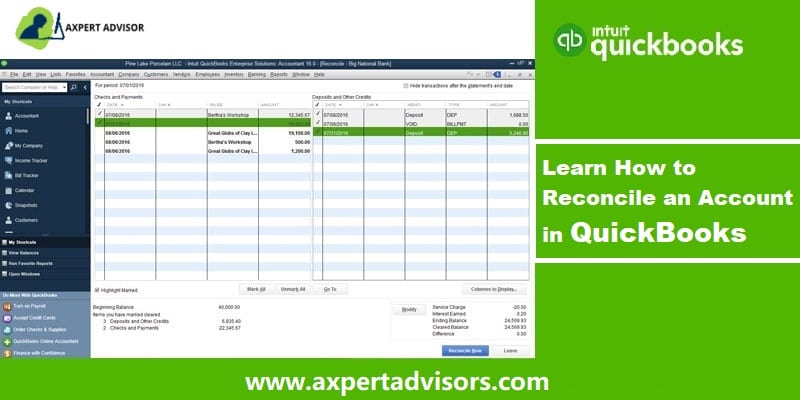
Steps to Learn How to Reconcile Accounts in QuickBooks desktop or online:
Ensuring your financial records are precise is crucial for any business. Just like balancing a physical checkbook, reconciling accounts in QuickBooks is an essential process to verify that your internal records perfectly match your bank and credit card statements. This vital procedure helps identify discrepancies, prevent errors, and maintain accurate financial reporting.
This comprehensive guide will walk you through the entire process to reconcile accounts in QuickBooks, making it easy to understand and implement. By following our clear, step-by-step instructions, you'll gain confidence in your financial data, ensuring everything aligns perfectly. Read on to master account reconciliation and keep your QuickBooks records pristine.
Convenient Steps to Reconcile Your Accounts in QuickBooks
Here is a complete guide that you can follow in order to reconcile the bank statement with office records:
Make sure that the bank statement has been collected from the bank account.
Fill the correct amount balance of both bank and credit card in QuickBooks for the opening of the accounts.
File all the transactional details from your end of the records.
Reconciling accounts can be intimidating. This video will help make the task more reasonable.
Steps to Reconcile an Account in QuickBooks Online
Move to the navigation bar.
And then, opt for Accounting.
Opt for Reconcile option.
Now, you will see a window with the question- which account do you want to reconcile?
Choose the checking account from the drop down menu, and then reconcile each of the connected bank and credit card accounts one at a time.
After that, enter the values for ending balance and ending date from the bank statement in box on the screen.
And then, look at the QB account line by line.
Next step is to match individual items amount to the corresponding entries in the bank statement.
Match the aggregate totals to the corresponding entries in the bank statement.
Once done with that, carry out this process.
$0 should be the difference between the bank statement and the QB account.
The final step is to hit on the finish now button.
Why is Bank Reconciliation Important?
At the end of every month, the bank shares the monthly statement of affairs. These include all the transactions that have been done by the company with respect to their bank account. Now, as we all know, preparing the book of accounts is a mandatory factor that every enterprise has to follow. But, in order to make sure that all the factors that are being included in the books are correct, it becomes quintessential to match the transaction in the books related to bank with the original Bank statement.
In simple terms, the meaning of reconciliation is to fix issues in the books of accounts as per the bank statement. This helps the accountant to make sure that all the transactions are done correctly. Also, if any values are transacted in a wrong manner, reconciliation will help us to identify that factor entirely.
How QuickBooks Reconciliation can Help you?
QuickBooks Bank Reconciliation is a great methods for those who have to deal with a great number of transactions. Thus, it is perfect for every business enterprise. As we mentioned earlier, the Reconciliation process is recommended to be performed every month in order to save ourselves from getting error reports in a bulk. So, the two major aspects where Bank Reconciliation can offer its aid and speed up the process are:
Timely updates regarding any sort of fraudulent transactions.
Easy and precise report of transactions that went wrong and are resolved in the swiftest manner.
Also, when you are using software to do this activity, you can even perform reconciliation every day as not only it will save you from any sort of delayed notification regarding fraud.
How Timely Bank Reconciliation Save you Time and Money?
Daily Bank reconciliation can offer a lot of benefits. It saves our time and money which are the two most important factors for a businessman and an organization as a whole. With daily reviews, the sanity of the accounts and financial books are maintained and it also helps us to easily recognize any and every problem before it can become a major issue. So, these are the factors that timely bank reconciliation can save you from:
Frauds:
One of the major issues that a company might get themselves into is the element of fraud. For a business where big and continuous transactions are happening, any corrupt person can perform small transactions and this can affect the entire accounting aspect of the organization. But, with QuickBooks Bank Reconciliation, it can save you from frauds keeping a check as per the anti-fraud guidelines which are:
Whether the transactions are performed without authorization?
Is there any sort of tampering with the original records in the financial books of accounts?
Who has to perform unapproved transactions from accounts of the company?
Errors by-Mistake:
Unlike fraud, there are times when people make a mistake in the transactions. It is quite a common factor and this is why it requires machine level precision to find out errors which QuickBooks Bank Reconciliation software can easily perform. So, here are some of the factors to be taken into consideration:
Complete analysis and information regarding the funds that are available in the bank account.
Early notification regarding the depletion of funds so that the bank fee charges can be prevented.
Saving transactions from bouncing and ultimately saving the penalty.
Precise tracking of Outstanding checks.
Quick reviews and easily catching transactional errors.
All the information regarding the payments made by the customers and timely reminder for any actions that are required.
Wrapping up!
Once all of this information is included in the software, it will perform the reconciliation and all the errors and unapproved transactions will be reported to you automatically. Also, we hope that you find this article helpful. However, if you have any query or you require ant kind of assistance, you can call our QuickBooks desktop support team.
Easy steps to find your company file if you are facing a 'Company File is Missing or cannot be Found' issue:
Are you struggling to locate your company file in QuickBooks Desktop, encountering the frustrating message, "The company file you selected could not be found"? This common issue can disrupt your workflow, but it's often resolvable. This comprehensive guide is designed to help you pinpoint the root cause of this QuickBooks error and provide effective solutions. We'll explore why your company file might become inaccessible, including scenarios where the company file has been moved or renamed, your system has been disconnected from the file's path, or the QuickBooks file has been accidentally deleted. By the end of this post, you'll have a clear understanding of this technical hindrance and the appropriate measures to uproot this troublesome error. For any additional support, don't hesitate to contact our QuickBooks support team, well-versed in resolving QuickBooks-associated technical error codes.
Solutions steps to fix unable to find company file in QuickBooks issue
To fix the QuickBooks company file not found error, you can perform the below methods one by one.
Case 1: If you are accessing the QuickBooks file saved locally on the same system
1st Process: Look for all the company files
You might have to head to the server system and then perform a search for all company files by typing one of the following into the search bar. Also, necessarily include the Asterisk sign before the extension to ensure the search works correctly. The file extensions are listed as follows:
*.qbw (Working files)
*.qbb (Back up files)
*.qba (Accountants Copy Files)
*.qbx (Accountant Transfer Files)
*.qby (Accountant changes files)
2nd Process: Opening the file in QuickBooks
1st Step: Herein, you would have to open the company file or an accountant’s copy
From the file menu, choose open or restore company.
You are then required to choose open a company file and hit the next tab.
Pick the company file.
And choose the open tab.
2nd Step: You are then required to restore the backup of .qbb file extension
You would have to opt for open or restore company from the file menu.
Choose the option that pertains to restore a backup file and hit the next tab.
You then need to choose the local backup.
And opt for the company file and hit next.
You would have to opt for the location where the restored file is to be saved.
3rd Step: Restore an accountants copy transfer file
You would then have to hit on open or restore a company from the file menu.
Choose the convert and accountant’s copy transfer file and hit next.
After that, tap on the next tab, if what the accountant’s copy can and can’t do window is displayed.
Finally, choose the transfer file and open it.
Case 2: If you are not accessing QuickBooks file over the network
1st Process: Verify network connectivity
You need to first identify the name of the server system
Tap on the win + R keys tab, which will access the run dialog box.
Type in CMD and click on enter in order to open the command prompt window.
The next step involves typing in the command 'ipconfig/all' and then hitting on the enter key.
Note the server names.
Type in ping and then the name of the server in the next window, and then push the enter key.
See a reply corresponding to each pocket.
If you get any packet loss, it indicates that there are some issues with the network connection. You should use QuickBooks file doctor to remove the issue.
2nd Process: Choose the right way to open the file in QuickBooks
You are required to open the company file correctly, irrespective of the type of QuickBooks you use. You can use the steps below:
1st Step: Opening a backup file
At first, you need to head to the file menu and tap on open or restore company.
Choose the option to restore a backup file and hit next.
Look for the QuickBooks backup file and the qbb extension.
Choose the company file and click on the Next tab to open the backup file.
2nd Step: Opening the company file
You need to hit on the open or restore company from the file tab.
And then tap on open a company file and tap on next.
Browse the company file by adding .qbw extension and pick the open option.
3rd Step: Open the accountant's copy transfer file
You will have to visit the file tab and choose the option open or restore a company.
Select the option to convert an accountant’s copy transfer file and tap on the next tab.
Hit the next tab on the what the accountant’s copy can and can’t do window.
Choose the particular file having a .qbx extension and then tap on the open tab.
Once done, save the file on the system by hitting the save tab.
3rd Process: Finding the QuickBooks company file
Under this process, you need to use the windows feature to look for the file type.
Tap on the windows start tab and type the extension of the company file along with an asterisk sign in the search programs and files search box.
Once you have found the file, right-click on it and choose the open file location tab.
If the option is not available directly after right-clicking, then the same can be accessed in Properties.
Lastly, open the file from the right location to remove the error message QuickBooks file is missing.
What is inferred by the QuickBooks company file?
Company file contains all the valuable financial data stored and is accessed by users while working on the QuickBooks accounting application. A typical company file can be easily recognized from the .QBW file extension. It is a single file and isn’t decomposed into multiple files; however, it can quite easily be opened, copied, or moved to convenient locations. This file can also be imported from one version of QuickBooks to another. However, you might face specific errors like the one that doesn't allow users to find their company files.
What triggers QuickBooks company file not found error?
The error that states QuickBooks company file not foundcan be triggered due to a handful of factors, which include the following:
Just in case a QuickBooks company file is moved to a new location.
Another reason can be if you try to open a QuickBooks company file using the incorrect option.
You might face a similar issue in case of accidental deletion of QuickBooks company file locally or on the server.
If the QB company file isn’t found in multi-user mode due to unstable network connectivity.
Summarizing!
After defining the characteristics of QuickBooks company files, this article thoroughly overviewed the triggers that prevent users from finding their company files. Afterward, an elaborate section contained the effective troubleshooting processes corresponding to specific cases.
That was all you need to know about resolving QuickBooks company file not found issue. As always, if you need assistance with any queries, have any QuickBooks-linked concerns, or are still unable to find the company file in QuickBooks, feel free to contact our 24/7 QuickBooks error support team at the helpline at 1-888-368-8874. Our team is readily available to help you around the clock. We are here to ensure that our clients have 24/7 access to QuickBooks without facing technical impediments while working with this accounting software.
Get to know how to rectify the QuickBooks update error 1603 at the time of installation or updating HTML
Encountering QuickBooks Error Code 1603 while installing or reinstalling QuickBooks Desktop can be frustrating, preventing you from accessing crucial accounting features and potentially leading to missed transactions or financial reporting issues. But don't worry, you've come to the right place!
This guide will equip you with the "secrets" to effectively tackle this common installation error like a pro. By following our straightforward steps, you'll be able to successfully resolve Error 1603 and gain full access to your QuickBooks software. Let's get you back on track to managing your finances seamlessly!
What is QuickBooks error code 1603? A brief insight
QuickBooks Error 1603 usually occurs while updating or installing QuickBooks software. This error message indicates that there was a problem installing Microsoft .NET Framework or other updates required by QuickBooks. When this error occurs, you may see an error message that says "Error 1603: The update installer has encountered an internal error."
This error message can appear during the installation of QuickBooks software or when you are trying to update it to the latest version. The message usually indicates that there was a problem installing Microsoft .NET Framework or other updates required by QuickBooks. This error code is usually seen with a warning message that states:
Message
Description
Error Status 1603:
The update installer has encountered an internal error.
Error Status 1603:
Unable to apply the patch.
MSI returned 1603:
Fatal error during installation.
Install Error 1603:
There was a problem installing Microsoft .NET Framework.
Procedures to Tackle Out QuickBooks Error 1603 (Installation/Updating Html Error)
If you wish to tackle the error, then you can try the following solutions:
1st Procedure: Making use of selective startup to install QuickBooks desktop
Prepare the data and create a backup of the company file and keep a copy of the QuickBooks desktop products and license info.
Hit on the Windows + R keys to open the run tab.
Type in 'MSConfig' and hit the ok tab.
Choose the selective startup and load system services in the general tab.
Herein, you are required to install the install diagnostic tool. This will help you in fixing problems associated with the .net framework, msxml, c++.
Log in to the system from the admin account.
Search and open the QB install diagnostic tool.
Hit the install diagnostic tool option.
Now download and save the file.
Close all background applications.
Choose the QBInstall_tool_v2.exe file and click on Run tab.
Run the complete scan option.
5th Procedure: Repairing MSXML 4.0
1st Case: QuickBooks installation process using CD
Under this, you would have to insert the QuickBooks .CD, in case the installation windows pop up, then make sure to shut it down.
Further, install MSXML in the OS by paying heed to the instruction,
2nd Case: For Windows 7 or Vista
If you are using windows 7, then hit on Windows or start tab
And in the search bar, type in ''exe /fvaum ‘D:\QBOOKS\msxml.msi''
Hit the enter tab
In case the CD force the ''msiexec.exe/fvaum ‘D:\QBOOKS\msxml.msi'' in the search dialog box, then hit enter tab.
3rd Case: For Windows XP
Herein, you need to tap on the run tab in the windows tab.
Now, in the search bar, type in ''msiexec.exe/fvaum ‘D:\QBOOKS\msxml.msi'' and hit the ok tab.
6th Procedure: Restart windows installer service
Initially, head to the control panel.
Furthermore, choose the system and security option.
Choose the admin tool and double-click on the services tab.
In the services tab, find the Window installer option.
Disable and Start the service to restart the windows installer service.
7th Procedure: Reinstall the Microsoft .NET Framework
Click the "Control Panel" link in the Start menu.
After that, select "Programs and Features."
On your screen, a list of the software is displayed.
From the list of program, look for ".NET Framework 3.5.1 or 4.5".
To uninstall or change it, right-click on it and choose that option.
Now hit a click on "Uninstall."
Comply with the instructions in the "Uninstall wizard" that appears on screen.
Restart your computer after the un-installation is finished.
8th Procedure: Install QuickBooks using a clean install
If you are experiencing issues with your QuickBooks installation or update, you can try to perform a clean install of QuickBooks. Here are the steps to install QuickBooks using a clean install:
Note: Before proceeding with a clean install, make sure you have your QuickBooks product and license information available.
Go to the Windows Start menu, and then select Control Panel > Programs and Features. Select QuickBooks from the list of installed programs, and then select Uninstall.
Rename the folders that contain your QuickBooks installation files. The default locations for these folders are C:\Program Files\Intuit\QuickBooks (year) and C:\Program Files\Common Files\Intuit\QuickBooks. You can add the word "old" to the end of these folder names.
Download the QuickBooks Clean Install Tool from the official QuickBooks website. Once downloaded, run the tool and follow the prompts to complete the process.
After the clean install tool has completed, reinstall QuickBooks Desktop using your product and license information.
After reinstalling QuickBooks, open the software and check for any available updates. If updates are available, download and install them.
Factors triggering the QuickBooks error code 1603
It is a common installation error that can occur when installing or updating QuickBooks software. This error can occur due to various reasons, some of which include:
There is any kind of virus or malware attack.
In case of incomplete or corrupted QuickBooks installation or download.
If in case there is Windows Installer issue
Furthermore, if the windows registries are corrupted in the recent QuickBooks update.
If the QB-related files got deleted for some reason.
Incorrect Antivirus or firewall settings
If the Microsoft .NET Framework is corrupted, it can cause issues during the QB installation process, leading to such issue.
Certain third-party software installed on your computer can conflict with QuickBooks installation.
Signs and symptoms of QuickBooks error code 1603
It is always better to identify the error, so as to apply the relevant solution steps. Let us check out the signs and symptoms of the QuickBooks installer error 1603:
If there is a file locked in the QuickBooks setup.
Another reason can be if you are making use of the old QuickBooks version.
Uninstalling Microsoft net 1.1 SP1 installer can be another valid sign.
You can also identify the error if you have insufficient permissions that restrict the installation.
There might be corrupted QuickBooks files, which can be another sign to spot the error.
Documents/files may be protected.
Overpacked Windows temp folders can be another sign of the same.
Final Words...!
That was all you needed to know aboutfixing QuickBooks error code 1603. In case of any concerns, please connect with us! We work round the clock to provide the best possible support services to our users across the globe. Feel free to call us at 1-888-368-8874 anytime, and our QuickBooks error support experts will there to assist you.
Learn how to Troubleshoot PDF and Printing problems with QuickBooks Desktop
Are you experiencing frustrating printing issues while working with QuickBooks Desktop? You're not alone. Problems like missing or corrupted components, or even issues with your printer or computer system, can disrupt your ability to print essential financial documents.
This comprehensive guide will walk you through the most convenient ways to get rid of these QuickBooks printing errors. While every printer is different, we've compiled a thorough set of troubleshooting steps designed to help you diagnose and fix QuickBooks Desktop printing errors.
By carefully following the guidelines outlined in this article, you'll be able to effectively resolve these interruptions and get back to seamless financial management. If you prefer expert assistance or are unsure about implementing the steps manually, our dedicated professionals are just a call away to provide the support you need.
Solutions to be performed for resolving printing issues in QuickBooks Desktop
You can perform the below troubleshooting methods to successfully fix the QuickBooks printing issues:
Measure 1: Tackling printer issues
Users may face a variety of printer-related issues, which include paper jams, out-to-date printer drivers, printer showing offline status, including several other causes. These can be kept in check by following the directions given below.
Initially shut down the system and also the printer.
Ascertain that you have paper correctly placed in the tray.
Check if there is no paper jam.
Checking the interface cables is also recommended.
Turn on the system and printer.
You now have to confirm that your printer is online.
This can be done by right-clicking the printer.
Print a Windows test page; if it turns out to be proper, then there is no issue with the printer and the system.
On the contrary, if the test page is not printed, then:
You would have to connect the system to a different printer.
Download and install the updated printer driver from the printer maker’s official site.
Try to connect the printer to another system and monitor if it is working properly.
Measure 2: Verify that the Printer is correct one
At the very first step open QuickBooks and choose the File option.
Then click on Print setup.
After that you need to select the form you are trying to print.
Next ensure that your printer’s name match the exact name of the printer what you are trying to use. If not then firstly, you are required to correct the setup within your computer’s Printer Setup.
Towards the end, you need to click on Help option in this area for more detailed instructions on the settings.
Measure 3: Verify the status and network of the printer
You need to find out whether your printer is local or network. This means:
Network: In case the printer is on the network, you need to verify the network setting, and also connect with an IT expert of the printer manufacturer to deal with the issue
Local: Just in case the printer is on local, in that scenario, the issue might be with the system. You simply have to check the connection between the system and the printer. If nothing goes wrong, but the error persists, then in that case you must seek professional assistance.
Monitor the status of the printer
You need to change the status of the printer to only during any error from ON.
Whereas, if the status reads OFF, then reach out to professionals.
Measure 4: Take out a test print of any page in QuickBooks
After following the guidelines listed till now, the user should again opt for printing a test page by adhering to the instructions as under:
The initial step requires turning off the printer and then rebooting the system
Now, turn on the printer and then open up the control panel.
Soon after, double-tap the printer and faxes option
Now, verify the status of the printer (whether it shows offline or online).
Right-click the printer if it is offline
Choose the user printer online then double-click the printer
Now opt for a print job and then choose the printer option
Cancel all documents and close the windows
Right-click the printer
Choose the properties option.
Print test page option
Measure 5: Checking the printer outside QuickBooks
It is recommended to examine the printing status outside QuickBooks. The same can be done by using some random word file editor like Microsoft Word or Notepad, the steps for which are given as under:
First, open up Microsoft Word or notepad.
Soon after, type in any text.
Hover over the file menu and hit on it.
Print on the default printer.
Head to the drop-down menu.
Click on a different one.
There is no issue with the printer driver if it prints the text properly.
Measure 6: Rename the ''qbprint.qbp'' file
Another workable solution against printing issues faced while using QuickBooks is to rename the file QuickBooks print file named qbprint.qbp.
Initially, look for QBPrint.qbp file on the system. The same should be accessible in the QuickBooks folder.
Soon after, manually rename the file.
For Windows 7, 8, 8.1, 10, and 11 the file can be traced by navigating to the following path via File Explorer: C:\ProgramData\Intuit\QuickBooks 2XXX
In case the file is untraceable in the QuickBooks folder, then, in that case, unhide the hidden files and folders.
Head to the QBprint.qbp file, right-click it, and then opt for the option to rename the file.
Since the file has been renamed, QuickBooks won't be able to locate it the next time when you open the accounting application.
Open QuickBooks and then open the company file. A new qbprint.qbp will get created on its own.
Open a transaction that earlier had printing or PDF-related issues and try printing it this time around.
If there is an issue with the company file, then try printing from the QuickBooks sample company file to confirm it.
You can also access the QuickBooks PDF and Print Repair tool from the QuickBooks tool hub program.
Measure 7: Resetting the temp folder permissions
Printing problems may also evoke if the temporary and junk files have over occupies your system space. It, therefore, becomes essential to get these files removed from your computer. Apart from deleting the temp files, make sure to allow full user control for the temporary folder.
By tapping on the Windows key and the Rkey simultaneously, gain access to the run command
Type in %TEMP% and hit the enter key.
Right-click the empty area of the temp folder.
Opt for properties.
Ascertain that user names and groups that are showing on the security tab have full control.
After the permissions have been set to full control, the user needs to make another attempt at printing through QuickBooks.
Confirm whether you are able to print to your XPS
This can be done by launching the notepad.
Enter in test and also choose file.
Hit on print.
Go for the XPS document writer and also hit on print.
Type in a filename and save it to the desktop.
Now, head to the desktop and view the XPS document you printed from the notepad.
Measure 8: Perform a System File Check using ''SFC/scannow'' command.
An out-to-date Microsoft MSXML component may also be a primary contributor to printing problems encountered in QuickBooks.
For Windows 8 users:
Go for the search option
Now, type in 'command.'
Opt for the command prompt and right-click on it.
From the drop-down list, choose the option to run as admin.
If prompted, make sure to provide the correct admin password.
After that, hit on the allow tab to reveal the command prompt window with a black interface.
Type in the command SFC/scannow and then hit the Enter key.
For windows vista and 7 users:
Visit the windows start tab
Opt for all programs and type in accessories.
Now, opt for the command prompt and hit a right-click on it.
Choose the run asadmin option.
Afterward, type in the admin password.
Hit allow tab.
Enter the following command in the command prompt: SFC/Scannow, and later, push the Enter key.
Measure 9: Bypass the print spooler (For terminal services only)
Once you are set the permission for the XPS document writer on the server for terminal services, set the XPS document writer to bypass the print spooler.
The initial step requires you to access the printer's control panel in windows.
Right-click the Microsoft XPS document writer and opt for printer properties or properties.
Choose the advanced tab and opt for print directly to print.
Hit the ok tab to save the changes and close print properties.
Now, check if the various printing problems with Quickbooks got resolved.
Common printing issues in QuickBooks desktop
Here is a list of common printing issues that may be confronted by users whole working in QuickBooks:
QuickBooks not connecting to Microsoft XPS document writer.
QB issues connecting to the printer.
QuickBooks freezes when saving pdf for syncing issues
QuickBooks software doesn’t save the form or reports as a pdf due to damaged components.
QB freezes when printing due to an unresponsive XPS port.
Missing XPS printer driver.
Error 1722 or 1801 was ignored during the installation.
Missing XPS printer driver.
QuickBooks is unable to print to a printer, and QuickBooks print command routes to null.
QuickBooks doesn’t convert pdf file because of XPS writer.
QB doesn’t covert to print due to communication issues
Unrecoverable error when printing from QuickBooks desktop for file readability issues.
QuickBooks pdf converter error 14982 50172.
PDF converter activation error 20 30 in QuickBooks.
Unrecoverable error with the code 15064 06798.
Cannot communicate with the company file.
Missing QuickBooks pdf component needs repair.
QuickBooks unable to complete the printing action due to missing component.
Print host driver problems in QuickBooks.
QuickBooks pdf converter activation error can be a major cause.
What leads to printing issues in QuickBooks Desktop?
Before we perform the various solutions to fix these issues, let’s try to understand the basic factors that can cause this printing problem.
You can end up in such an error if the printer is turned off
Another reason can be if there is no paper on the paper tray
You can experience a similar issue if there is difficulty in communicating with the company file
The components are missing in the pdf file
Or the XPS printer driver is missing or corrupted
You can also end up in such an error if the QuickBooks pdf converter installation is incomplete
Experiencing such an error is also common if the printer is not installed in a proper manner.
Wrapping-up! Still facing printing issues in QuickBooks? Reach out to our professionals
Were you successfully able to fix printing problems with Quickbooks after following the guidelines provided herein? This article elaborately described the various measures to troubleshoot various printing problems with QuickBooks. We hope that the content helped you out. Despite this, if you have any questions or suggestions that you wish to share with our QuickBooks Support Team, just ring us a call at the helpline at 1-888-368-8874 and speak with our certified experts directly.
To find solutions to the common errors that may impede your Quickbooks operations, you can sail through our articles on variegated error codes in QuickBooks or connect with our QuickBooks desktop support team personnel.


? 15")
? 16")
? 17")
? 18")
? 19")
? 20")
? 21")
? 22")
? 23")
? 25")
? 26")
? 27")
? 28")