Learn the 10 different ways of tackling the QuickBooks has stopped working error.
Are you troubled by the recurring occurrence of QuickBooks has stopped working error while accessing the software? We shall be covering all the different aspects of this error and make sure that the issue gets resolved at the earliest.
Is your QuickBooks Desktop freezing, crashing, or displaying "QuickBooks has stopped working" or "QuickBooks is not responding" messages? If so, you're not alone. This common issue can bring your accounting tasks to a screeching halt, causing significant frustration and lost productivity. But don't worry – this comprehensive guide provides the most effective solutions to get your QuickBooks software back on track quickly and efficiently. We'll explore why your QuickBooks might be encountering this problem, from software glitches and corrupt data files to system resource conflicts, improper installations, malware infections, and even occasional hardware limitations. Understanding these root causes is crucial for effective troubleshooting. Following this, we'll provide step-by-step guidance on the top, most efficient methods to resolve this annoying QuickBooks errors, helping you diagnose and fix the problem without hassle. If, after trying these solutions, your QuickBooks is still not responding, don't hesitate to reach out for professional help. Our team of certified QuickBooks technical professionals is available to provide personalized assistance. Simply call our customer support number to speak with an expert who will guide you through every step of the troubleshooting process, ensuring your QuickBooks runs smoothly and gets your business back to business today!
Many times, while performing some important tasks on QuickBooks accounting software, it stops working or doesn't respond. The error message regarding the same might pop up on the screen when the user tries to open the QuickBooks again. This error can be caused due to various reasons, such as virus infection and many others. The various causes triggering this error are listed as follows:
In this article, we are going to discuss that unpleasant moment when we receive "QuickBooks has stopped working or QuickBooks not Responding" problem. After this error message appears, our system may freeze and QuickBooks may not open even after restarting the system. But don’t worry, in the below section, we have described the top and the most efficient ways in which you can resolve the “QuickBooks has stopped working” or “Notresponding” error without much hassle. So, read on!.
Methods to Rectify QuickBooks Has Stopped Working or Not Responding Issue
Well, encountering such a situation where QuickBooks isn’t responding or stopped workingerrorcan be extremely frustrating for QB users, therefore, we have come up with ideal solutions that, if applied properly, can bring the software back to life.
1st Method - Download the QuickBooks Refresher Tool
The QuickBooks accounting software is complemented by various tools and utilities that leave no stone unturned in boosting the capabilities of the QuickBooks software. One such utility is the Quickbooks refresher tool. The tool can assist in getting rid of the QuickBooks has stopped working error code. Follow the guidelines provided below:
The first step is to turn off the QuickBooks accounting software.
Next step includes the Downloading of the QuickBooks refresher tool.
Further, “Save” it on the desktop.
Once downloaded, hit on the “Run” option.
This tool will automatically find the existing issue in the software and will fix issues efficiently.
In the last step, verify if the issue resolved.
2nd Method - Create a New Windows Admin User
If the first methods didn't work out for you, then the creation of a new admin user should help you out. All you need to do is follow the steps below to create a new admin user.
Initially, hit on the “Start” button and then tap on the “Control panel.”
After that opt for the “Add or remove user accounts” link.
Further, the “Manage accounts” dialogue box will appear, tap on the “Create a new account” option.
Mention the “Account name” and choose “Create an admin account.”
To complete the process, hit the “Create account button” to create a new Windows operating system account.
3rd Method - Rename the QuickBooks.INI File
One of the major reasons forQuickBooks software not responding is some specific problem in QBWUSER.INI files.
Renaming the QBWUSER.INI file can help to fix problems occurring in the QuickBooks software.
You can rename the “EntitlementDatastore.ecml” file in the following manner:
Tap on the Win + E keys to show your File Manager.
Now, search for the QuickBooks directory. Another alternative way is to right-click on the Quickbooks desktop icon and hit on the Open File Location option from Properties.
Once you are in the Quickbooks Folder, search for the Entitlement Client folder and search for the file named “EntitlementDatastore.ecml.''
You need to right-click on the file and hit on the rename option. Subsequently, add '.old' at the end of the file name.
Follow the same instructions for the ''QBWUSER.INI'' file and add '.old' towards the end of the file name.
4th Method - Accessing the Company File From a New Location
Relocating the file to a location other than the original default destination can help in fixing the issue. To do this, implement the steps given below:
The initial step is to tap on the “Windows + E” keys together on the keyboard.
And then a new window will open on the screen.
Further, you will search the data file with the “.qbw extension.”
Next step is to right-click on the file and hit on the “Copy” option.
Now move it to the “C drive” and create a new folder.
Further, rename it to QBTEST
Once the new folder has been created, paste the file into it.
Press the CTRL key and launch the QuickBooks software.
After that, hit on the “Open or restore an existing company” option.
The last step is to check if you still encounter the error in the QBTEST folder.
5th Method - Error After Window 10 Updation
In some instances, the error specifically occurs after updating the Windows 10 operating system. For users who face this issue, getting rid of the error is a cakewalk. Proceed as follows:
The first step is to move to the “Control panel” and choose the “Window firewall.”
Hit on the “Advanced settings” and “Outbound rules” options
Further, visit the “New rule” option and tap on the “Program” checkbox
The next step is to hit on “Next.”
Go through the program path option and copy the QuickBooks location.
Tab on the “Block the connection” option and opt for the “Public, Private, or Domain” checkbox
The concluding step is to rename it and hit on the “Finish” tab to complete the process.
6th Method - Use the QBinstall Tool After Downloading it
After that, install the tool hub program and launch the application by hitting on the Icon.
Now, hit on the Installation issues tab and then tap on the QuickBooks install diagnostictool option.
Run the QuickBooks install Diagnostic tool and let it process. You can see a bar with a progressive line that will show whether or not the root cause of the “QuickBooks has stopped working” or “Not responding error" has been found or not.
As the install diagnostic tool will recognize the issue, it will fix the program and will ensure that you won’t have to face the problem again in the near future.
7th Method - Reboot the System and Disable the Anti-virus Program
Sometimes, the anti-virus system can potentially block the activity of QuickBooks. So, for that, you need to first reboot your entire system. Make sure that the system is not connected to the admin computer or the server network as the reboot will wipe off all the changes and updates and reset the system to its original configuration.
Once done, you have to open the anti-virus software that you are using. In the settings option, you will find the button to disable the software. Hit a click on it and then try to run QuickBooks again. If the software is working fine, it means that you need to upgrade the anti-virus software or use another one compatible with QuickBooks.
8th Method - Turn off Your Antivirus Temporarily
Disabling the antivirus temporarily can assist in fixing the QuickBooks has stopped working error. This works in most cases because the antivirus can potentially obstruct the seamless functioning of the QuickBooks software. To turn off the antivirus, follow the steps below;
Restart your computer.
If the error still persists, turn off your antivirus. You can do this by right-clicking on the antivirus icon i=on the bottom right corner of the taskbar and then choosing ''Disable temporarily.''
The procedure to turn off different antivirus programs is not the same and thus you should contact your antivirus support or your IT professional.
9th Method - Reinstall QuickBooks Using the Clean Install Tool
If the methods elaborated above could not assist you, then it is advisable to go for a clean installation of the QuickBooks software. Although the process can be implemented manually via the Control Panel also, it is advisable to use the QuickBooks
Select Control Panel from the Start menu.
Then select Programs and Features.
Look for QuickBooks Desktop in the list of programs that appear on the screen.
Then click it and choose Uninstall/Change.
Now, select Uninstall.
Watch for the uninstalling procedure to be finished.
Use the clean install Tool to re-install QuickBooks Desktop after the procedure is finished. When installing the software, be sure to have your license and product keys on hand.
Restart your computer after the procedure finished, and then launch QuickBooks Desktop once more to see if the problem has been fixed.
The process to reinstall QuickBooks using clean install should get rid of the issue.
10th Method: Scanning for any Bad Sectors
To open the Windows File Manager, press "Win + E."
Right-click the drive labeled "C."
Select Properties,
After selecting the Tools menu, click Check now.
Check the boxes next to the "Automatically rectify file system issues" and "Scan for and try to recover faulty sectors," respectively.
Click Start.
Wait until Windows has finished the scan and repair operation.
Causes Behind The QuickBooks Has Stopped Working Error
One can easily land up in such a situation where QuickBooks has stopped working error might occur because of the following reasons:
The first reason can be the corrupted hard drive
Secondly, if there’s any damage in the QBWUSER.INI file
If the file name is excessively long.
The company name may be too large and make QuickBooks unresponsive.
Another reason why you might face this error is low system resources.
Damaged program files.
Symptoms of QuickBooks Has Stopped Working Problem
Having visited the various causes behind the error, let us now have a look at the various signs and symptoms that a user usually witnesses on the arrival of this error. Let us go through these signs one by one.
Note: If you have been observing the above-mentioned symptoms, fix your software immediately or your data, as well as the computer, may be at risk.
Conclusion
So, you have plenty of solutions to tackleQuickBooks has stopped working or not responding issuewith utmost ease by now. All the provided solutions are simple to implement and can be performed without considerable IT knowledge.
However, if you still feel that you need technical assistance to deal with this complex issue, then it is recommended to get in touch with our QuickBooks error support team. We have technical experts who will provide you with the most relevant solution possible.
Check out how to troubleshoot QuickBooks abort error effectively
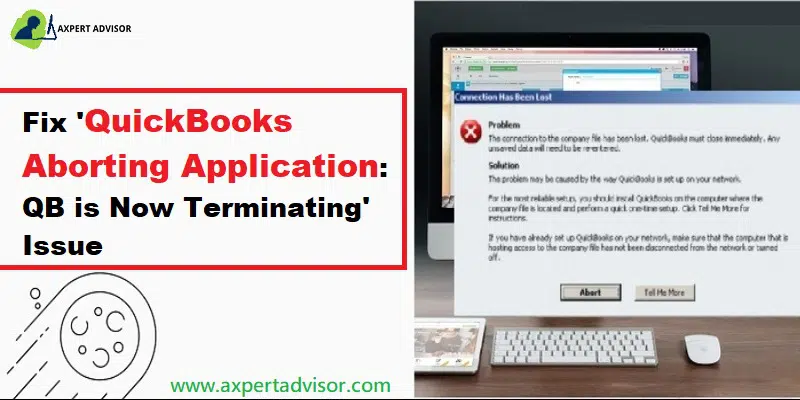
Is the QuickBooks Desktop Abort Error halting your progress? You're not alone. This frustrating issue can bring your accounting tasks to a sudden stop, but finding a reliable fix shouldn't be another hurdle. Many users struggle to find effective, lasting solutions for the unique errors that crop up in sophisticated software like QuickBooks. We understand the urgency of getting your system back on track and ensuring your financial data remains secure. This article cuts through the noise, offering clear and effective strategies to tackle the QuickBooks Abort Error head-on, so you can resume your work quickly and confidently. If you're ready to resolve this pesky problem, keep reading for our expert solutions, or feel free to reach out directly to our team of specialists for personalized assistance.
QuickBooks Desktop: A Brief Overview of the Impressive Accounting Software
Before understanding what exactly QuickBooks abort errors are and their fixes, it's important to glance at what QuickBooks is. To be very precise, QuickBooks is an application that effectively manages everyday business transactions including tracking expenses and managing sales. This program generates reports much more easily which proves to be a boon for multiple organizations. First rolled out in 1992, this flagship product has been ruling the industry since then.
What is QuickBooks Abort Error and Why it Occurs?
QuickBooks Abort problem is a major glitch that frequently takes place while working on QuickBooks desktop. This particular software asks the user to abort the ongoing company transactions or any other process and restart the software to resume. It generally crashes during the saving process or when changes are made to improve its company's file. If something like this happens regularly, it can damage the QBWUSER.ini file, therefore finding effective solutions becomes majorly important.
Reliable Procedures to Debug QuickBooks Abort Error Message
It is easy to tackle QuickBooks Abort Errors if you are familiarized with the right ways to fix them. Below we have mentioned some of the most effective solutions that can help you to tackle this problem. Let us explore each of the methods one by one:
Procedure 1: Running QuickBooks File Doctor tool
File Doctor Tool is a marvelous troubleshooting tool that can fix a broad domain of technical errors related to the Company files. To use the tool, one is required to download and install QuickBooks Tool Hub. Refer to the below given guidelines for more help.
In the beginning, the downloading the QuickBooks Tool Hub is required from the website of Intuit.
Following the download process, the user should proceed with the installation of the Tools Hub by double-clicking on the saved file.
Once culminated with the installation, the user should run the Tools Hub program, and following that, advance to the Company Issues tab.
When in the Company Issues tab, the user should browse for the Company File, and then choose the same.
Follow that by running the scan to allow for a comprehensive diagnosis and error fixation of the issues confronting the file.
Procedure 2: Using Verify and Rebuild Data Feature
This holistic feature can check the Company file for any issues and consequently resolve the same. It is an inbuilt feature in QuickBooks and can be accessed through the below given steps:
The first step involves running QuickBooks and then tapping on the File menu.
Following that, the user should tap on the Utilities option.
After that, from there, opt for the Verify Data option, and tap on Ok.
The feature will diagnose any issues pervading within the Company file that may be laying grounds for the QuickBooks Abort error.
If any error got diagnosed, the user should subsequently, make an exit from this tool, and again click on the File tab.
Again head to Utilities to choose the Rebuild Data this time around.
Let the tool rebuild the company file.
When the process is done, end the same by clicking on Ok.
Now, run QuickBooks and try to gain access to the Company file again.
This should fix a wide range of errors confronting the Company file, including the Abort Error in QuickBooks desktop encountered while opening the file.
Procedure 3: QuickBooks Restoration From the System's Backup
In case all the above methods didn't work in fixing issues, switch and try to restore QuickBooks through backup. To do so, generate an admin user to the windows that will most probably solve the issue of the QuickBooks desktop abort error. If still, you find something fishy, switch to the last solution mentioned below.
Procedure 4: Check the Hosting Status of QuickBooks
The following are the steps to get rid of the QB abort error message.
Open the files and hit on the Utilities option.
Tap on the “Stop hosting multi-user access” option.
Open the company file in the same mode.
The final step is to look if the “Open file in multi-user mode” is there.
Procedure 5: Consider changing the Filename of the 'QBWUSER.INI' File
Another easy and viable procedure to get the error fixed out is by renaming the QBWUSER.INI file. The process for the same is given below:
Before proceeding ahead, the first step you need to take is to enable access to the hidden folder which contains the 'QBWUSE.INI' file.
After that, visit the location ‘Drive: \ [user name] \AppData\Intuit\quickbooks[year]\‘
After paying heed to the above steps, hit a right-click on the 'QBWUSER.INI' file.
Now, tap on Rename.
Introduce '.OLD' at the end of the file name.
Then, rename the .ecml file.
When you have accomplished all the foregoing steps, check if the issue got resolved.
Procedure 6: Making a New Admin User
The steps for the creation of a new admin use are highlighted below. This process can nullify the chances of the occurrence of the Abort error due to the insufficient permissions.
In the beginning, the user should tap on the Start button.
After that, the subsequent step is to delve into the Control Panel and then proceed into the User Accounts section.
Now, tap on the option to manage another Account, and followed by that, hit on the option to create a new account.
Follow up by filling in the username and then opting for the Administrator option.
Head to the Create option to finalize the creation of the admin user.
Procedure 7: Make sure to Allow Permissions for Installation Folders of QuickBooks
To start with, access the file explorer (hitting Win + E keys) and move to the following destination: ‘Drive: \ Program Files \ Common Files.’
Herein, alter the Security settings of the common files folder, For this, right-click on the folder and tap on Properties.
Now, visit Security and opt for the Edit option.
In Group or usernames, you are required to opt for Users.
Now, modify & allow to write, read, read, & execute the permissions in the Permissions for users tab.
Then, tap on the Apply button.
To conclude, push the OK button.
Hopefully, the abort error must be outrooted by now.
Procedure 8: Perform a Clean Installation of QuickBooks
If the 7th solutions discussed till now fail to resolve the Abort error in QuickBooks, the user should Clean Install either manually, or by using the QuickBooks Clean Install Tool. The manual steps are:
In the inception, head to the Control Panel, and then follow up to the Programs and Features to choose QuickBooks.
Upon choosing the accounting program, the next step is to tap on the click on Uninstall/Change tab located above the list of programs.
Now, proceed with the Uninstall process by abiding by the onscreen instructions.
When the program is uninstalled, make a move to the QuickBooks directory and rename the QuickBooks folder.
Follow up with a system restart, and then reinstall QuickBooks either by using the installation disk, or by downloading the same from the official website of Intuit.
Reasons Leading to QuickBooks Abort Error Message
There are innumerable causes that could lead to the sudden crashing of QuickBooks due to the QuickBooks Abort Error message. However, some of the most common ones among them are listed below:
The QBWUSER.INI file is missing from its original location, or is corrupted by a sudden system shutdown or a virus attack.
Wrong configuration of the firewall settings could be a causing a network disruption between QuickBooks and the Server, and may also have targeted QuickBooks .exe file as a potential threat.
System may have been switched to the sleep or hibernation mode while saving the Company file.
The Company file on which the user is working suffered from data damage due to sudden reasons. In this scenario, the Abort error is usually encountered when opening the Company file in QuickBooks, or when saving the changes made to the file. Now let's dive in together to find effective fixes to the common QuickBooks abort errors:
Conclusion
So, by now, you have plenty of solutions to get rid of QuickBooks Abort Error message effectively. However, if you still feel that you need further help or bump into similar errors again, get in touch with our team of professionals at the QuickBooks error support team that offers 24*7 services.
Are you struggling with QuickBooks Error 12157 and finding yourself unable to update your payroll or QuickBooks Desktop? This common issue, part of the QuickBooks 12000 error series, typically signals underlying web connectivity problems within your Windows operating system, often related to the Microsoft Win32Internet (WinInet API).
QuickBooks Desktop relies on the WinInet API to facilitate internet protocols like FTP, HTTP, and Gopher, which are essential for downloading and applying critical updates. When Error 12157 strikes, it usually means your software is encountering difficulties connecting to the internet to complete these updates. This can prevent you from getting the latest features and tax table updates, potentially disrupting your payroll and other QuickBooks functionalities.
If you're encountering this frustrating error message, you've come to the right place. This guide will walk you through the common triggers behind QuickBooks Error 12157and provide you with effective, step-by-step solutions to get your QuickBooks back on track. Stay with us to successfully troubleshoot and resolve this error!
Methods you Need to Rectify the QuickBooks Error 12157
The best part about QuickBooks software is that any errors that are seen in this software can be resolved with much ease, using some unique set of steps. You can perform the below-stated set of steps, so as to get rid of the error code 12157 permanently. Let us explore each of the set of steps one by one:
Method 1: Restoring the System
The first method you need to opt for is to restore the system. Herein, you are supposed to perform the steps listed below:
At first, you would have to hit on start the system option.
You further need to log in as the system admin.
And hit start to catch and opt for all applications, accessories, and computer tools, and later on, choose the system repair tool.
You are further required to tap on the restore point and after that hit the next tab, and also choose the advanced system to restore the point.
Hit on the next tab and also on the confirmation window.
Lastly, you need to reboot the system.
Method 2: Add QuickBooks and its Additional Processes to The Exception of Firewall
There can be situations when the firewall or internet security settings aren’t configured in a proper manner, then in that case you would have to ensure that ports 80 and 443 are active. You are required to have access of the following files:
QBDBMgrN.exe
QBServerUtilityMgr.exe
AutoBackupExe.exe
FileManagement.exe
FileMovementExe.exe
IntuitSyncManager.exe
QBGDSPlugin.exe
QBW32.exe
Dbmlsync.exe
QBLaunch.exe
QuickBooksMessaging.exe
DBManagerExe.exe
QBCFMonitorService.exe
QBDBMgr.exe
Method 3: Change the Internet Connection Settings
In certain situations, inappropriate internet connection settings might trigger this error. The steps to be performed to rectify this issue can be as follows:
Start off by opening QuickBooks.
You need to then advance to the help menu.
Furthermore, choose the internet connection setup.
Choose ''use my computer’s internet connection settings'', so as to establish a connection when this application accesses the internet.
You are then supposed to hit on the next tab.
And furthermore, steer to the advanced tab.
Next, tap on the restore advanced settings tab.
Now you would have to hit the ok tab and then hit on done.
Method 4: Reset the System’s Date and Time
One of the major reasons behind the occurrence of such an error can be the misconfigured date and time of the computer system. This can also be resolved using some set of steps. So as to rectify the issue by configuring the root cause, you are supposed to perform the below set of steps:
You need to start off by visiting the clock on the right bottom of the system’s screen.
The next step is to right-click the mouse.
You are further required to pick the adjust date and time option that would appear after you perform the steps stated above.
Heading forward, you would have to specify or select the current date, along with the current time.
Under this method, you would further have to close the screen. This can be done by hitting the OK tab, once the date and time are configured to the current time.
Once you are done with these steps, close the QuickBooks desktop software.
You further need to reopen the QuickBooks.
At last, run the QuickBooks update again and observe whether the error 12157 got rectified in a proper manner.
Method 5: Restoring Advanced Settings
Initially, one has to close the QuickBooks desktop.
Furthermore, open internet explorer.
Later on, opt for the tools tab, and from the drop-down choose internet options.
Hit on the advanced tab.
Choose the restore advanced settings tab and close the window and you are done.
Method 6: Make Sure Not to Use More Than One Version of QuickBookson Same PC
Several times, users install more than one version of the QuickBooks software on their system. Such action may contribute to the QuickBooks error 12175. Proceed with the steps below to make sure that you only have one version of the software installed on your system.
Visit the Downloads and Updates page of QuickBooks.
Now, choose your country.
Afterward, opt for the Product (i.e., QuickBooks)
Then, opt for Version and move to Search.
Now, opt for 'receive the most recent updates.'
Now, set up the latest version of the QuickBooks software.
Once it is established that you only have one specific version of the software set up on the system, try launching the QuickBooks software to ascertain that the error 12157 got wiped out.
What Factors Instigate the QuickBooks Update Error 12157?
As we stated earlier, the QuickBooks error 12157 can be instigated due to the following factors, which include:
One of the major factors behind the occurrence of such an error can be, just in case the date and time are not configured correctly.
If there is any restrictive setting of firewall or internet security applications.
That was all you need to learn about QuickBooks error code 12157. As always, in case you have any queries or concerns, feel free to contact us via our helpline i.e., 1-888-368-8874! However, if by any chance this error continues to trouble you, then do not hesitate in speaking to our QuickBooks error support professionals and certified experts.
QuickBooks has revolutionized accounting for businesses, offering powerful features like electronic funds pre-authorization and employee time tracking. However, like any sophisticated software, users can encounter technical glitches. One common errors is QuickBooks Banking Error 9999, often reported as a script error that disrupts the crucial connection between your bank and QuickBooks Online.
This article provides a complete guide to understanding and resolving QuickBooks Banking Error 9999. By following our detailed steps, you can quickly get your banking connection back on track and ensure seamless financial management.
What is QuickBooks Banking Error Code 9999?
Error code 9999 in QuickBooks Online pertains to the script error. It impacts your internet connection and impedes the connection between QuickBooks Online and the Bank. Additionally, your computer begins to freeze or reacts to your requests slowly. It consequently has an impact on your company's operations and may lead to the deletion of your essential company files. A faulty installation of QuickBooks is the main reason for such a mistake. Let us get to the depth of the issue and know the various causes and ways to resolve it.
Error
Sorry, we can’t update your account. Please try updating again later. (Error 9999)
It is the banking error 9999 in QuickBooks Online, and whenever you identify this error, you should immediately contact your bank partner or take help from an expert.
Ways to Troubleshoot the QuickBooks Error Code 9999
The main cause behind this error is when QuickBooks Online cannot establish a seamless connection with the Bank. You may experience this issue with several banks. Follow the methods listed below to get rid of the QuickBooks Banking Error 9999.
Method 1: Clear Browser's Cache Files
For Google Chrome
Launch Google Chrome and proceed to 'Settings,' followed by hitting the 'Clear Browsing Data' option.
Afterward, head to the 'Cached Images and Files' option.
Hit on the 'Clear Data' button.
The cache files will be deleted.
For Firefox
Type 'About: preferences#privacy' in the address bar and hit on the 'Enter' key.
Choose the 'Clear Recent History' option.
Finally, hit on 'Clear Now' after choosing 'Cache' from the list.
For Internet explorer
Hit on the 'Ctrl+Shift+Delete' buttons together.
From the 'Delete Browsing History' page, proceed to the 'Temporary Internet files and website files.'
Finally, hit on the 'Delete' tab.
For Safari
Hit on 'Develop' from the top menu.
Choose the option 'Empty Caches.'
Method 2: Report the Issue to your bank
Once the concern is dealt with, you will certainly receive an email straight from the team that settles banking errors, not from the customer care team.
Method 3: Clean Off Any Junk Files
When you remove files from your PC, it could leave temporary or trash files behind. This, in turn, causes a conflict between various programs on your system. You might also be unable to connect to your bank account because of these junk files. As such, it is mandated that you delete the temporary files from your PC to prevent any further conflict.
The Disk Cleanup tool is quite useful for this. The steps are as follows:
Hit on the 'Win + R' buttons together to show the 'Run' box on your screen.
In the 'Run' box, type 'cleanmgr.exe.'
Hit the 'OK' button or press the 'Enter' key.
Subsequently, choose 'Clear up system files' in the 'Disk Cleanup' window.
Hit on the 'Yes' button after that. You will be given a list of files that will be deleted as a result of the process.
Now, hit a click on 'OK' after marking each item on this list.
Next, choose 'Delete Files' from the menu.
Wait until the Disk Cleanup tool removes the temporary files from your system. Your system's cache will be quickly cleared by conforming to this method. This shall also allow you to continue managing your bank account uninterruptedly.
Method 4: Disconnect and Reconnect Bank Account
Follow these procedures to disconnect your bank account from QuickBooks Online:
From the left side, first, choose the 'Banking' tab.
Afterward, hit on the 'Edit' option next to the account you want to disconnect from.
Subsequently, opt for the 'Disconnect this account' option from the 'Account' window.
Hit on 'Save and close.'
Afterward, follow these procedures to reconnect the bank account to QuickBooks Online:
Hit the 'Add Account' option under the 'Bank' tab.
Enter your bank account login information now, and then choose 'Continue.'
Then, click on the 'Bank' option after choosing 'Securely connect.'
Choose your account from the 'Account type.'
Next, choose a credit card or bank account.
Lastly, hit on '+Add new' and then tap on 'Connect' if you don't already have an account.
Method 5: Log in to the Bank's website From the Web Browser
You may no longer link your account to the Bank for security reasons. As a result, your Bank must perform additional verification. Choose a web browser of your choice, and then proceed to the website of your Bank. Subsequently, sign in to your bank account using the security credentials. Enter the OTP that the Bank sent you or respond to any security inquiries for validation. Try updating your Bank feeds in QuickBooks Online after logging in successfully.
If you still face the QuickBooks online error 9999 even by logging into the Bank's website, then proceed to Method 6.
Method 6: Update Your Bank Account
If you update your bank account a few times, the error might get fixed. To update your Bank, follow the instructions below.
Launch QuickBooks online and follow up by choosing the 'Banking' option.
Subsequently, hit on 'Update.'
Repeat the same action number of times.
Implement the next method if upgrading your Bank doesn't fix the problem.
Method 7: Manually Import Transactions
You can visit the Bank's website. Subsequently, download the transactions in the '.QBO' format, and thenimport them into QuickBooks Online. This step can be performed if none of the methods mentioned above for fixing the error code 9999work out.
Method 8: Repair the Registry Files
The Windows Registry is essential for running several functions. It thereby becomes necessary to fix any damaged Windows registry files at the earliest. You can use the command line to fix the Windows Registry files. Just follow the below-mentioned steps:
Advance to the 'Start' menu.
In the Search box, type in 'Command.'
While holding down the 'Ctrl + Shift' keys, hit on the 'Enter' key.
If prompted, hit on the 'Yes' option.
In the 'Command Prompt' window, type in the 'Regedit' command.
Afterward, hit the 'Enter' key.
Right-click the 'key associated with Error 9999' in the 'Registry Editor.'
Proceed to the 'File' menu.
Afterward, hit on the 'Export' button.
The backup key should now be saved in the folder you selected.
Choose 'Selected branch' in the 'Export range' box.
Finally, hit on the 'Save' option.
Ensure that the '.reg file' extension is used to save the file.
Make a backup of the registry entry in the final step.
You can then check if the QuickBooks Banking Error 9999 got fixed.
Method 9: Use the System File Checker
You may easily check your system files with the Windows System File Checker. If you discover any troublesome files that are giving you issues, fix them right away. You can make use of the SFC command to complete this operation. The Command Prompt window can be used for this. For your convenience, we are assisting you with the following steps:
Initially, hit on the Windows key.
In the 'Search' box, type 'Command.'
Choose 'Run as administrator' by right-clicking on the 'Command Prompt' button.
Subsequently, type the following command in the command prompt: ‘SFC/scannow.’
Hit the 'Enter' key.
This procedure could take a short while. Restart your computer after the procedure is complete.
Later, check if this method fixed the QuickBooks problem 9999.
When using online banking, it can be incredibly annoying when an unexpected issue pops up and prevents you from continuing any further. The connection between QuickBooks and the Bank is disrupted due to the appearance of the error code 9999 in QuickBooks.
Why Does QuickBooks Banking Error Code 9999 Occur?
Numerous factors may contribute to the occurrence of the Banking error 9999 in QuickBooks. Following are a few of them:
The link between the Bank and Intuit Server is too slow due to a poor internet connection.
Antivirus or firewall application obstructing the connection between the QuickBooks server and the Bank's website.
Due to excessive browser cache files.
When Windows firewall or antivirus firewall blocks the bank website or Intuit server to connect.
Some problems at the Bank's end.
A corrupt and incomplete installation.
In case the QuickBooks files are mistakenly deleted.
Malware or virus-corrupted windows system files.
A variety of factors can cause QuickBooks error 9999, so it is vital that you should troubleshoot each of the possible causes to prevent it from recurring.
Primary Signs and Symptoms of the QuickBooks Error 9999
There can be various symptoms of QuickBooks error 9999, a few of which are listed below -
You will not be able to get connected to the bank.
The browser will slow down and your system will experience extreme lags.
You will get a dialogue box stating “Sorry, we can’t update your account. Please try updating again later. (9999)"
Wrapping up! Still, facing the issue? Just contact our Support Team,
In this article, we've tried to cover every aspect related to the effective methods for fixing this QuickBooks banking error 9999. We hope that this piece of writing served your purpose. However, if you are facing any such errors or any other problem associated with it or require any further assistance, reach out to our QuickBooks online error support team through our helpline i.e., 1-888-368-8874.
Learn Simple Steps to Fix QuickBooks Error Code 6189
QuickBooks users often encounter various errors, and QuickBooks Error Code 6189, 77 is a common one. This particular issue, part of the 6000-error series, is notorious for preventing access to your crucial company file. When this error strikes, you might see a message on your screen indicating that QuickBooks is unable to open the company file.
But don't panic! This comprehensive guide will walk you through the causes of QuickBooks Error 6189, 77, and provide step-by-step solutions to get you back to work efficiently. From common error like a damaged company file to more complex network issues, we've got you covered.
Message
Description
Error
QuickBooks is unable to open this company file. It may have been opened by another user. You should ask that user to switch to multi-user mode so you can both use the company file at the same time. The file could also be located in a read-only network folder. If it is, ask your system admin to make the file accessible. Error codes: (-6189, -816)
Warning
"An error occurred when QuickBooks tried to access the company file (-6189, -816),” don’t worry. There’s an issue with your multi-user network, not with your data file.
Read on this post to know how you can spot, avoid and fix QuickBooks error message 6189 by your own. However you can save your time and efforts by taking help from our dedicated support line to resolve this problem quickly.
Basic Procedures to Fix QuickBooks Error Code 6189, 77
Getting rid of QuickBooks error 6189 becomes a little easy with the steps scribbled below. Let us explore each of the measures that can be taken one by one:
Procedure 1: Reboot the system along with the server
Rebooting the system and the server can be one of the most basic fixes. Restart the systems having company files and along with that reboot the server and head forward till the issue is resolved.
Additional license is not required during the installation of the Database Manager.
Install the Database Manager if there is no QuickBooks database user.
Now, you need to restart your server after installation is complete.
Inside the QuickBooks Database Server Manager, browseto the location of your company file and then select Start Scan tab.
The database server manager will auto repair your Firewall permissions. After that hit a click on Close option once the scan process finishes.
After the installation process is complete, you are suggested to reboot the server and you are done with the process.
Procedure 3: Check if your data file is stored on a network drive
Ensure that your QuickBooks file is not stored on a NAS device or any other Removable drive.
These devices are not allowed to run the Database server Manager.
Sometimes this setup can trigger data corruption.
Procedure 4: Resolve .Tlg and .QBW file issue
Under this process, you need to open the system and browse the transaction log file. Name of the file will be similar to that of the company file, except .tlg extension.
You need to right-click on the transaction log file and go for rename option.
You now have to insert OLD after the company file, which would look similar to companynameold.tlg
Moving ahead, QuickBooks will regenerate .tlg files on its own.
Reboot the system and check if the issue is fixed.
Procedure 5: You can use encryption software on your computer
It’s not advisable to encrypt your company file.
Don’t encrypt company file in your computer.
Procedure 6: Run Quick Fix my Program from the QuickBooks Tools Hub
Basic symptoms of error code 6189, 77 in QuickBooks
It will be a little for you to spot the error, exploring the signs and symptoms listed below would surely help.
One of the basic signs can be each time you open the same program, you might witness your system crashing.
In case the system hangs for a couple of minutes.
If the warning message appears on the screen with an error description.
Also, in the event of an active window, the system crashes immediately on the arrival of the issue.
Another sign can be if the system slows down.
Summing up!
The above-mentioned methods should enable you to resolve QuickBooks error code 6189. However, these do-it-yourself methods don’t work all the time. In case the issue still persists after performing the given solutions, you should not waste any more time and immediately contact our 24/7 QuickBooks enterprise error support geeks.
Our tech professionals will surely come up with the most appropriate solution for you. We boast a team of experienced U.S based accounting professionals who can provide you with precise solutions in no time. So, get on a call with us and get all your QB-related doubts and queries sorted out.
Here's we have explored the ways to resolve QuickBooks payroll error 15107
QuickBooks is an invaluable tool for businesses worldwide, streamlining financial operations and automating accounting tasks. Intuit consistently releases updated versions, ensuring millions of subscribers have access to the latest features.
However, like any software, QuickBooks can encounter errors that disrupt your workflow. One common issue is QuickBooks Payroll Error 15107. This error can prevent you from efficiently managing your payroll, leading to significant delays and frustration.
This guide provides comprehensive solutions to help you resolve QuickBooks Payroll Error 15107 and get back to business. For immediate assistance, don't hesitate to connect with our dedicated support team. We're here to answer all your queries and provide step-by-step guidance.
What are the Workable Solutions to Resolve QuickBooks Error 15107?
Below are discussed in detail different solutions that can be implemented for permanent resolution of Error 15107 in QuickBooks.
Solution 1: Reboot your computer system
The very first solution is to restart the computer system. This is one of the basic methods that one can opt for in order to deal with this error. When we restart the device, the error is compelled to reset and also move out of the way of the screen. Thus, it is suggested to restart the computer. Also, when any device is restarted, it works in a more efficient way. This is one of the basic and simplest solutions, and in case this solution does not work, one can move on to other solutions listed below.
Solution 2: Downloading the QuickBooks updates again
Another solution that one can opt for is downloading the QuickBooks update again. The steps that one needs to follow in this method are scribbled below:
First step is to shut down the QuickBooks software.
Next step is to visit the “C:\Documents and Settings\All Users\Application Data\Intuit\QuickBooks <version>\Components”
Then search for the folder by the name “DownloadQBxx”, where the xx is the version of QuickBooks.
Then tap on “Reset the updates” and check box to roll back the update.
Now, download the newest update again by simply hitting on the “Get updates” button.
The next step is to wait for the download to finish.
Finally, install the update by tapping on the “Install Now” button.
Solution 3: Running Reboot.bat file
In some instances, running the batch file named “Reboot.bat” in the QuickBooks folder can effectively resolve the ongoing error, and other update errors belonging to Error code 15xxx family. The steps for running the file are:
Make a move to the QuickBooks folder. For you reference, you can right-click on the QuickBooks icon, and then tap on Properties to choose Open File Location tab.
Once in the QuickBooks folder, look for the Reboot.bat file and once located, right-click and opt for Run as administrator tab.
Wait for the culmination of the process.
Finally, run QuickBooks and try the update process again upon hitting on the Help tab and then choosing Update QuickBooks Desktop option.
Solution 4: Perform a QuickBooks Clean Installation
In order to get any kind of assistance, one can use QuickBooks clean install tool. This is one of the most effective tools that can be utilized to get rid of this error. All you need to do is to follow some steps.
The basic step is to download the tool named “QuickBooks Clean Install” and then save it on the desktop.
Next step is to double-tap on the “QuickBooks_Clean_Install_Utility.exe.”, in order to open the setup file.
Once you have performed the above step, a new box will appear asking for permissions, then click on the “I Accept” option on the license agreement.
Then, you will be directed to another box. Hit a click on it and choose the “Continue” button.
The last step is to hit on the “OK” button.
Solution 5: Repair QuickBooks Desktop
Repairing QB Desktop can help in fixing Error message 15107 in QuickBooks. For this, follow the trails below:
Initially, open the Control Panel, and upon opening the window, opt for Programs and Features.
Here, the user should choose QuickBooks Desktop version which is facing the update-related issues.
Tap on the icon and follow up by hitting on Uninstall/Change tab.
Now, click on Repair tab and get the accounting program repaired by following the onscreen directions.
Later, once done, restart the computer, and try the update process again.
This should exterminate Update Error 15107.
Solution 6: Install digital signature certificate
You need to follow the path C:\Program files (x86)\ Intuit\QuickBooksXX (XX means the QuickBooks version being used)
You will see a Search bar, where you are required to insert QBW.exe. Herein, right-click the QBW32 and from the open list, tap on the Properties tab.
Look for Digital signatures and opt for Intuit from the list.
Head to the Details tab.
Choose the View certificate and hit on the Install certificate option.
Opt for Next till the Finish tab appears.
Restart the system to update the changes.
Try to download the update again.
Solution 7: Configure Internet settings
Initially, run the Internet Explorer browser, and make a move to the Internet Options.
From there, advance to the Connections tab.
Within the Connections tab, opt for the LAN settings and place a checkmark in the box besides “Automatically Detect Settings”.
Also, make sure that the Proxy server is empty. Follow up by hitting on Ok.
Now, shift to the Advanced tab, and therein, checkmark SSL 2.0 and SSL 3.0.
Make sure to unmark the option besides Check for Publishers certificate.
Also, checkmark TLS 1.2, and uncheck TLS 1.0 and TLS 1.1 checkboxes.
Once done with all the foregoing steps, try the QuickBooks update process once again. Error 15107 should no longer be showing up.
Solution 8: Switch to normal startup mode
For this, you need to access the run box by pushing the Windows + R keys.
Enter in 'Msconfig' and hit on the OK tab.
Look for Normal startup mode and also tap on it.
Hit on the Apply tab and also tap on the ok tab.
Reboot the system to save changes.
What factors trigger QuickBooks error 15107?
Well, throwing light upon the various causes of this error, it is generally believed that this error occurs while updating QuickBooks desktop or payroll updates. Certain other errors are also detected, including
Any damage or corrupt registry files may cause this error.
Cases when the payroll files are damaged or corrupted
Incomplete or intentionally closing QuickBooks updates may also cause such errors.
General Symptoms of Error Code 15107 in QuickBooks Payroll
QuickBooks payroll error 15107 is regarded as one of the most common errors, and certain symptoms can be observed that can help the users to detect this error in advance. The symptoms of this error can be as follows:
The message of error is being displayed on the screen.
If the proper update file cannot be accessed or started up in the software.
Also, if QuickBooks is not properly configured to deal with the newest versions of the file.
Conclusion!
The current discussion focused on the different solutions to fix QuickBooks error code 15107. If you need technical assistance of any kind, just give our QuickBooks payroll error support experts a call at the helpline, i.e., 1-888-368-8874.