Here are the most common reasons and solutions for QuickBooks Error H505:
Small and mid-sized businesses all around the globe have established a firm reliance on QuickBooks for its user-friendliness and multitasking features. It is robust accounting software that more than one user can use simultaneously (depending on the version you buy) and from remote locations. However, the software does receive some errors occasionally.
Mostly, the issues can be fixed using the prompts offered by the software. And sometimes, they may require some troubleshooting by users or an expert. Hence, today we’re going to discuss about one such error confronted by QB users is the ‘QuickBooks error code H505′.
A brief about QuickBooks Error H505 and reasons for it’s occurrence
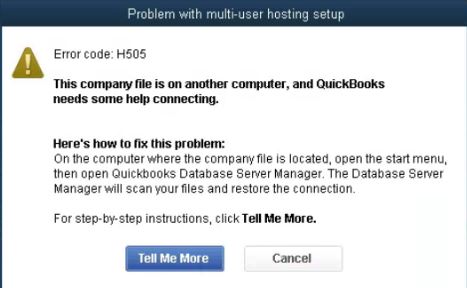
QuickBooks is a prevalent accounting software preferred by evolving businesses. It helps in management of finances efficiently. But even this software can throw up errors and issues from time to time. One such standard error is H505. It can occur if the company file is not located on the computer. This article explains the causes, symptoms, methods to rectify this QuickBooks multi-user error H505. You may get the following image if the multi-user error occurs on your software:
Error
Description
Problem with multi-user hosting setup
QuickBooks has faced a problem and needs to close. Sorry for any inconvenience caused.
Error code H505: This company file is on another computer, and QuickBooks needs help connecting.
Error H505 in QuickBooks enterprise is a part of the H series error in QuickBooks. All these H series errors are hosting settings-based problems. This error usually appears with a message stating that the computer on which the QuickBooks company file is stored needs reconfiguration.
Plausible Reasons Behind the QuickBooks Error Code H505
Some of the possible causes of this error code are as follows:
The QuickBooks file you are trying to access is located on some other computer.
QuickBooks installed and available in the system server name is set-up to consent to all the shared connections to the company file, however, the QuickBooks accounting software is failing to communicate resulting in error H202.
Host PC has incorrect settings
Firewall causing connectivity problems.
.ND Network file may be damaged.
The required hosting configuration setting is not appropriate.
QuickBooks database server manager facing issues.
What are the Symptoms of QuickBooks Error Code H505?
This error can be identified easily if the multi-user mode is not accessible.
If in case you fail to access the QuickBooks company file stored on the server.
Another indication of the same can be when the error H505 flashes on the screen.
If the system or laptop crashes frequently.
Windows might become unresponsive and freeze periodically or the software freezes.
Solutions to Troubleshoot the QuickBooks Multi-User Error H505
We are now into the section containing viable solutions for resolving the QuickBooks error H505. Try these solution steps in order to resolve this problem
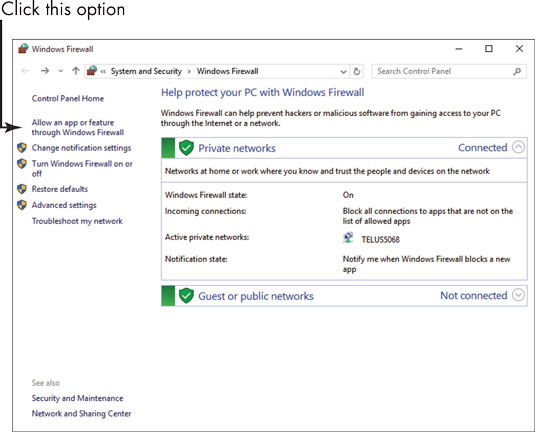
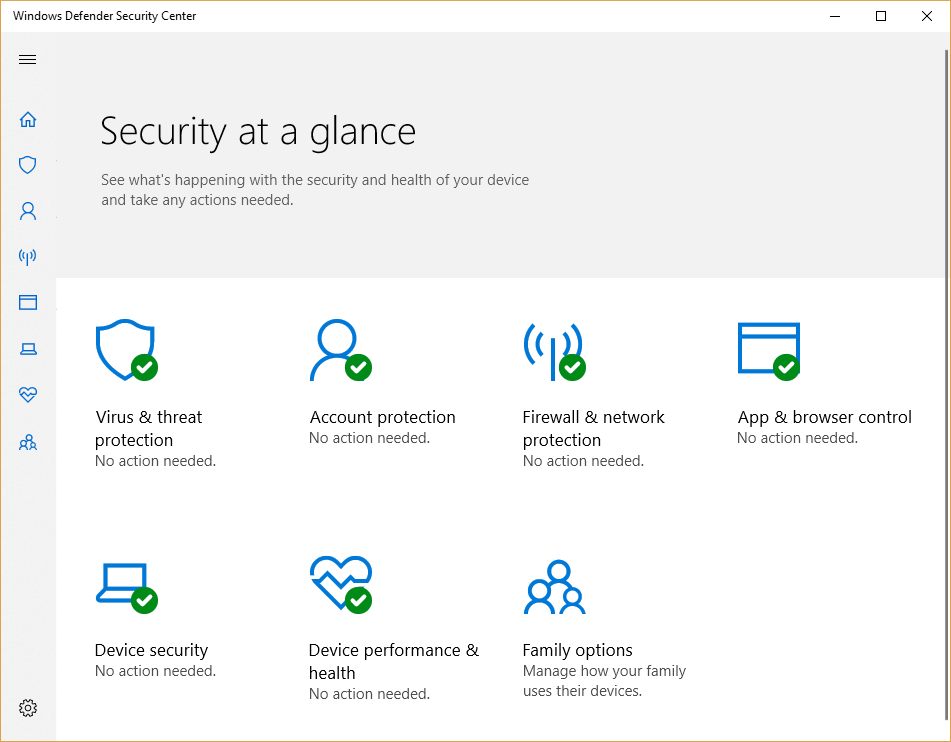
Solution 1st – Modify your System’s Firewall Settings
Initially, hit on the Windows key on the keyboard and proceed to Control Panel.
Within the Control Panel, head to the Firewall Settings.
After that, choose the Allow a Program through your system’s Firewall.
Moving ahead, you need to hit on Add Program tab and include QuickBooks 20xx to the exception list.
Restart your computer to save the changes.
Add the following ports according to the version of your QuickBooks software:
QuickBooks Desktop 2015: 8019, 56725, 55363-55367
QuickBooks Desktop 2016: 8019, 56726, 55368-55372
QuickBooks Desktop 2017: 8019, 56727, 55373-55377
QuickBooks Desktop 2018: 8019, 56728, 55378-55382
QuickBooks Desktop 2019: 8091, XXXXX, XXXXX-XXXXX
QuickBooks Desktop 2020: 8091, XXXXX, XXXXX-XXXXX
QuickBooks Desktop 2021: 8091, XXXXX, XXXXX-XXXXX
QuickBooks Desktop 2022: 8091, XXXXX, XXXXX-XXXXX
QuickBooks Desktop 2023: 8091, XXXXX, XXXXX-XXXXX
QuickBooks Desktop 2024: 8091, XXXXX, XXXXX-XXXXX
Solution 2nd – Assess QuickBooks Hosting Settings
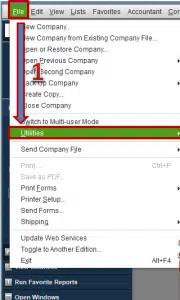
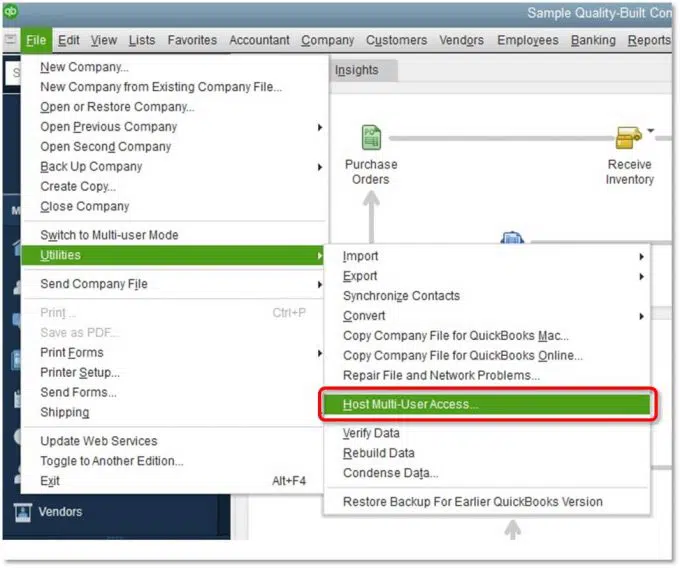
In the very start, you need to launch QuickBooks on both the systems configured as multi-user.
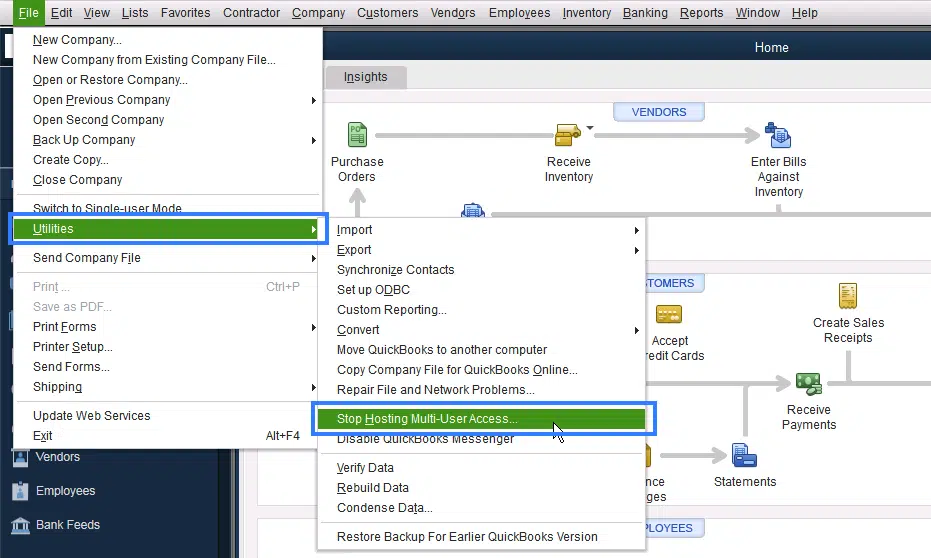
After that navigate to the File menu and select the Utilities option.
In the next step choose Discontinue or Stop Hosting Multi-User Access Configuration.
Now turn on Hosting through clicking on File menu and then hit on the Utilities option and selecting the Host Multi-User Configuration option.
Lastly, you need to restart QuickBooks software on both the QuickBooks.
Solution 3rd – Make Changes to the Setting of Your QuickBooks Folder Location
Initially, you need to make a New Folder on the hosting system.
After that share the folder and set/change Windows access permissions to share company files (contact an IT professional if you are not able to access the QB file server).
Now copy the .qbw file and paste it to the new folder.
Solution 5th – Configure the Firewall Ports Settings
Make sure that the firewall settings are not blocking QuickBooks. You may have to add QuickBooks as an exception or open ports needed by QuickBooks. Usually, these ports are needed to develop a proper network connection. Also disable the firewall and then try to switch to the multi-user mode to host the company file.
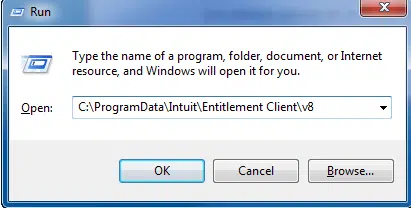
At first, you need to open Run box by clicking on the Windows + R keys together.
After that type in ‘Control Panel’ and hit on the Enter key.
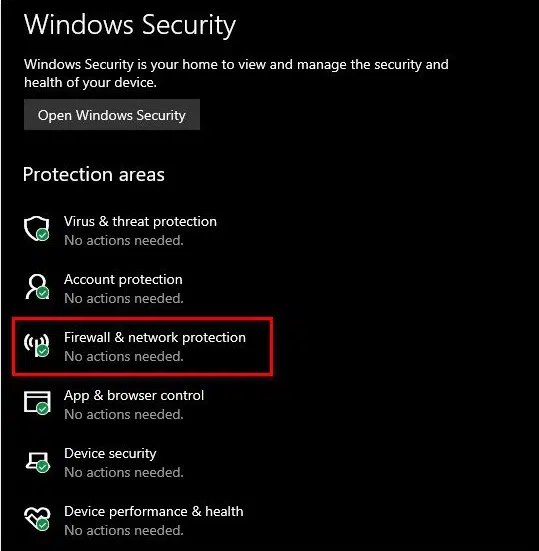
Moving ahead, you need to select the System and security option.
Following that, open the Windows firewall and network protection.
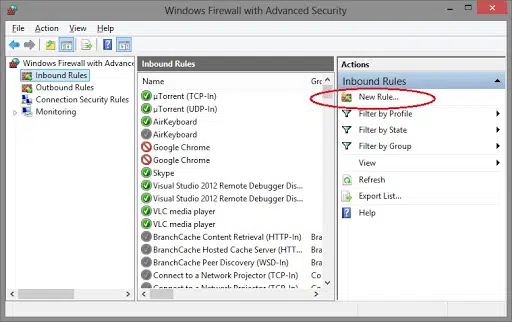
Now you have to hit a click on the Advanced settings tab and also choose Inbound rule.
Next step is to choose New rule option and then opt for a Port and hit on the Next tab.
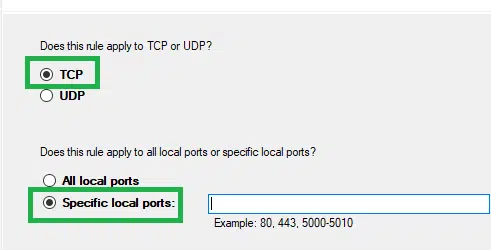
Now select the correct TCP option.
Hereafter, you need to enter the port of the QuickBooks year version.
After the year code has been entered in the respective field, hit a click on the Next tab and restart your PC once.
Solution 6th – Edit the Host File
Step 1: Finding the IP address and system name of the server and workstation:
At first, you need to hit a click on Windows + R keys on your keyboard. It will pop up the Run box on your screen.
After that type in ‘Cmd‘ and then press Enter key.
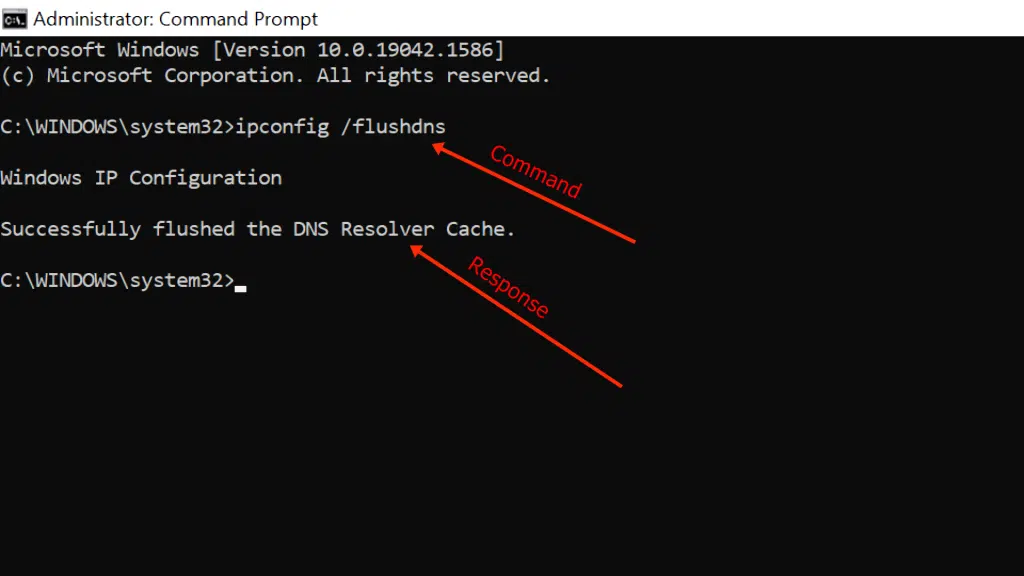
In the next step, you need to open the Command prompt window.
Furthermore, enter the ‘Ipconfig/all’ command and press the Enter tab.
Now you need to find the hostname in the Windows IP configuration section.
Then provide the hostname and IP address.
Hereafter you need to repeat the all above given steps into all of the systems with the multi-user setup.
Now you have to move back to the workstation to test the server. Do the following steps here:
Move to the Windows start menu.
Then type ‘Run‘ into the search bar in order to open the Run box.
Now type in ‘CMD’ into the run window and hit the Enter key.
Here you need to type ‘Ping’ command and then hit on the Enter tab.
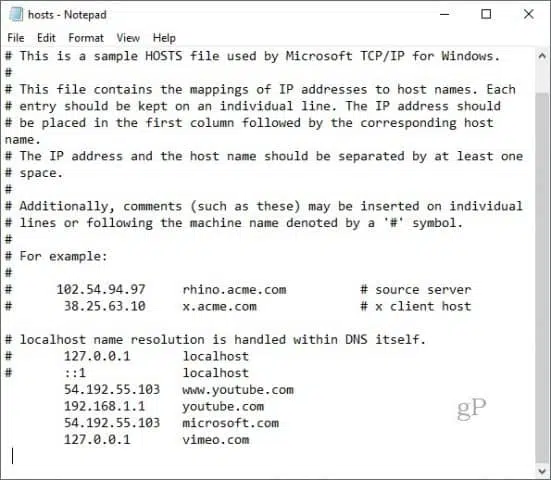
Step 2: Edit the Windows Hosts File
At first, you need to close the QuickBooks software and move to the Start menu.
After that move to the PC option and head to the address:
C:\Windows\System32\Drivers\Etc
C:\Windows\System64\Drivers\Etc
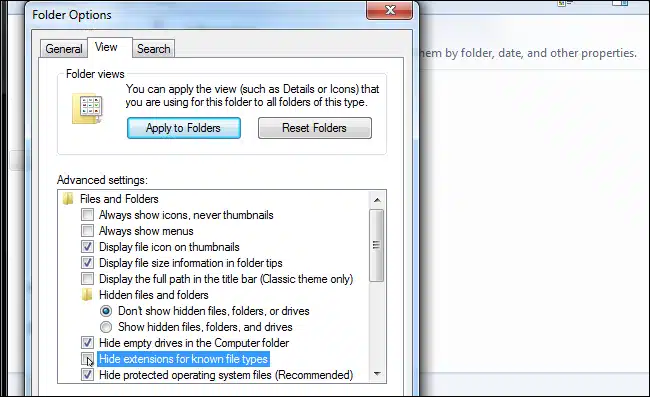
If you’re not able to find the Windows folder, then perform the steps to unhide the folders.
At first, you need to tap on View and then choose Hidden items.
Now, right-click on the View tab. It will unhide all the hidden files and folder.
In the next step hit a click on open with notepad option.
Now fill in the IP address and system name.
To complete the process, you need to save the changes and then reopen the QuickBooks software in multi-user mode.
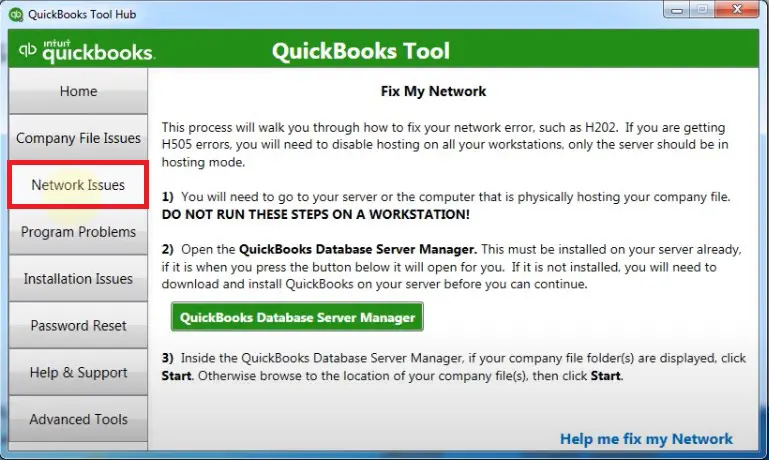
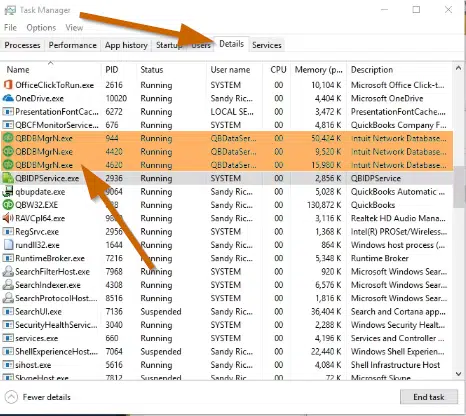
Solution 7th – Run the QuickBooks Database Server Manager on Your Server
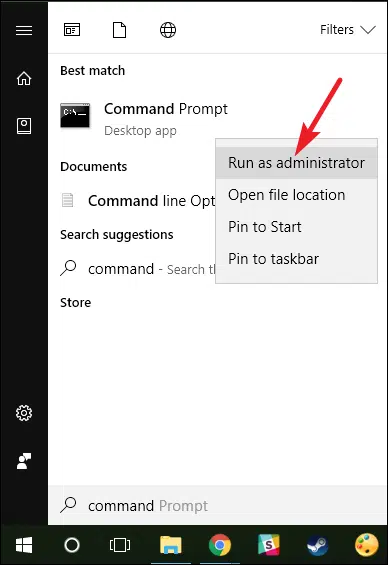
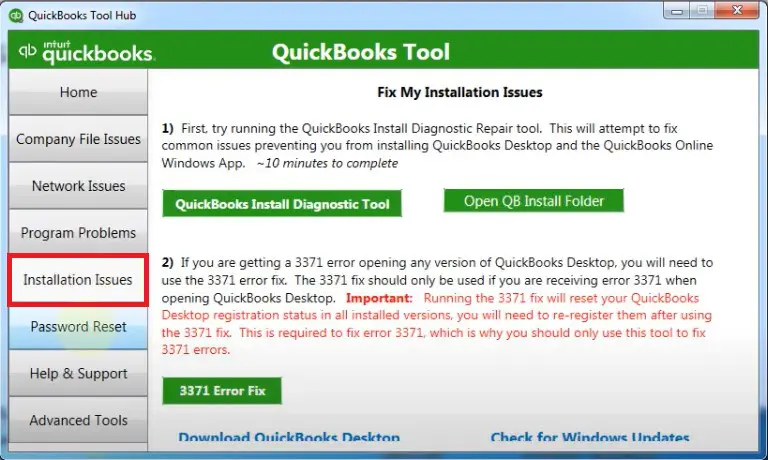
Step 1: Download and Install the QuickBooks Tools Hub on your Server
Firstly, you need to close QuickBooks desktop and other apps running on the background.
Next, you need to download the latest version of QuickBooks Tool Hub program and save the file on your computer.
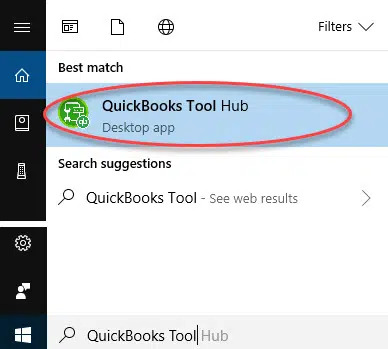
Moving ahead, search for the downloaded file (i.e. QuickBooksToolHub.exe)
To run ToolHub.exe file and install the tool hub on your system, you need to follow the on-screen instructions and Agree to the terms and conditions of it.
Now hit double click on the created QB tool hub icon to open it.
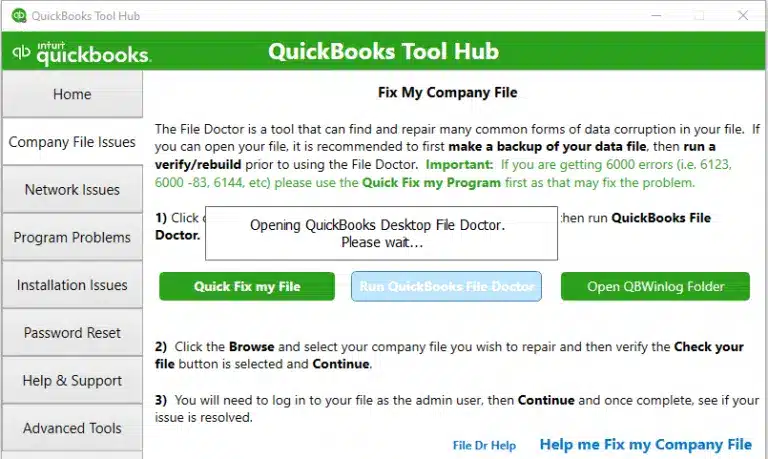
Step 2: Run the QuickBooks Database Server Manager on your server
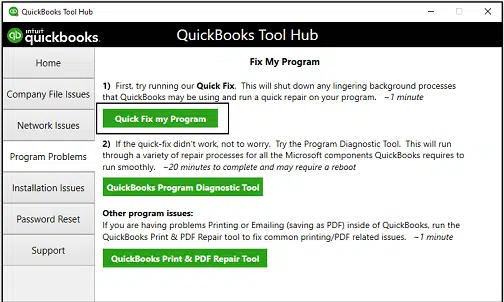
At the very first step, you need to open the tools hub program and then choose Network Issues tab.
It will open the QuickBooks database server manager on your system.
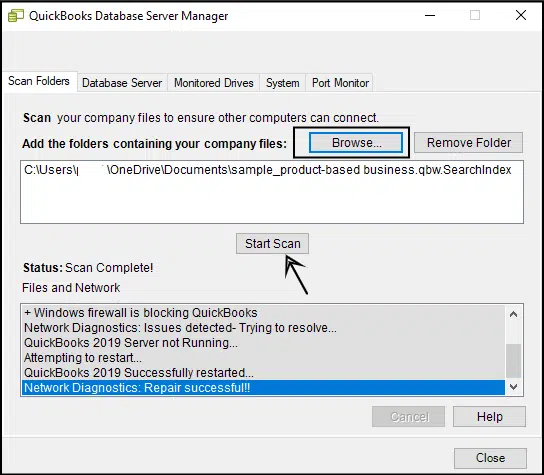
Now inside the Database Server Manager, you need to click on Browse button and navigate to the location of your company file and then select Start Scan button.
You need to select the Start Scan option if you already see your company file folder on the scan folder option.
The QBDSM will automatically repair your firewall permissions.
Once the process finishes, you need to hit on Close.
Lastly, select the File option and Switch to Multi-user Mode.
In case your workstations can go into multi-user mode without any issues, everything is fixed.
Summing Up!
The above-mentioned solutions shall enable you to fix QuickBooks multi-user error H505 and resume working. However, on the off chance that the issue persists, you can contact us and speak to our QuickBooks enterprise support experts via our helpline i.e., 1-888-368-8874. We’ll be happy to help you in every possible way. So, what is the wait for? Just ring us on our helpline and get your queries resolved.
Got QuickBooks Error code 80070057? Here is the solution!
QuickBooks is an innovative bookkeeping and accounting software that millions of business owners across the world find useful. It allows them to handle some of the most complicated tasks such as tracking daily transactions, managing expenses, invoicing customers, and tax filing. But, despite being robust software it sometimes receives errors.
However, being a top-notch accounting software QuickBooks is not entirely free from errors. Here, through this blog, we shall be diving in deep to unravel all the information related to the QuickBooks error 80070057 which has been reported by many users in the QuickBooks community. For your easy understanding, we have encapsulated all the necessary information in a brief, yet easily understandable form. After going through this blog, you should be easily able to fix the error even if you don’t have the considerable technical know-how. So, let us dive in!
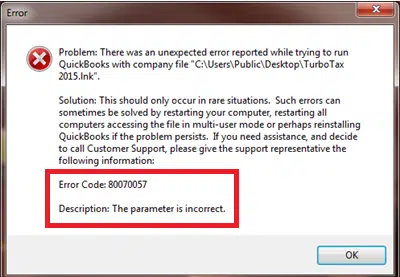
One error that occasionally pops up while opening company files is QuickBooks Error code 80070057. This error code generally shows up as “80070057: the parameter is incorrect.” It denotes that you do not have the required permission to delete the company files from their current folder or location. In order to access the company file, you would be required to read/write and also create/delete rights.
You may see the following error message on your computer screen:
Another error message you might see:
Error
Description
Message
80070057 the parameter is incorrect or You do not have sufficient permissions
Message
80070057 the parameter is incorrect.
Message
Error Code 80070057: There was an unexpected error reported while trying to run QuickBooks
Message
Error: “80070057: parameter is incorrect” when clicking on a QBB, QBM, QBW, ND, or TLG file from a Google Search Timeline.
In this article, we are providing you with some invaluable tips to get rid of this QuickBooks error code 80070057 issueand enable you to resume working. However, you can hire an expert in order to save your valuable time and efforts. Let’s start with the causes behind this error.
What are the causes triggering QuickBooks Error message 80070057?
One or more of the following reasons may cause this error code 8070057:
The company file can’t be read because its extension got changed.
Your system’s firewall is not configured for QuickBooks desktop.
Resolve QuickBooks Error 80070057 When Trying to Open Your Company File
Perform the following recommended solutions to resolve the Error code 80070057 in QuickBooks desktop:
Solution 1: Verify the Company File Name Extension
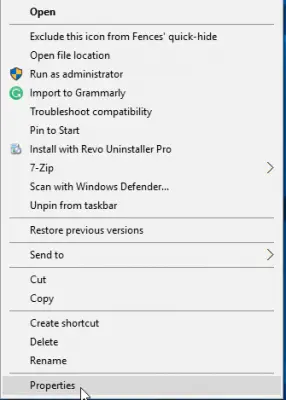
Right-click on the company file.
Now, hit on Properties and then QuickBooks.
Here, check the company file extension and if it is other than qbw, then change it to qbw.
Make a note of the file extension from the Filename field and the current version of QuickBooks in the last opened file.
Now hit the OK button.
Change the Extension
Firstly, create a new folder.
After that Copy and paste the company file into the new folder.
Next, rename the new folder and then change the extension of the file to .qbm
To save changes hit anywhere on the screen.
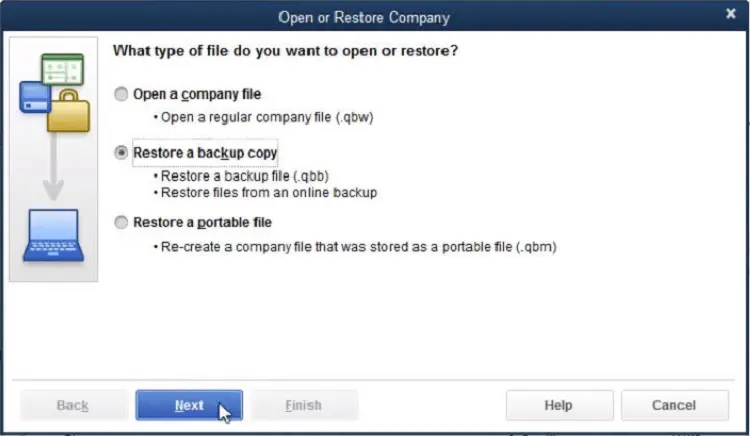
After that open QuickBooks Desktop to Restore the Portable.
Rename the extension to .qbb if you are not able to open QuickBooks.
Open QuickBooks Desktop and restore the Backup.
Rename the File extension to .qbx if it still doesn’t open.
Lastly, open QuickBooks to convert the file to an Accounting copy.
Copy the company file and paste it into another folder on the Flash Drive
Open the Windows Explorer with QuickBooks Desktop by hitting the Win + E keys.
Right-click on the File option and hit on the New Folder.
you are then required to Copy (CTRL+C) the “Companyfile.QBW” from the Flash drive and Paste (CTRL + V keys) it into the new folder.
Finally, open QuickBooks Desktop and then the new folder.
Solution 2: Perform a Clean Installation of QuickBooks
Perform a clean install while uninstalling and reinstalling QuickBooks. You can also uninstall QuickBooks manually from the Control Panel and then reinstall the software. You will need your license key while re-installing the QuickBooks software.
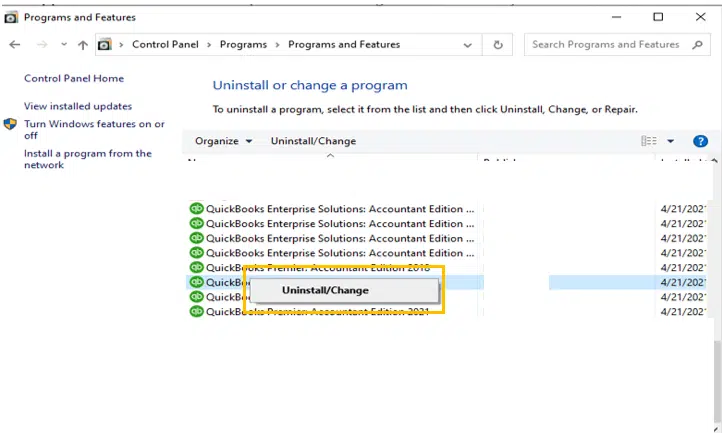
Open Control Panel, then the Programs and Features.
Here, choose QuickBooks, then go for Uninstall/Change tab.
Now, click on Uninstall and wait till QuickBooks is removed.
Then, rename the QuickBooks folder, and proceed with Reinstallation of QuickBooks.
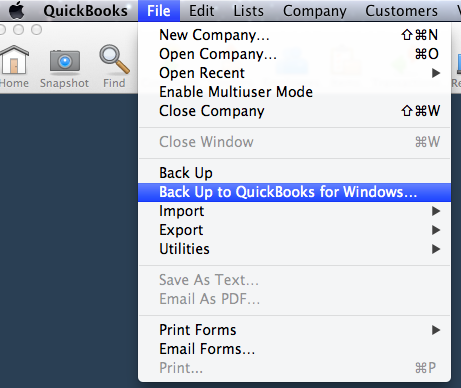
Solution 3: Convert the Files From Mac to Windows (Mac Users Only)
In case you are converting files from Mac to Windows, make use of the Back-Up option available in Windows function and convert QuickBooks from Mac to Microsoft Windows.
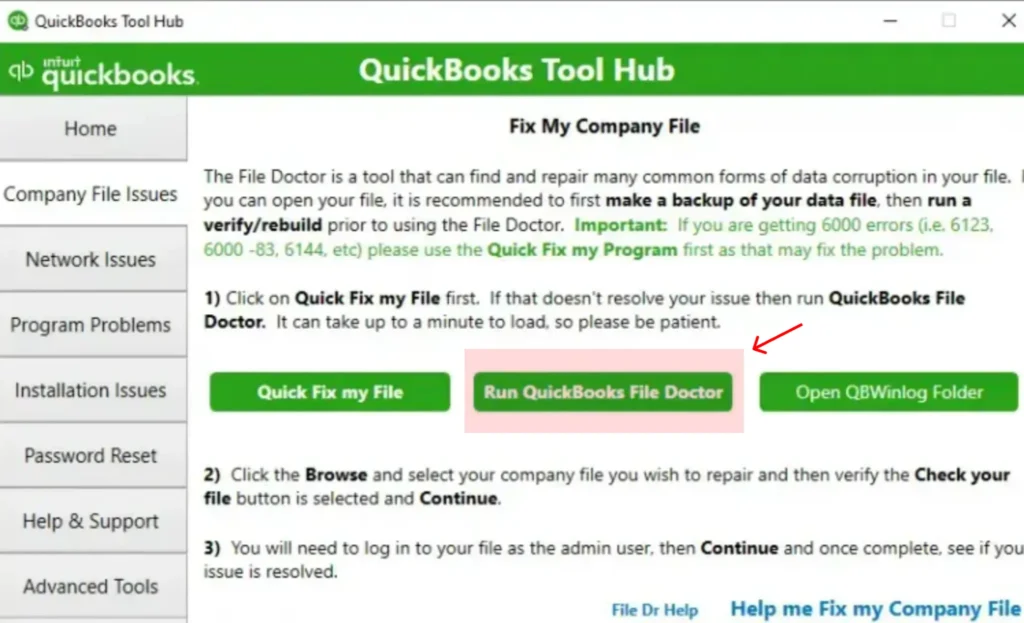
Solution 4: Install and Run the QuickBooks File Doctor
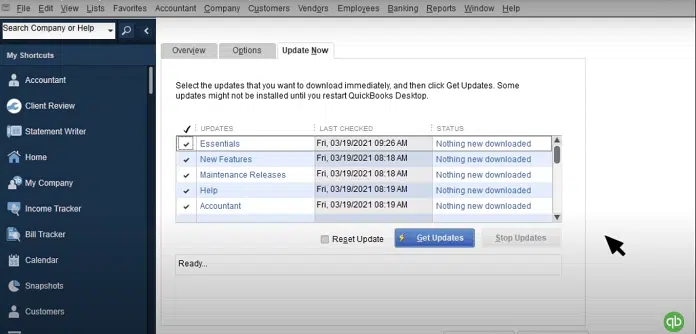
You need to now launch the Update now tab and also pick the Reset update tab only if you want to remove the earlier update downloads.
Later on, choose the Get updates option and hit on start QuickBooks.
Verify whether the error got fixed or not.
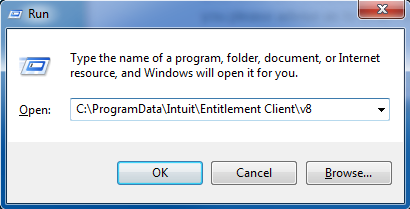
Solution 8: Move to The Default Location
First, close the QuickBooks software.
Furthermore, browse the location of the company file.
Right-click the company file by opting for the Copy option.
You now have to Browse the default location and right-click and hit on Paste.
Open QuickBooks along with that opt for Find a company file option.
Choose Local drives and look for the company file name.
End the process by opting for the Correct company files and hitting on Open.
Solution 9: Manually Resolve the Error 80070057
Step 1: Rename the Network (.ND) file
All network configuration setting related to QuickBooks are stored in the Network Description (ND) files. Any corruption in this file can result in such errors. To fix the running error, it is advisable to rename the ND file. Here’s how:
First of all, you need to Browse the location of the company file.
Afterward, look for the corresponding ‘.ND’ file of the company file.
The next step is to right-click the .ND file and then hit on Rename.
Add .old in file name to make it look different from the new ND file which will be created when you open QuickBooks next time.
Lastly, run QuickBooks and open the same company file again.
Note: You might proceed to the next step, in case you are using QuickBooks in multi-user mode.
Step 2: Launch the QuickBooks Database Server Manager on the Server
We hope that after implementing the solutions included in this article, you were able to fix the windows file error – QuickBooks Error Code 80070057. If the issue persists or you need any additional assistance related to QuickBooks, you can call our 24×7 QuickBooks support and speak to our experts.
Don’t be hesitant to call us anytime as our experts are available 24/7 to help you out on all the QB-related issues.
Here are the reasons and solutions of QuickBooks Error 6000 83:
Business owners and accountants find QuickBooks immensely useful in handling the accounting operations of their business. This software is specifically recommended for all small and mid-sized business owners who can’t hire too many employees or pay external service providers. Some of the most complex and exhausting tasks that this accounting software performs with ease are bookkeeping, sending invoices, tracking growth, managing cash flow, and preparing taxes. Thus, it saves both time and money. Errors, however, may occur at any time and they may be strenuous and frustrating.QuickBooks Error 6000 83 is one such error that may put all your accounting operations on a halt.
One of the common error that users often report or look for solutions for is QuickBooks Error code 6000 83 which is a company file error. This issue oftentimes occurs when users try to access, create a backup or restore the company file.
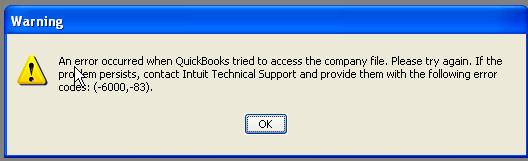
This error generally occurs when a user tries to access the company file but the company file couldn’t open due to some reasons. There might be numerous possible reasons behind this error. We recommend that you should check every possible cause manually to rectify the error and then attempt the solution steps to resolve it. You may see the following error messages on your computer display when Error -6000, -83 encounters.
Error
Description
Warning
You do not have sufficient permissions to the specified folder. To use QuickBooks in a multi-user environment, you must have read/write access and create/delete rights to the folder where the company file is stored.
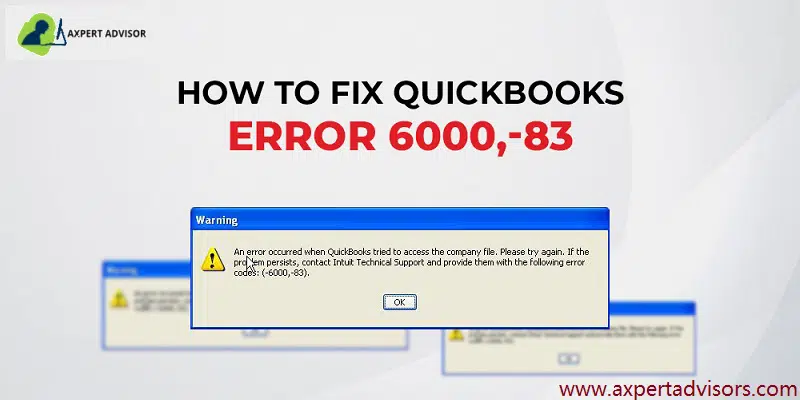
Warning
An error occurred when QuickBooks tried to access the company file,
Warning
Unable to access company file error: – 6000, -83
Error
We’re sorry, but QuickBooks can’t open your company file.
Along with this, users may face other company file errors as well that belong to the 6000 series. Multiple reasons trigger Error Code 6000, 83 in QuickBooks desktop and there are different solutions to fix them. Here are some of the most reliable troubleshooting steps that you can try. This article is created to discuss all the possible reasons and appropriate solutions for such an error Thus, keep read on and have all your questions answered.
Possible Causes of QuickBooks Error 6000, 83
One or more of the below-listed conditions may cause this error:
Your company file or the folder housing your company may be damaged.
The system firewall is blocking the QuickBooks programs and files.
Incorrect file extension
There are Insufficient permissions for your network server, Windows user, or QBDataServiceUserXX
Easy Solutions to Troubleshoot QuickBooks Error Code 6000 83
Multiple reasons trigger QuickBooks Error Code 6000, -83 and there are different solutions to fix them. Here are some of the most reliable troubleshooting steps that you can try.
Condition 1: You were Trying to Open a Company File That’s Stored on a Windows Server
The file doctor will automatically detect the company file problem and then try to resolve it.
Restart the computer.
Solution 2: Turn off Hosting on Systems That Attempt to Access the QuickBooks File Over the Network
In case you use QuickBooks Desktop on multiple systems, configure just one to host the company file. Here are the steps that you can follow to turn off hosting on computers.
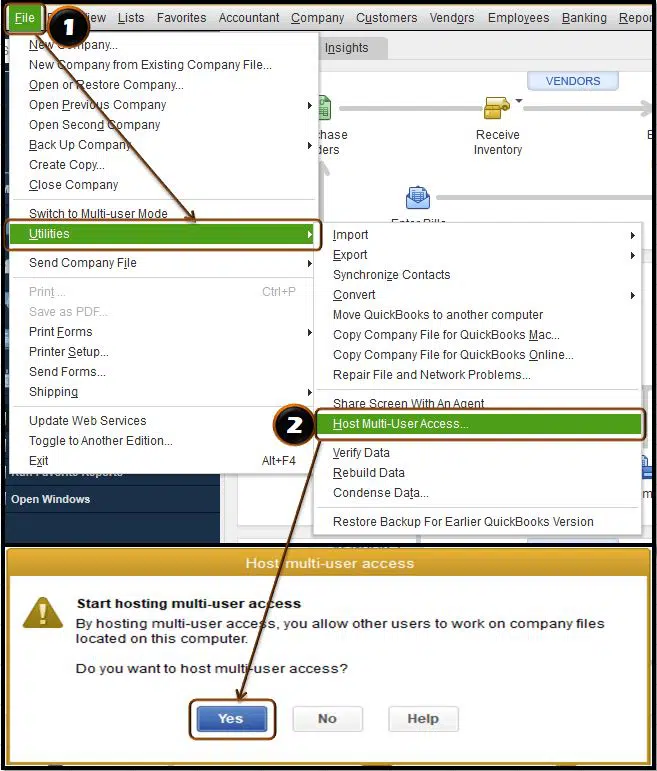
Open QuickBooks Desktop, choose File menu, and then hit on Utilities.
You may see either of the two options:
Host multi-user access – It denotes your computer is not hosting your company file and you can move on the next system.
Stop hosting multiple user access – It will show up a window where you have to click Yes. While performing this step, you should be aware the company file window should be closed, choose Yes and proceed to the Next computer.
Choose “Host multi-user access” after repeating the steps.
Furthermore, you now have to head to the QuickBooks database server manager screen and hit a click on Add folder tab and search the folders that have QuickBooks company files.
After the QB folders are added, then hit on the Start Scan tab.
Now, under the QuickBooks company files, you need to Check the files.
Lastly, browse to the files and folder that have the company files. Ensure that the qbw and .nd file was created or built for each of the company file.
4. Check the hosting on the systems
You need to open the QuickBooks application and move to the file and select Utilities tab.
From the list:
If the Host multi-user access option is present, then it indicates that the system is not hosting the company file.
Else, Stop hosting multi-user access should be selected.
5. Open the company file from a different location
At first, you need to host the system to open the company file.
Move to the system where the company file is saved.
If the only system that stores or installed the server is hosting the system, then you should move the company file to some other location.
Now open the software and also the company file that is facing the issue.
In case you are capable of opening the company file, then check the company file.
Else, move to the other step.
If you are getting instructions from the software to rebuild the company file, then do the same.
Now copy the QuickBooks file to another location.
At first, open and access the folder having the company file.
After that, right-click on the File name and hit on the Copy tab.
Afterwards, hit a right-click on the Empty area and hit on the Paste tab.
Now turn on QuickBooks and open the company file on the desktop.
In case the QuickBooks company file opens, then copy the file back to its original location.
Make sure that the original company file name is renamed before copying the file that is freshly opened from the system.
Solution 4: Edit the Hosts File
One should edit the host file on the desktop with the correct IP address and Windows server name.
Initially, you need to close the QuickBooks.
After that choose the Start menu and computer on the server.
Then move to the following location:
C:\Windows\System32\Drivers\Etc
C:\Windows\System64\Drivers\Etc
Furthermore, you need to double click on the Host file.
Now choose Notepad.
In the next step, you need to enter the IP address followed by the system.
The name server will have the Workstation IP and system name while the workstation will certainly have the web server IP and also computer name.
When entering these details, you are suggested to use the Tab key instead of the Space bar to differentiate between the IP address and the system name.
Condition 2: You Were Trying to Restore the Company File
Solution 1: Check if the File Name and the File Path are Leading to the Error
QuickBooks accounting software keeps every file name and path at the time we try to restoring the backups. You need to make sure that the file name should not contain any special characters in the file and the path.
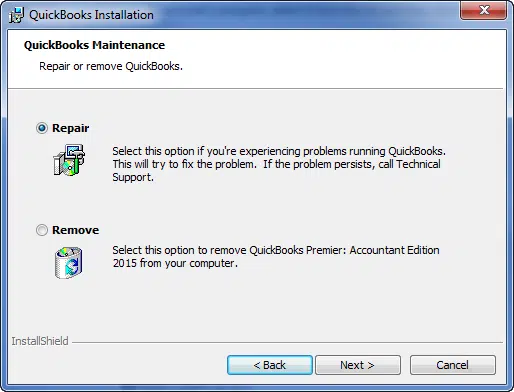
Solution 2: Repair QuickBooks desktop
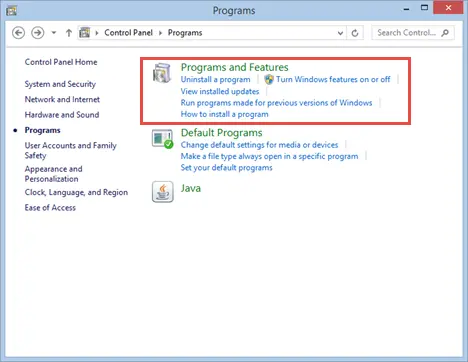
In the first step, you need to go to Control panel and open the Programs and Features option.
After that click on Uninstall a program tab.
Moving ahead, you need to select QuickBooks desktop from the list.
And opt for Uninstall / change.
In next step you need to click on continue < Next < Repair < Next < Finish.
We hope that you are able to fix QuickBooks Error code 6000 83 with the help of the solutions entailed in this article. In case the issue pervades or if you want to stop this error code from reoccurring, you can contact us at our QuickBooks enterprise error support team and rest assured of a quick and precise solution. Our experts are available 24 x 7 to provide you with complete support.
Learn what to do if you see QuickBooks Error 3371 (Could not initialize license properties):
Facing QuickBooks Error code 3371? This is a pretty common error that you can run into when reconfiguring the system or setting up the company file. Tackling these technical glitches can be super annoying at times. However, going through this piece of writing will help you in finding out the right fixes to implement for fixing this error.
Scroll through the segment with much care to avoid missing any of the important points. Whereas, if you aren’t interested in investing your time in fixing the QuickBooks Error 3371 Status code 11118 issue manually, then contacting our tech geeks using our support line would surely help.
What is QuickBooks Error 3371 (Couldn’t Initialize License Properties)?
This error is a common error reported by many users of QuickBooks software. This error may occur due to missing or damage caused to the company file. If you are facing this error then you have reached the right place because in this article we have focused on this error and its causes, alongside a comprehensive section containing all the solutions. When you reconfigure your system or try to activate your QuickBooks desktop for the very first time, then QuickBooks Error message 3371 may be on your display screen.
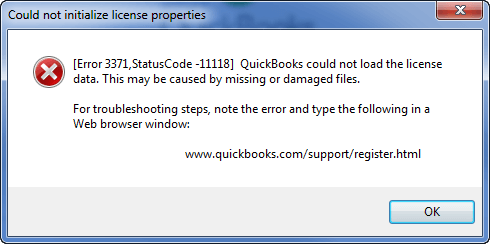
You may get a warning message showing:
Error
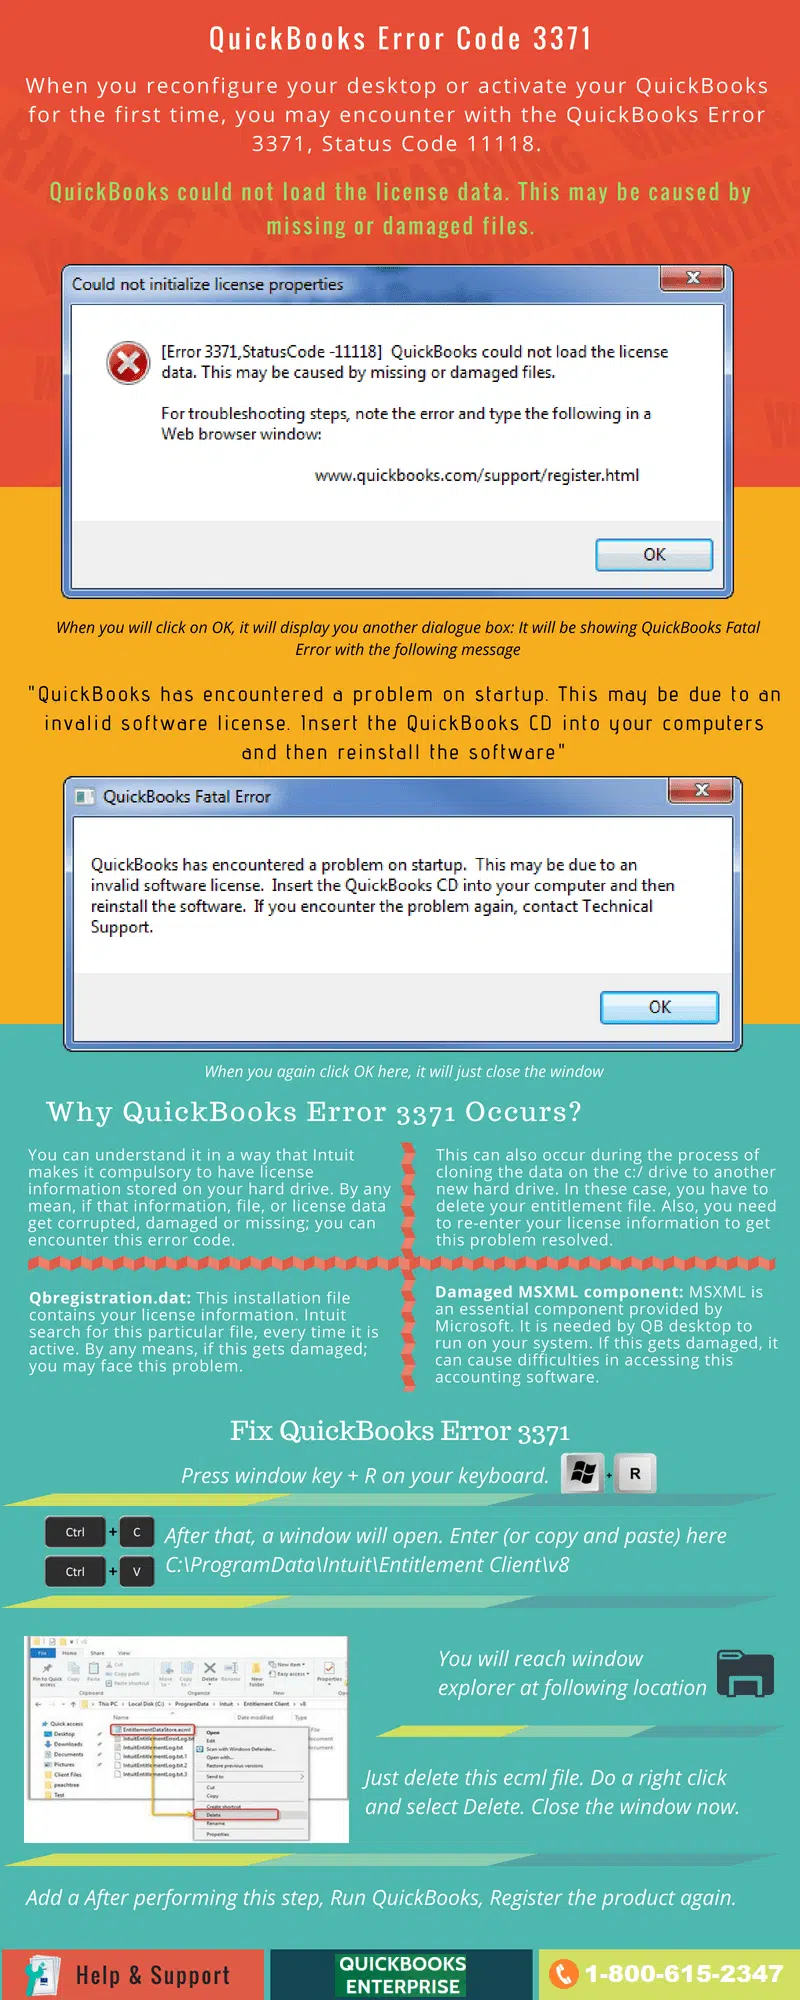
QuickBooks could not load the license data. This may be caused by missing or damaged files. For troubleshooting steps, note the error and type the following in a web browser window: www.quickbooks.com/support/register.html.
Once you will hit on OK button, it will display you another box showing as – “QuickBooks Fatal Error“
QuickBooks Fatal Error
QuickBooks has encountered a problem on startup. This may be due to an invalid software license. Insert the QuickBooks CD into your computers and then reinstall the software. If you encounter the problem again, contact Technical Support.
In order to resolve this error without any hassle or exerting any effort, you can take help from our certified experts. Our technical support team will be pleased to help you out with this error code. Check out the info-graphic below and learn the ways to resolve the ongoing error:
The QuickBooks Error 3371 Status code 11118 shows up in different forms
This error can appear in the following forms:
“Could not initialize license properties. [Error 3371]: QuickBooks could not load the license data. This may be caused by missing or damaged files.”
“Could not initialize license properties. [Error 3371, Status Code -11118] QuickBooks could not load the license data. This may be caused by missing or damaged files.”
“Could not initialize license properties. [Error: 3371, Status Code -1] QuickBooks could not load the license data. This may be caused by missing or damaged files.”
Plausible causes of QuickBooks error code 3371
Let us now check out the possible reasons which incite the error message 3371 in QuickBooks desktop. the error may be caused due to any single factor or may be due to the various causes working together to bring about this error:
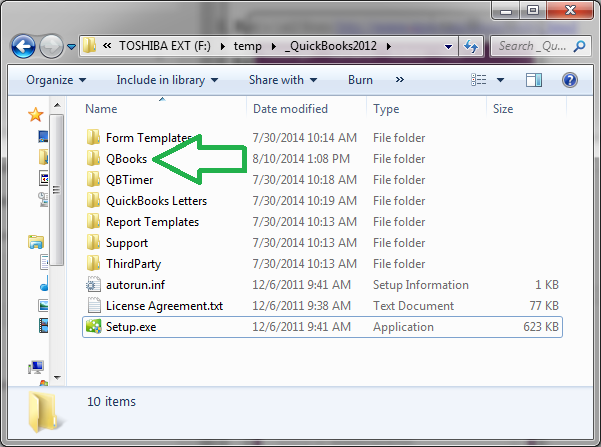
If one or both crucial components of the QuickBooks get corrupted or damaged, in such a situation, it possibly moves from its original location. Usually, those two components are:
dat: It is one of the essential files present in the QB folder that contains the account’s license information. To check this file, you need to retrieve it while the QuickBooks version opens.
MSXML Component: The MSXML Component is also a crucial component that makes sure smooth operation.
Due to the outdated Windows Operating System.
If the system security program detects QuickBooks files as a threat or virus to the system.
For Right Networks and QB Enterprise with WebConnect users: You may experience this error if you open the file before you save it.
Different Fixes for QuickBooks Error 3371 Status Code 11118
This section encloses some of the easy, yet effective methods to resolve the QuickBooks Error 3371 Status Code –11118. In case, you require an instant solution in a short time frame – you can follow the quick manual solution. Follow the below given manual troubleshooting guide to up-stem the error once and for all.
Method 1: Update your Windows system drivers
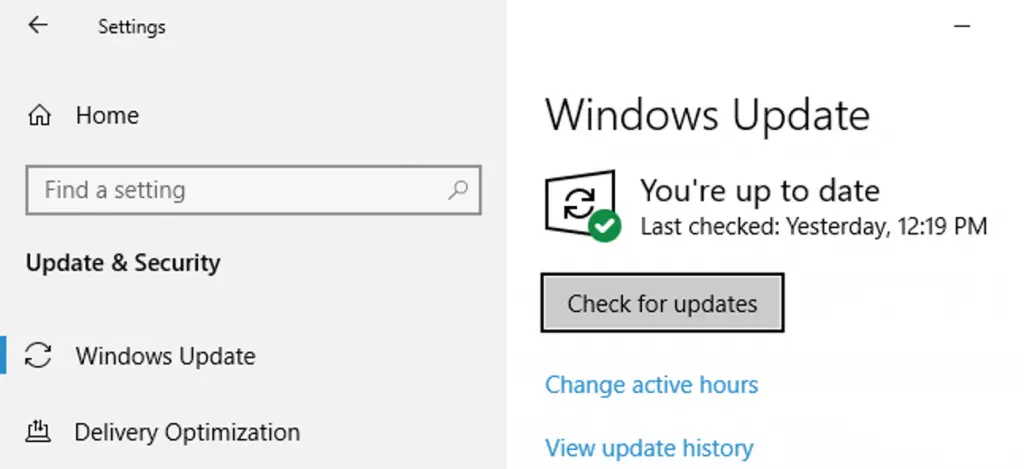
Ensure that all the Windows updates are installed.
One useful approach to fix Error message 3371 in QuickBooks desktop is by updating Windows. This will update the Windows components to their latest version and will also set up the security updates. The steps include:
In the beginning, go for the Start menu
Subsequent step requires typing “Update” and then open Windows Update feature.
Next, set for the Check For Updates tab.
As the updates get revealed, mark all of them.
Afterwards, tap on the Update Now tab and kickstart the update.
The system shall restart and if it doesn’t, go for a manual system restart.
The updates will start installing on the system and once they are done, the desktop will load up.
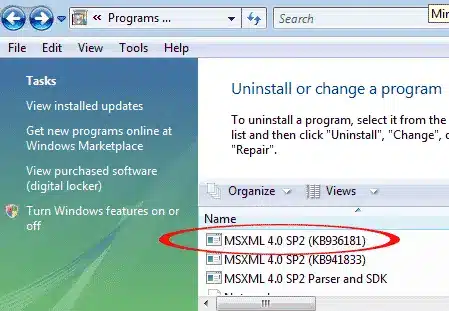
Some corruption in the Windows components can also embolden QuickBooks Error 3371 Status code 11118. To get this thwarted, perform the steps below:
The first move is to head to the Control Panel.
Therein, make a move for Programs and Features tab.
upon clicking on this tab, a long list of installed apps will appear. Search for MSXML and .NET Framework programs and get them uninstalled by clicking on Uninstall/Change tab.
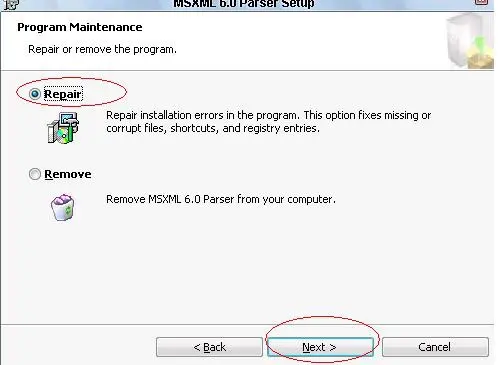
Then, proceed by clicking on the Repair tab to get these components removed.
Although there is another option of repairing the file, but it is better to uninstall the components and install the compatible versions of these components from the official website of Microsoft.
Sum up!
Hopefully, this segment would be useful for you to understand and fix QuickBooks Error code 3371. However, In any case, if you need immediate QuickBooks help or support for this particular error or any other QB-related issue, you can contact our Intuit-certified professionals via our helpline i.e., 1-888-368-8874. We comprise a US-based team of qualified professionals who have devoted themselves to the field for several years and have served clients on a global level.