Here is how you can Install multiple QuickBooks versions on one Computer:
We understand how intricate it can be for you to install multiple QuickBooks desktop versions on the same system. Considering this difficulty, we have drafted this piece of writing, where we will be talking about the complete set of steps to install multiple QuickBooks desktop versions on one system.
You can have multiple versions and editions on the same system. You can use these specific steps to install each version or edition one at a time. We recommend you to go through this piece of writing till the end. Or you can also connect with our tech support professionals for any sort of further tech assistance.
Essential pointers to note before you install multiple QuickBooks versions
You are suggested to consider the below set of pointers, so as to install multiple QuickBooks versions on one system.
You can work in multiple versions of QuickBooks at the same time. In case you are using premier 2019, then open premier 2018. You can only open the same version of premier and enterprise if you use the accountant edition.
Note that, you can install the same version of QuickBooks desktop pro or premier and enterprise.
It should be noted that QuickBooks desktop pro and premier make use of the same install files. Also, you won’t be able to install the same version of pro and premier on the same system.
You can only install one industry-specific edition of QuickBooks for each version. This basically means that you can either have QuickBooks desktop premier 2018 retail or premier 2018 contractor.
One can’t mix and match different regional versions and editions of QuickBooks.
In case you need multiple regions on the same system, use a virtual machine or a web hosting service for creating an environment for each region.
Also, you can’t easily share data or company files between QuickBooks desktop enterprise and pro or premier.
Steps for installing multiple versions of QuickBooks Desktop
You can either install the same versions of the various available editions or successfully download multiple versions of the same or more editions. The process is quite simple to follow but equally important. Therefore, pay due attention to sail through it with no hassle.
In case you haven’t, download the version or edition and save the file where you can find it easily.
Open QuickBooks.exe you downloaded.
Perform on-screen prompts.
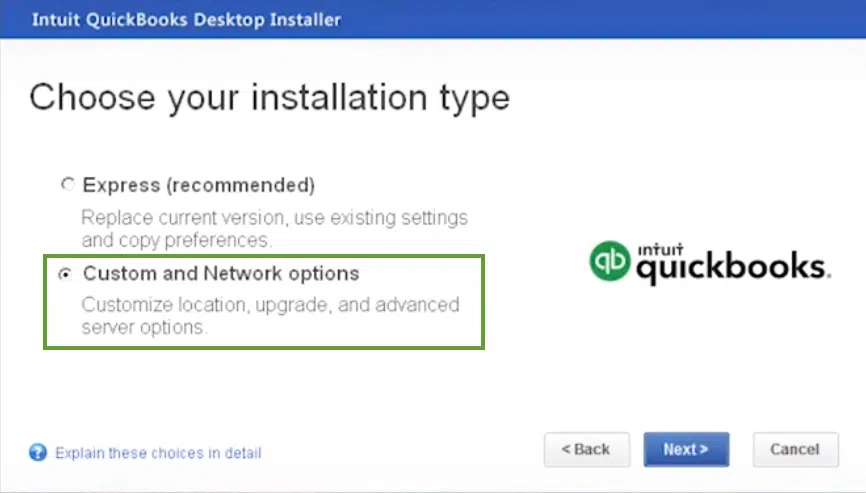
Select custom and network options. Avoid selecting express.
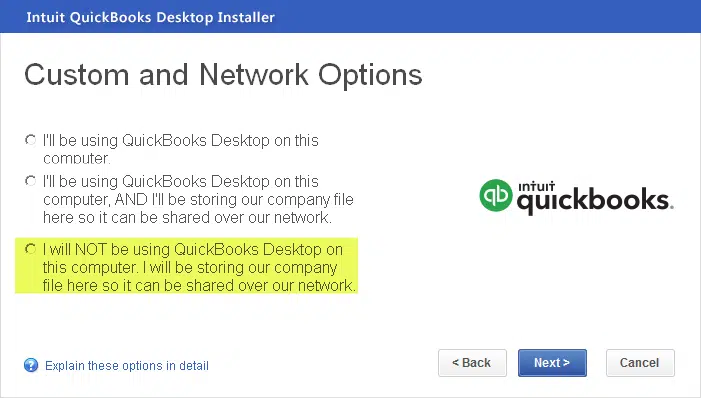
You need to opt for a custom network option. In case you plan to use QuickBooks only on this system and not share the files over a network, then choose I’ll be using QuickBooks desktop on this system. In case you are setting up a multi-user network, then either go for I’ll be using …. And or I will not be using, as per your setup.
When installing multiple versions or editions, QuickBooks will ask if you wish to replace what’s currently on the system. Avoid replacing anything, unless that’s what you want to do.
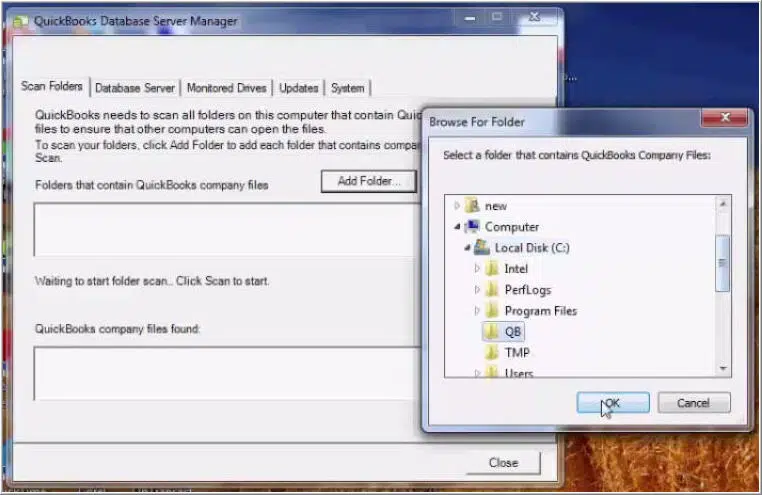
Head for the browse option and also right-click the window and create a new folder.
Avoid opting for the existing QuickBooks folder or any folders that have QuickBooks info.
Pay heed to on-screen prompts.
Perform the same steps for each version and edition.
Viable steps to install 2 versions of QuickBooks on the same PC
Check out the following steps to install the QuickBooks desktop versions on one computer.
1st Step
Do you have the QuickBooks CD with you? If yes, it’s an ideal choice to download and install the same version on the CD onto your desktop, otherwise, you can always install the already downloaded version of QuickBooks on your desktop.
2nd Step
Wait for some time, mere seconds, or max a minute or two before the installation procedure starts. In case there is any halt in processing, don’t fret. You always have an option to click the installation method manually.
3rd Step
While you are aiming to download the same version of QuickBooks of a different edition, after the installation window pops up, change the location of the software to save it elsewhere. Though, the methods will vary whenever you are trying to install different versions of the same software.
For instance,
If you have QuickBooks 2009 or older version, these steps are applicable:
As the Select Installation Folder flashes on your screen, click on the first and foremost option, that is, Install QuickBooks desktop (which version you have currently) to Folder C:\Program Files\Intuit\QuickBooks (the version you have and want to install).
Similarly, if you have QuickBooks (version 2010 and more), follow these steps:
Choose the Custom and Network Options.
You will be given an installation option, select the ones which you think suit your need.
As soon as the Upgrade or Change Installation Location checkbox appears on your screen, tick the option which says Change the Install Location.
4th Step
If you are comfortable with manual changes, you can click Browse or Change icon and select a new folder or different location where the installation will be stored.
5th Step
Press the Next button to step forward.
6th Step
You will be given a set of instructions, pay attention and apply them word-for-word for successful installation of QuickBooks versions on a single desktop.
7th Step
As all the steps mentioned are followed correctly, QuickBooks creates a desktop icon. You can browse that shortcut folder to open the installed version you desired of QuickBooks desktop software.
That’s All!
Isn’t it easy?
Though, we would like to guide you through some of the important points to be taken into consideration whenever you are following the above-mentioned steps for another version to be installed catering to your organizational or individual business needs.
These essentials are as clarified below:
In respect of the QuickBooks Desktop premier and pro or enterprise, please keep in mind that they both have namesake installation files as well as folders. Therefore, the same version of both the editions should not be installed on the same desktop location.
Various versions of QuickBooks Desktop can co-exist on your Desktop device.
Also, it’s to be taken notice that the dataset files of one version or edition cannot be shared or exchanged with the other version or edition. So, please be careful while operating QuickBooks on different editions or versions as you wouldn’t be able to merge or shift them from one version to another.
As an endnote, QuickBooks installation is fairly simple and it is a must-have enterprise resource planning software for unstoppable documentation.
By the time we drive to the conclusion of this segment, we expect that you might be able to successfully install multiple QuickBooks desktop versions on one system. Despite that, if you aren’t able to install multiple QuickBooks versions, then in that scenario connect with our QuickBooks desktop support professionals.
25 Reasons Why You Should Upgrade to QuickBooks Enterprise from QuickBooks Pro/Premier
Is your business garnering more revenue than before and you are planning to expand and hire more employees? Or, are you an accountant and are seeking to serve your clients with more accuracy and results? In either of the cases, if you use QuickBooks Pro or Premier, it might be time to upgrade to QuickBooks Enterprise.
In this blog post, we have concluded some of the most popular and useful features of QuickBooks Enterprise. Read on and find it yourself if it’s about time you upgrade to QuickBooks Enterprise.
Reasons to Upgrade QuickBooks Enterprise from Desktop Pro/Premier
Understand why you should upgrade QuickBooks desktop enterprise from QuickBooks Pro/Premier:
QuickBooks Desktop Pro and Premier may get sloppy if you have to open or work on the file size of “250 MB” or more. On the other hand, QB Enterprise can easily handle files of much larger sizes.
While QuickBooks Pro and Premier have a limitation of list name (maximum 14,500 customers, vendors, employees, items and other names), QuickBooks Enterprise enables you to add as many names as you want.
While QuickBooks Pro is limited to 3 and Premier to 5 users, QuickBooks Enterprise host as many as “30 users” at the same time. Besides, the Latter also enables you to set up particular roles for every user and task-based security access.
You can create up to “15 custom item fields” and 12 custom name fields with QuickBooks Enterprise. However, Pro is limited to 5 and Premier to 7.
Intuit built QuickBooks Enterprise with “Windows Terminal Services” in mind, and therefore, it works great with multiple users connected to one “Windows Server“, no matter locally or remotely, with MS Windows Remote Desktop function.
You can also configure QuickBooks Enterprise to accommodate data field format input specifications and drop down menus in custom fields. The added “Custom fields” can further capture more data to search or filter on custom reports.
QuickBooks Enterprise makes it simple to search for items within transactions like “Purchase Orders and Invoices“. You can use numbers, description or both to find a specific item from a large item lists.
This tool allows you to consolidate reports from various QuickBooks files into one financial statement in MS Excel.
A feature called “Enhanced Inventory Receiving” separates the receiving process from the accounts payable process and enables you to maintain a separate receipt date of inventory from the bill date.
With “Automatic Price Markup“, you can “configure the MARGIN” or the “MARKUP” of an item to be fixed, and the software will itself update the sales price in case the cost changes.
You can use “Automatic PO,” to create a Purchase Order to stock up to recommended levels. It also enables you to track both minimum and maximum reorder points.
Its Default Classes let you assign a class in transactions to an account, item or name (Customer/Vendor/Employee).
In Vendor Transactions, for example, Checks, Bills and Credit Card Transactions, you can use a “Sales Rep” and “Custom Fields“.
With QB Enterprise, you get “WIP Summary Report” (Contractor Edition) along with the percentage of completion calculation. And Committed Costs by “Job Report” (Contractor Edition) displays estimated costs of open purchase orders as well as time sheets assigned to jobs.
With Enterprise you can automatically build assemblies with sub-assemblies. Also, remove or replace discontinued entries and auto-calculate the cost of assembly items based on “Bill of Materials“.
It prevents negative quantity on items by catching inventory errors and restricts users from selling items through invoice or sales receipt that have less amount than what has to be sold.
Make use of options to hide “opening balances” on items and customers and vendors. Also, prevent users from putting in opening balance information.
Keep from selling to overdue customers with “Optional feature” that would disallow users from creating invoices for customers who have any unpaid invoice post due date.
You receive “Shortage Report” for inventory assemblies. It show the items needed to build an assembly that falls short and is highlighted as pending.
An “Inventory Shortage Detail Report” consists of all pending builds and items required to complete the assembly.
You can subtotal item quantities and custom fields, sort items by any column, print footer on the last page, and compose alternate gray lines when “Printing or creating PDF” transactions.
QuickBooks Enterprise enables you to see the item’s cost in the sales forms, sales orders, invoices and sales receipts, which used to be available on Estimates only.
Use “Advanced Reporting“, a fully customizable pivot-style advanced reporting.
Delete checks, invoices or bills in batch to save time and rectify errors.
Enterprise automatically upgrades to the latest versions. But for this, you need to have an active subscription.
In the end, we see why businesses should upgrade to QuickBooks enterprise solutions that can help you manage your business faster and more accurately. If you have any doubt or you need any assistance, you can connect with our 24×7 QuickBooks Enterprise Support team.
Get the latest steps to track your cash flow in QuickBooks Desktop:
The QuickBooks accounting software offers a wide range of impressive features and tools that aid accounting sectors. Discussing cash flow, it is basically the amount of money that moves in and out of the business and the bank account. Keeping a track of the cash flow in the QuickBooks desktop is a must, so as to get a crystal-clear picture of the current and future businesses’ finances. To learn the process for tracking cash flow in QuickBooks desktop, check this segment out. You can simply track your cash flow using the below set of steps. Let us dive in together.
Check Out Your Financial Position Using the Below Steps
Here are some simple steps that you can execute so as to track your company’s financial position. Explore the steps by scrolling down carefully.
Step 1: The first step to track your cash flow in QuickBooks is to ensure that data is accurate
The very first thing that you should ensure is that the books of accounts are appropriate and accurate. All the reports will make use of the data in QuickBooks, thus, it is very much important to have a clean starting point.
You are required to ensure that you have entered all the transactions into QuickBooks.
Just in case you have set up bank feeds, download the transactions and match them to the transactions in QuickBooks.
Reconciling the accounts in QuickBooks is the next step you should perform and ensure to match them with the bank and credit card statements. Just in case you need any assistance in reconciling the account, it is a good idea to consult an accountant.
In case, you reconcile report tallies with the bank statement, then you are all set to start running reports. If not, then you can check the process to fix beginning balance issues in QuickBooks.
Step 2: Make use of the Financial Reports to See how much you have made
The profit and loss report and balance sheet report will display how your business is doing based on the data in QuickBooks. Thus, you can run a profit and loss report for the past 3 months and get a better insight into the average income and expenses for each month.
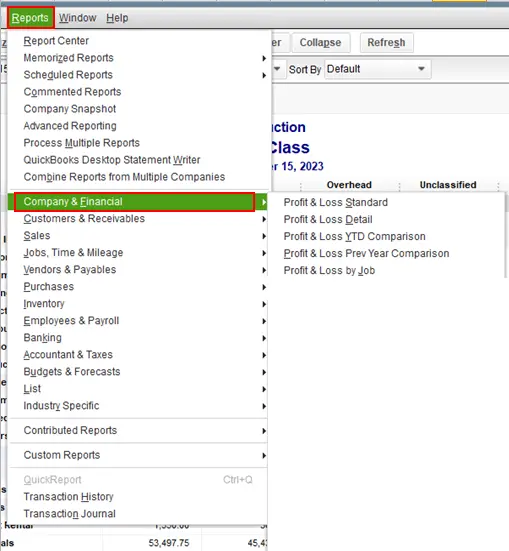
Head to the reports menu and then the company and financial option.
After that, choose the profit and loss detail.
Set the date range for the past 3 months.
Also, note that if you wish to change what appears on the report, then choose to customize report and customize it based on the data you want.
Once done, print, email, or export the report to excel.
When you check the income, make sure to see the top sources of revenue. For expenses, you can pay attention to things such pay payroll, rent, insurance, and marketing expenses to see where you can reduce your spending.
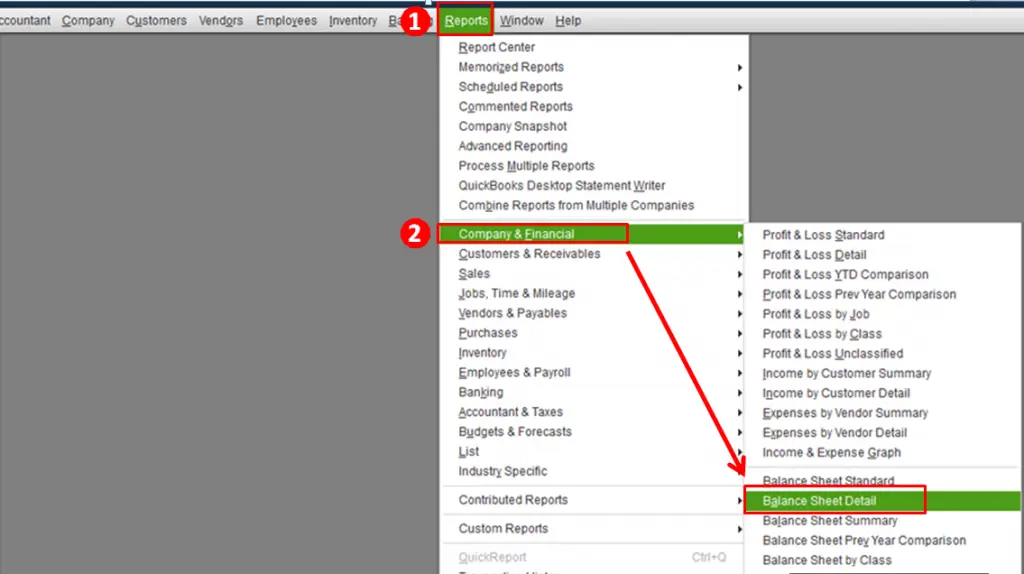
Running a balance sheet detail report
You can run a balance sheet report to get the financial snapshot of the company as of the specific date. This will calculate the business worth by eliminating the money your company owes from the amount you own.
You are supposed to head to the report menu and then the company and financial.
Choose the balance sheet detail.
And pick the customize report and customize it according to the data required.
Once done, print, email, or export the report to excel.
You can perform the below steps for optimizing the cash flow:
Step 1: To Track your cash flow in QuickBooks, start by setting up a cash flow projection
Making use of the upcoming bills and cash on hand, you can check the cash flow looks for the next six weeks by creating a cash flow projection.
Step 2: Looking for the top-selling items
You can use the company snapshot, and see what the customers are buying the most. Run the best-selling item report by performing these steps:
Head to the company menu and opt for the company snapshots.
Select add content and choose the arrow on the right.
Look for the best selling items and select add.
Double click each product to see a detailed report.
In case you wish to change what appears on the report, go for the customize report tab and alter it depending on the data you need.
Print, email, or export the report to excel.
Step 3: Identifying the customers having upcoming or overdue invoices
By using automated invoice payment reminders, QuickBooks will be able to spot the customers with upcoming or overdue invoices. After it is set up, you will see a notification that you have payment reminders ready to send. You can review and approve them before they go out.
With the help of the bill tracker, you can spot the pending and unpaid bills and pay them directly in QuickBooks.
Step 5: Check where you can cut down the spending
You can use your company snapshot and see what your top expenses are and see what you can do to cut down your expenses:
Run the expense breakdown report, by heading to the company menu and select company snapshots.
Choose the add content and select the right arrow.
Look for the expense breakdown and select add.
Double click the wedge on your expense breakdown.
And print, email, or export the report to excel.
Concluding step: Also check for the top vendors by expense
Just in case the cash flow is causing a delay in paying the vendors, you can negotiate the payment terms or delay paying bills till you have the cash. In QuickBooks, you can also run the report to see the vendors you spend the most. You can run the report using the steps below:
Move to the company menu and choose the company snapshots.
Choose the add content and tap on the right arrow twice.
Hit on add from the top vendors by expense.
Double-tap the vendor on your expense report to see a detailed report.
That was all you need to know about tracking cash flow on QuickBooks desktop. As always, if you are still puzzled to opt for the right option, then you must get in touch with our QuickBooks desktop support team of technocrats to make your development choice clear. Our team comprises certified and experienced professionals who have served the industry for several years and have attained unfathomable skills in troubleshooting evolving issues encountered while working with the Quickbooks software. For assistance on various issues pertaining to Quickbooks, you can reach us out on our helpline, or through the Live chat option.
Are you in pursuit to upload receipts to QuickBooks desktop, but are still wandering in search of the walkthrough? If that is what you are looking for, then, we assure you that you are at the perfect spot. The Quickbooks software is undoubtedly proving itself as the forerunner in the accounting sector by creating a boom in businesses of various kinds. The software has an unmeasurable outreach of features and utilities.
Being a user-friendly software, Quickbooks offers its users multiple facilities, which involve the leverage to upload receipts to QuickBooks desktop and subsequently work on them. The QuickBooks accounting software will pull the information from the receipt and match it with an existing transaction, after which it will be possible for you to review and approve the match. To know the process of uploading receipts to QuickBooks desktop pro, plus, premier plus or enterprise, make sure to read this segment till the end.
Procedure to upload receipts to QuickBooks desktop pro plus, premier plus, or enterprise
You can perform the below steps, so as to upload the receipts to QuickBooks successfully.
Step 1: Adding the receipts to Quickbooks software
You are required to ensure to not upload any sensitive information such as credit card numbers, social security numbers, or health information.
Easy process to Upload receipts using QuickBooks desktop
Below is the process that you can follow to upload PDFs or images of the receipt to the QuickBooks desktop. The most important point that you should consider is that if you are using PDFs, you can only have one receipt per page.
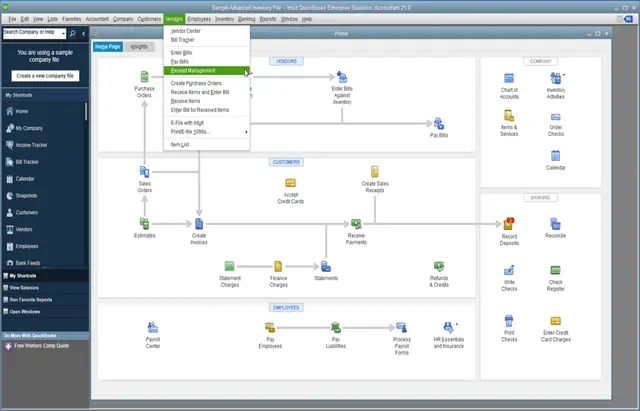
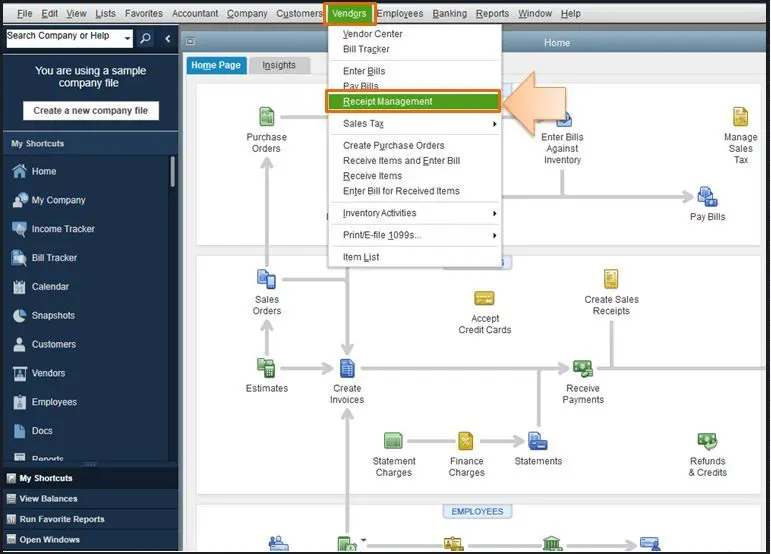
Start off by heading to the vendor menu, and choose the receipt management tab.
Opt for the intuit account that you use for the company file.
Also, note that if you don’t have permission for accessing the company file or the account isn’t associated with one, then you can carry out the necessary steps for the same.
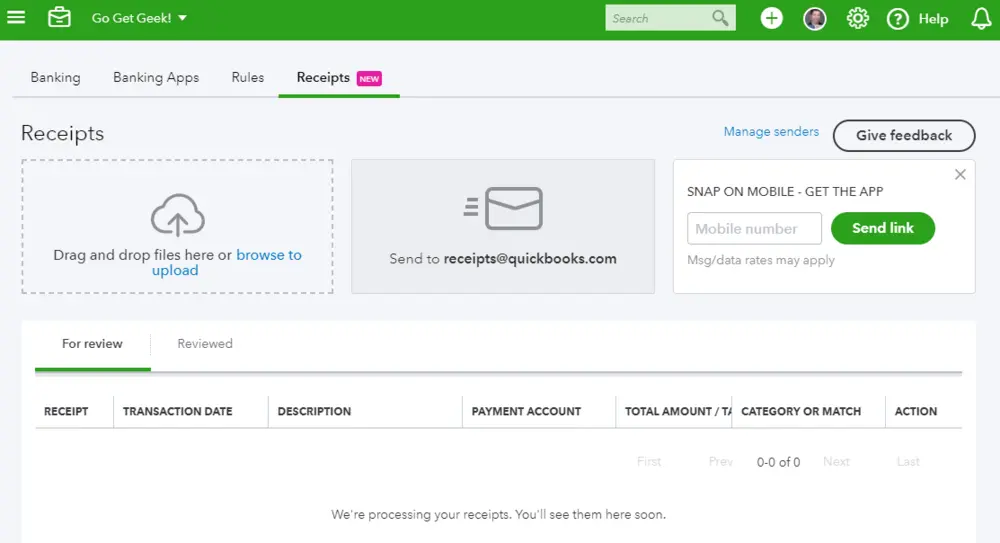
Now, drag and drop the receipts into QuickBooks or pick browse to upload, and choose the receipts.
Uploading receipts from QuickBooks desktop to IOS mobile app
The most important point to be noted here is that the QuickBooks desktop supports PDF’s and images with JPEG, JPG, GIF, or PNG format. In case you make use of newer iPhone or iPad, then you might have HEIC format images. Below are the steps to convert existing images to compatible format.
Sign in to the Intuit account from the QuickBooks desktop app, and opt for the company file to upload the receipts to.
Hit on the company file to upload the receipts and then tap on the continue tab.
You are then supposed to tap on the capture receipt.
Tap on the camera icon for taking picture of the receipt or tap the photos icon to upload the receipt. In case you require, crop and rotate the photo.
Next, hit a click on use this photo option.
Add a name and memo, further hitting a hit on the upload photo and OK tabs respectively.
End the process by signing in to the QuickBooks desktop company file to review, edit, and match the receipts to transactions.
Steps to upload your receipts from QuickBooks desktop to the android mobile app
Initially, launch the QuickBooks desktop android app and hit on receipt snap.
Further, tap on continue after tapping on the company to upload receipts.
Tap on capture receipt.
Hit on the camera icon to take a picture of the receipt or tap on the photos icon to upload the receipt Just in case if you require, crop and rotate the picture.
Tap on use thisphoto option.
Enter name and memo, and head for the upload photo and OK tabs respectively.
Opt for the company to upload the receipts after signing in to the intuit account.
You will need to do this once.
Sign in to the QuickBooks desktop company file to review it, edit and match the receipts to transactions.
Emailing PDFs or images of the receipt to the QuickBooks company file is possible with the steps below:
Step 1: Creating a custom email address
Head to the vendor menu and choose receipt management.
Go for the intuit account you use for the company file.
Also, note that if you don’t have permission to access the company file or the account isn’t associated with one, then you can perform the necessary steps.
Go for the send receipts option.
Pick a custom email address you will email receipts to. This will end in and further choose the create option.
After you confirm the email address, the list of all the users who form a part of the intuit account will be shown to you. Where you can manage the users who can email the receipts with the help of the toggle tab.
Step 2: Emailing images of receipts to QuickBooks desktop
It should be noted that you can send multiple receipt images in one email, as long as the email size is under 20 MB.
Opt for a picture of the receipt on the mobile. Note that the photo you hit should be on PDF, JPEG, JPG, GIF, or PNG format.
Ensure that each image or file contains only one receipt.
Emailing the image to the custom email address. This might take a few minutes.
QuickBooks accounting software will automatically pull the date, amount, vendor, and the last four digits of the credit card from the image. Just in case you are uploading multiple receipts, then edit or delete them in a batch:
Head for the receipts and choose batch action.
Go for either edit or delete, if you wish to delete the receipts.
In case you go for the edit tab, make the edits to the vendor name, account, bank/card details, and date of the transactions.
Reviewing, editing and matching the receipts to the transaction
After you upload the expense receipts in QuickBooks desktop, they will show up in the for-review tab. This is where you can review, edit, or match the transactions to the register.
Choose the vendor menu and head for the receipt management option.
Opt for the review tab and pick the refresh icon to see the receipts.
Choose a small arrow from the receipt and choose review.
In case the receipt matches the transaction, then go for the attach tab.
Or if the match is incorrect, then choose remove match then create a new transaction.
Hit the OK tab to finish the process.
Winding up!
This was all you should take into consideration for uploading receipts to QuickBooks desktop pro, plus, enterprise, etc. As always, if you have any queries or concerns, call our QuickBooks Support team for assistance! Our certified accounting professionals are always ready to assist you and fix the errors for you in the least possible time. Our QuickBooks experts can be contacted via the helpline 1-888-368-8874.
Here is how you can configure firewall settings for QuickBooks to set up multi-users in QuickBooks:
Firewall and security settings often seem one of the trickiest settings, when it comes to QuickBooks accounting software. Firewall is basically a must to have as an application as it saves the system from different threats including malware, viruses, and unwanted programs. Often firewall blocks the internet access needed to run QuickBooks desktop and the company file. You can experience such an error when using QuickBooks desktop in multi-user environment.
This segment is going to throw some light on how to configure firewall settings for QuickBooks and all the relevant procedures involved in configuring the security settings. Thus, if you are interested in finding out what it takes to configure firewall and security settings for QuickBooks, scroll through this segment carefully. For expert advice, give us a call using our QuickBooks technical support line.
Procedure to configure firewall and security settings for QuickBooks desktop
You are suggested to perform the below set of steps for configuring firewall and security settings for QuickBooks accounting software.
Step 1: To configure firewall settings for QuickBooks, initially, set up the QuickBooks Tools Hub
So as to use the QuickBooks tool hub program, shutting down QuickBooks software is the first and foremost step. Moreover, while opting for Tool Hub on Windows 10, 64-bit is believed to be the best choice for a seamless experience.
Kick start the procedure by closing QuickBooks.
Head forward by downloading the recent version of the tool hub.
Make things easy by saving the file to a folder therefrom it can be easily accessed in future.
Most importantly, in case you have installed the tool hub previously, then you can spot the version you are using. Head to the home tab and you will be able to find the version at the bottom.
Opt for and open the file downloaded in the previous step.
Performing the steps that pop up on your screen would take you further in the process.
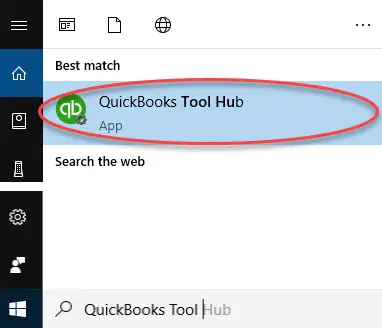
After the installation process concludes, double-tap the icon on the Windows desktop to open the tool hub.
Mark that, if you are unable to spot the icon, search for the same in windows and choose the program.
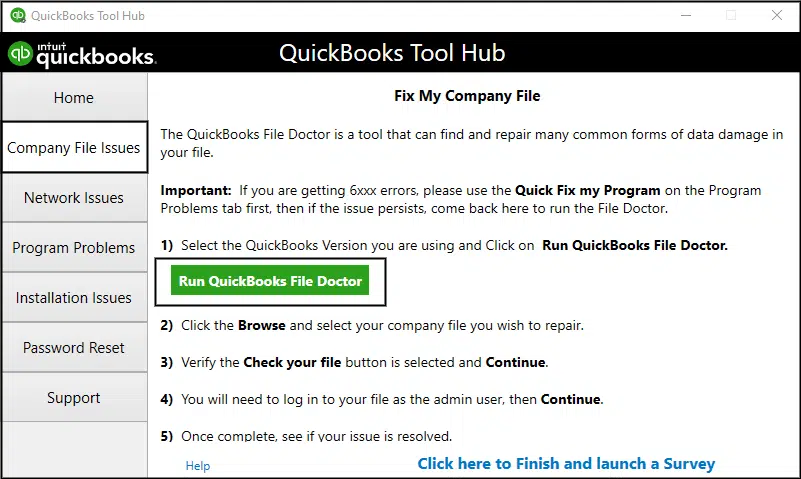
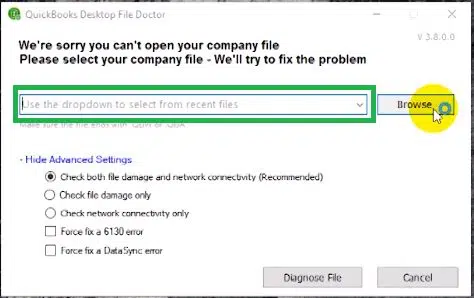
Step 2: Run the QuickBooks File Doctor tool
Under the QuickBooks tool hub, you need to opt for Company File Issues.
The file doctor tool might take a couple of minutes to open.
You need to note that if the tool doesn’t open up, then look for the QuickBooks file doctor tool and open it manually.
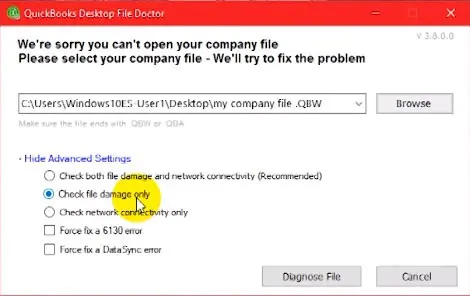
Once it opens up, you need to tap on the company file from the dropdown menu.
In case identifying the file becomes difficult for you, then you are suggested to hit on Browse and search to find your file.
Head for Check your file and network and then Continue.
Fill in the QuickBooks admin password.
Hit next.
One of the most important points to note is that the scan time depends on your file size. Often, it can take up to 5 minutes. When the scan finishes, you need to open QuickBooks and your company file. The scan may say it was unsuccessful even if it fixes your issue.
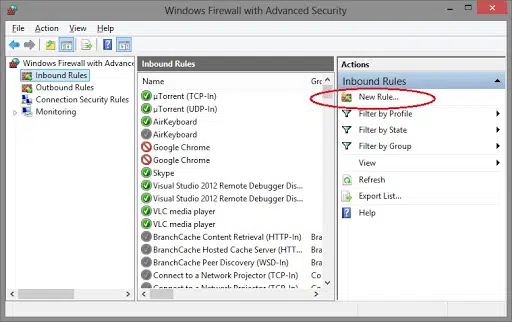
Step 3: Updating and configuring the firewall manually
Afterward, enter the windows firewall and also hit on windows firewall and open the same.
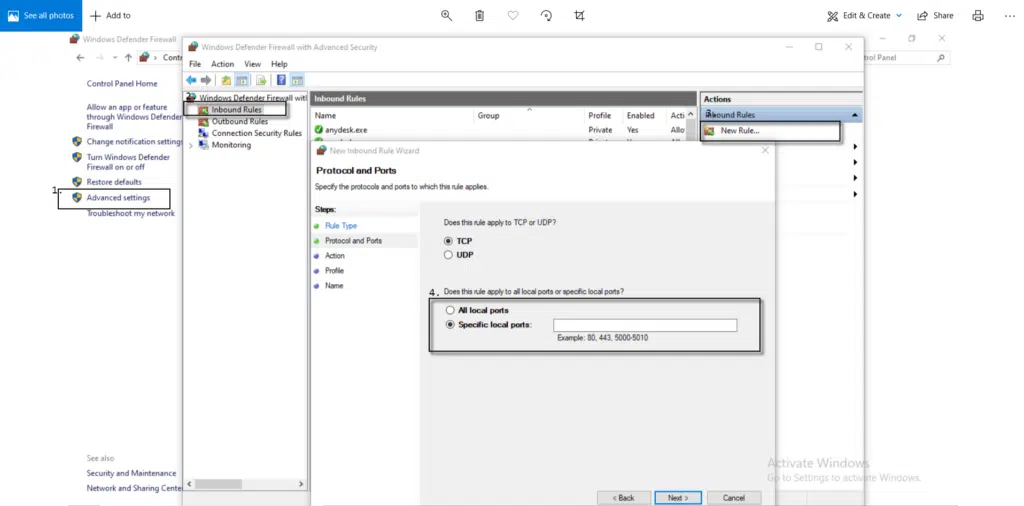
Head to the advanced settings tab.
Then, right-click on the inbound rules and opt for the new rule.
Tap on port and hit the next tab.
Ensure to hit on TCP.
Insert the ports needed for your QuickBooks year version
QuickBooks desktop 2021: 8019, XXXXX
QuickBooks desktop 2020: 8019, XXXXX
QuickBooks desktop 2019: 8019, XXXXX
QuickBooks desktop 2018: 8019, 56728, 55378-55382
QuickBooks desktop 2020: 8019, 56727, 55373-55377
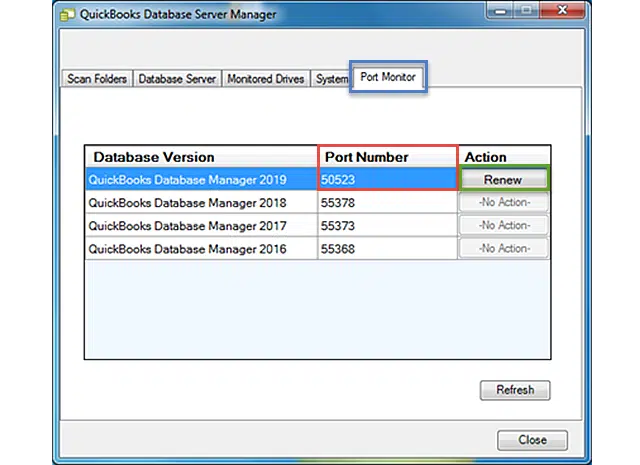
The point to be noted here is that QuickBooks desktop 2019, 2020, 2021 and upcoming versions use dynamic ports. These are firewall ports mentioned during installation. The format of the port for QuickBooks desktop 2019 and later version is said to be 8019, XXXXX.
Steps to get the dynamic port number
Perform the below steps to get the dynamic port number. The steps are easy to follow, the only prerequisite is that you follow them sequentially.
You need to change the port number by hitting on the new tab. Find out the scan folder tab and also opt for the scan now tab. This will basically reset the firewall permissions, but you can only upgrade ports for QuickBooks 2019 and later versions.
Once you are able to enter port no., you need to hit on the next tab.
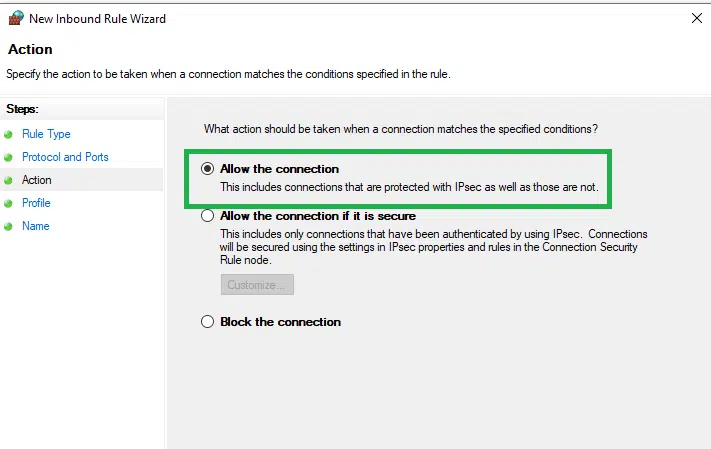
Then, choose to allow the connection, and later on, hit the next tab.
Check mark all profiles and then hit on next.
Create a rule and name it as QBPorts
Hit the finish tab.
For creating outbound rules, perform a similar set of steps. Move to QuickBooks desktop and switch to multi-user mode. Open QuickBooks on the network from one of the host systems.
Steps for creating windows firewall exceptions for QuickBooks programs
Initiate the procedure by heading to the windows start menu.
Type in ‘windows firewall’ and double-tap on the windows firewall to open the same.
Then, hit on the advanced settings.
Right-click on the inbound rules and tap on the new rule.
Furthermore, choose the program option and head to the next tab.
Head to the program path and also opt for the browse tab.
Look for and tap on one of the executable files on the chart above.
Hit the next tab.
Opt for allow the connection option and hit on the next tab.
Ensure that all the profiles should be marked and also tap on the next tab.
Generate a rule and later on assign a name to it.
You are required to create outbound rules and also repeat the steps for outbound.
In case you can notice program files, then it indicates that you are using the 64-bit operating system. You need to move to QuickBooks desktop and also switch to multi-user mode.
Check your antivirus or firewall settings
In case you configured the firewall but continue to land into similar issues, then checking the antivirus settings would be the best-recommended solution. You are also required to ensure that QuickBooks has general permissions. This ensures that it is not blocked. However, the procedure might be different. You can have a look at the procedure to set up permissions for your antivirus software.
Add QuickBooks ports exception on your antivirus or firewall
Are you still experiencing the same issue when opening the file over a network or in multi-user mode? A solution to that is to add port exceptions for the executable files listed in the table above.
Ascertain that the TCP is opted right and also type in the ports required for the QuickBooks version. The port numbers are mentioned in the step related to configuring the firewall manually. Also, keep in mind that if you are using different or multiple versions of QuickBooks desktop, then adding each year’s ports is recommended.
Restart your computer
A couple of programs demand rebooting the system, so as to save the changes. After you are done with the procedure above, you need to reboot the system and try opening QuickBooks now.
Still unable to configure firewall settings for Quickbooks?
Having explored the steps mentioned above, you should be able to configure firewall and security settings for QuickBooks. However, if that isn’t the case, all you need to do is to get on a call with our QuickBooks technical support professionals using the support line. Our customer executives will be more than interested in answering your queries associated with this accounting software.
Learn how you can fix any error using the QuickBooks component repair tool
QuickBooks Component Repair Tool is a significant tool that you can freely download to diagnose and fix errors with Microsoft components used in QuickBooks such as .NET Framework, MSXML, and Visual C++. The tool automatically diagnoses and troubleshoots errors in your computer that prevent QuickBooks from running. Since it’s such a useful tool, we decided to create this blog post to give you detailed information on how to install and use it.
Most of the time during the installation process, few QuickBooks installation errors like 1603, 1935, 1904, 1402, etc. are faced by many users. These errors are a little bit tricky and give you a very bad experience while using QuickBooks. In this blog post, we are going to discuss the QuickBooks component repair tool which is a very useful tool to fix all the installation errors.
What is The QuickBooks Component Repair Tool? An Overview
QuickBooks component repair tool can be downloaded and used to generally fix common installation issues. This tool is designed and developed in a way to resolve issues that can be experienced during the usage of .NET framework and other windows components needed to run QuickBooks. What makes this tool even better is that it doesn’t demand any specific configuration and it automatically scans the components. You can try fixing the below set of errors, using the QuickBooks component repair tool:
The QuickBooks component repair tool can be downloaded without any additional charges and can be of great assistance in fixing errors associated with QuickBooks.
Steps to Download QuickBooks Component Repair Tool
To automatically scan and repair QuickBooks components, first of all, you have to Download the QuickBooks Component Tool. But the positive thing is that this tool it doesn’t require any specific system configuration or requirement. Follow the below given steps to download this tool:
First of all, you need to make an exit from all the Open programs.
After that, reboot your computer system once.
Download the QuickBooks Component Repair Tool from here.
You need to double-click on the saved file to Run or execute the setup file.
Once the tool successfully installed on your computer reboot your computer once more time.
Steps to Fix common Installation Errors in QuickBooks
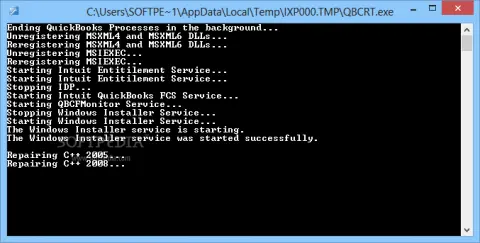
Run the program by double-clicking on the downloaded file.
Delete all the executive programs and scan your QuickBooks files using this component repair tool.
Restart your computer after running the tool.
Steps to Download Windows Updates
Expired Windows
will not allow you to Install/Open QuickBooks on your system. Your QuickBooks
may face several errors, and the Outdated Windows misses updates related to
Visual C++, .NET Framework, MSXML, etc.
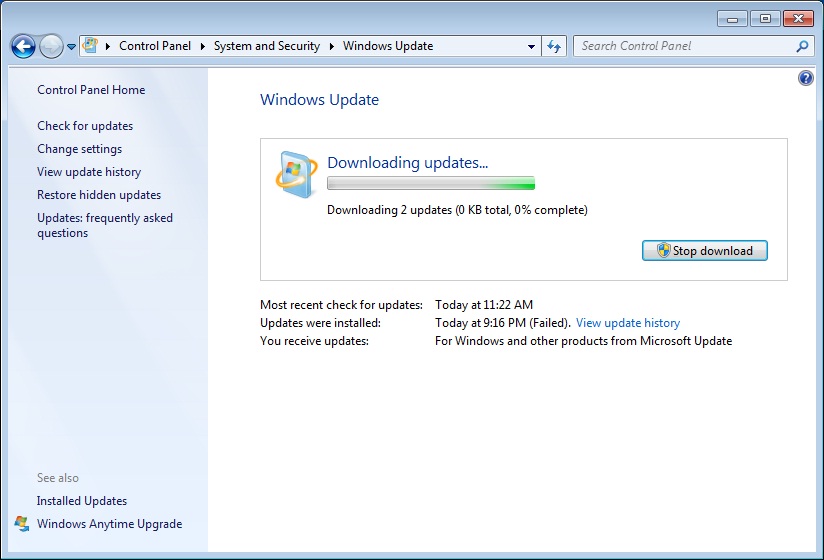
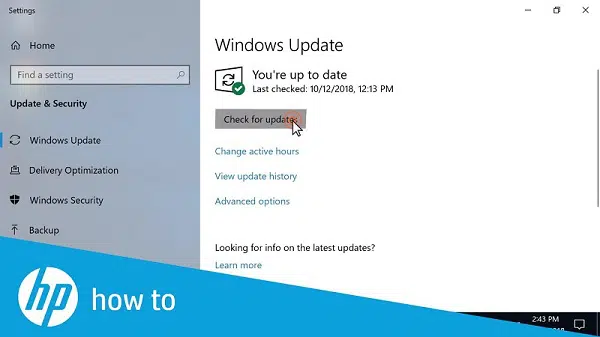
Update Windows on your desktop by hitting on the Windows Key on the keyboard & type ‘Windows update’
After that, tap on the Check for updates option.
Download and install all the updates (if there any)
Once the windows is updated, restart or reboot the computer.
After the download is complete, Save the file to a local desktop.
Close all Running programs before running this tool
Now, restart the system after you have to RUN the tool
The problem should be solved by now and if it still exists then use QuickBooks component repair tool to resolve the issues.
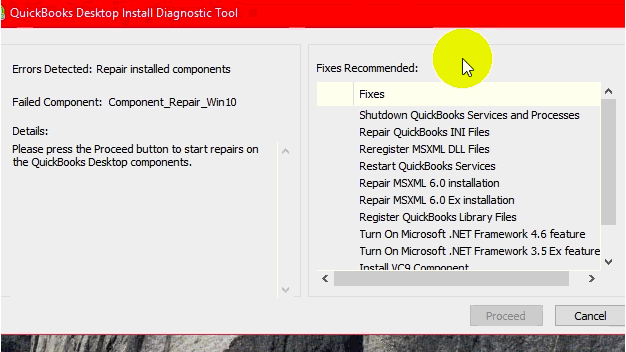
Manually Fix Errors with Microsoft Components Using QuickBooks Component Repair Tool
If QuickBooks Component Repair Tool hasn’t worked and the problem still persists, then you need to manually fix errors related to the Microsoft components by:
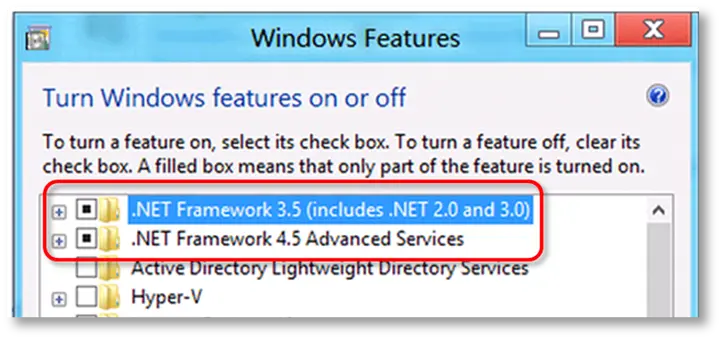
Rebuilding/repairing Microsoft .NET Framework
Reconstructing/repairing Microsoft MSXML
Step 1. Rebuilding/Repairing Microsoft .NET Framework
The Microsoft .NET Framework is a Microsoft component that is used by QuickBooks to connect with web apps. Several errors and issues are faced by users which can be resolved by following the below steps:
The first step is to download the QuickBooks Component Repair Tool to your computer system.
When prompted, Save/Store the file on the local desktop.
Close all the “Open programs” and applications & double-click on the QBInstall_tool_v2.exe file
Restart your computer after process diagnosis is complete.
The above-mentioned process will Repair Microsoft .NET Framework, however, if still there is an error then follow the below steps:
Hit on the Windows Key
Head to the Search bar and type ‘Windows Update.’
Now, opt for the check for Updates option.
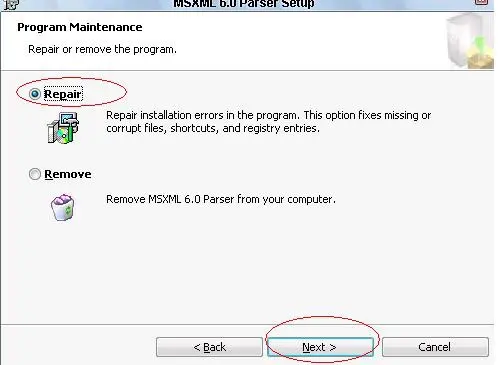
Step 2. Reconstructing/Repairing Microsoft MSXML
QuickBooks will not run because of the damaged Microsoft MSXML component. To repair the damaged MSXML component, please find the below steps.
We hope that you find this article helpful in installing and using QuickBooks Component Repair Tool. In case you require any further help in installing this useful tool, you can contact our certified QuickBooks desktop support experts. Thanks for visiting us, and spending your valuable time in reading this article till the end. We expect that the information provided in this article might have helped in making the best of this tool.