A Quick Guide on How to Install and Use QuickBooks Install Diagnostic Tool
QuickBooks Install Diagnostic Tool is a useful and efficient tool to diagnose and fix installation errors during the Installation process. The impressive tool is equipped to handle multiple issues that can occur in C++, .NET framework or the MSXML.
It’s a repair tool which is designed to identify and solve the issue automatically. It decreases the time to resolve the issue. It is recommended by experts to run QuickBooks install diagnostic tool before using manual methods to resolve the issue. The tool is developed to make things easy by identifying and solving issues automatically. To know more about this tool, make sure to read this blog post till the end, or you can also get in touch with our tech professionals.
Errors that can be resolved using QBInstall Diagnostic tool:
QuickBooks Install Diagnostic Tool can be employed to fix a wide range of assorted problems that occur in QuickBooks while installing or setting up the software. If you are a victim of the below given errors at the time of opening QuickBooks Desktop after installing it, Follow the below given steps to resolve it.
Now, close all the apps that are running on your system background.
You will notice .exe file on the system, just double click there to run the file.
Restart the system after the diagnosis to ensure that the QuickBooks components are updated correctly.
You can also update your windows operating system to prevent yourself from facing these type of installation errors. (Note: Check out this article in order to manually update your window OS at Microsoft site.)
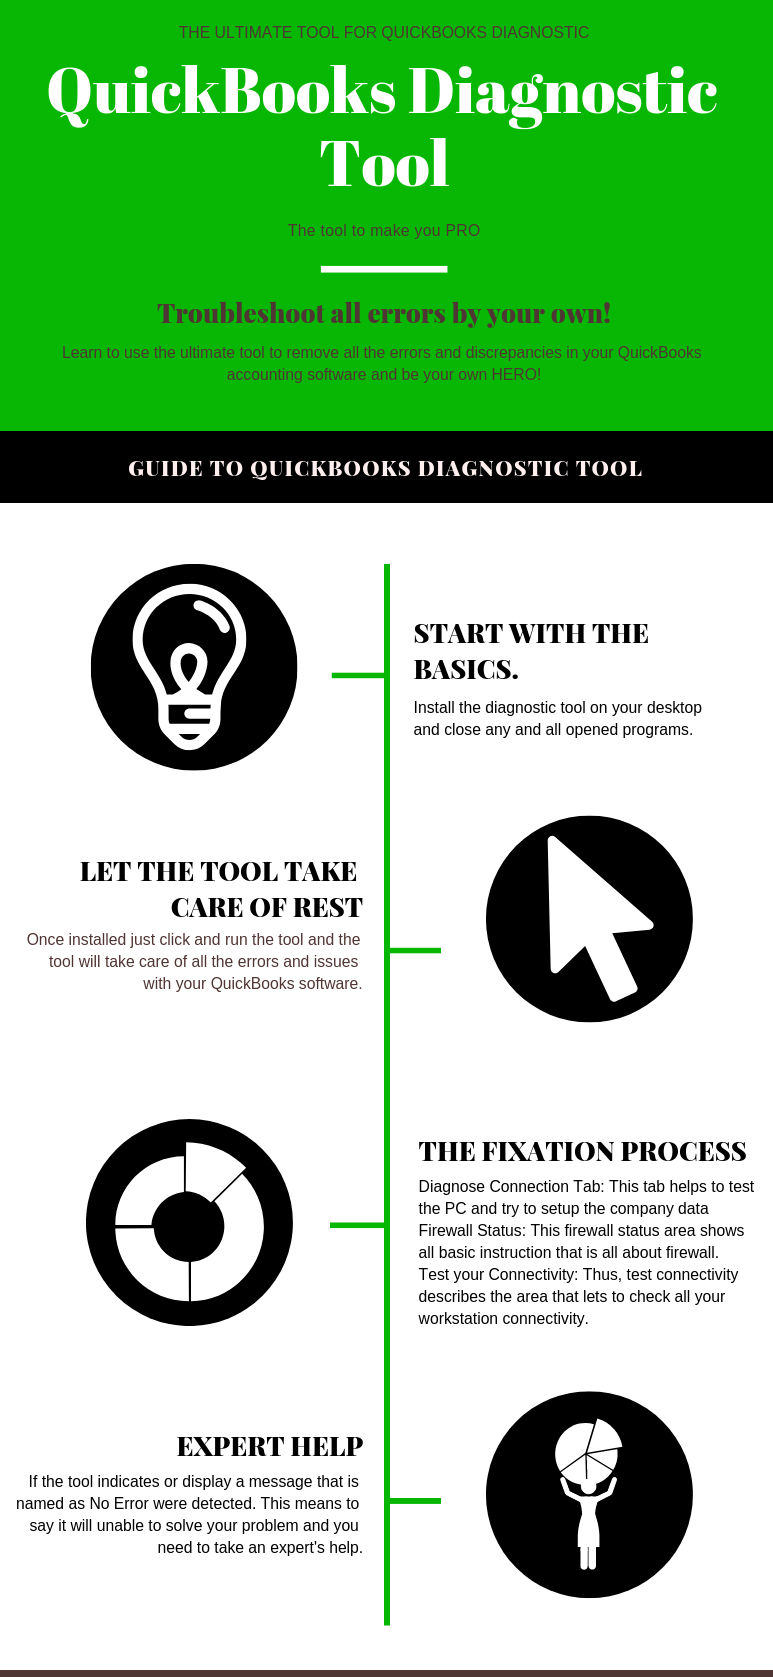
Blog Summery in Infographic
Resolve Installation Errors Using QuickBooks Install Diagnostic tool
Below are the steps that might help you to resolve any installation error that occurs in QuickBooks at the time of software installation.
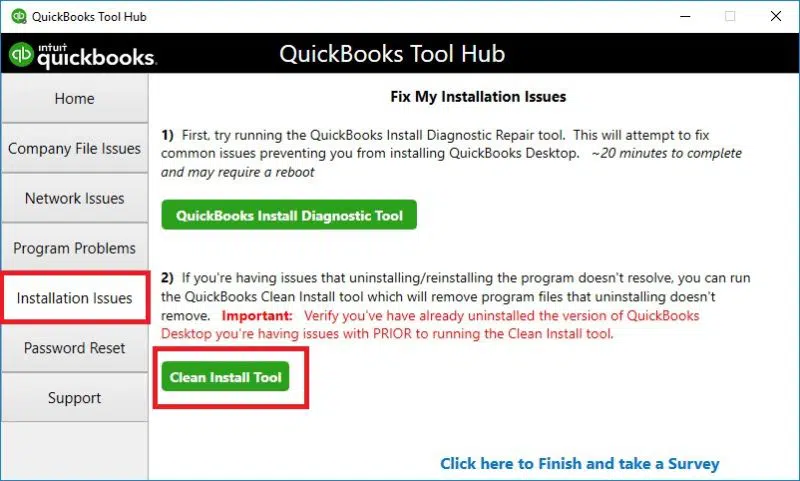
Step 1: Run the QuickBooks Install Diagnostic Tool Using QuickBooks Tool Hub
QuickBooks tool hub usually helps you in resolving all sorts of common install errors.
You now have to save the file on the system where you can easily find it.
After you have downloaded successfully, then open it.
Perform the on-screen prompts.
Hit on the next tab to agree to the terms and conditions.
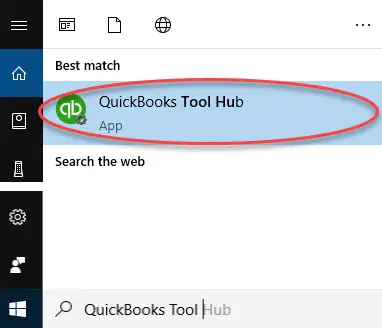
After the installation of QuickBooks tool hub finishes, then open the tool hub by tapping twice on the icon.
You now have to keep in mind, that if you are not able to find out the icon from the desktop menu, then look for QuickBooks tool hub from the start menu and choose the program.
Step 2: Run QuickBooks Install Diagnostic Tool
You need to launch the QuickBooks tool hub program from desktop icon or do a search from windows search.
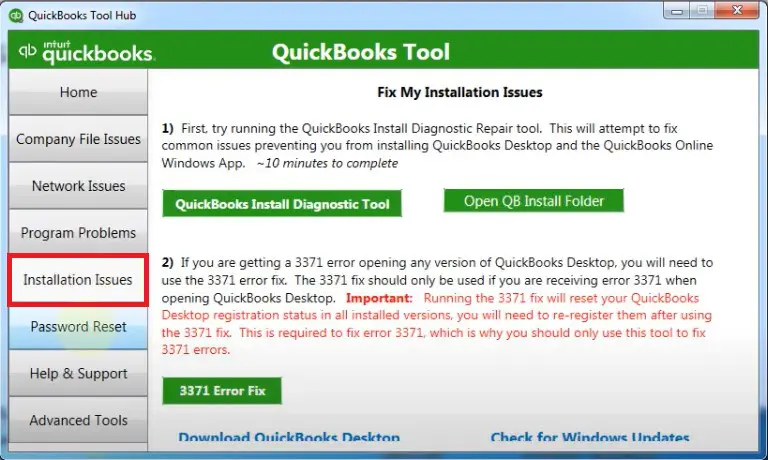
Now, in QuickBooks tool hub, choose the installation issues from the list.
Choose QuickBooks install diagnostic tool option.
After you tap on the QB Install tool, it will start on its own.
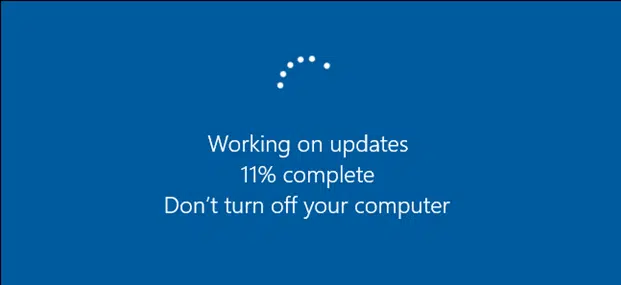
Let the tool run.
This might take some time, after which you simply have to reboot the system.
Other Methods to Effectively Fix the QuickBooks Desktop Install Errors
Following are the latest solution methods to resolve the installation errors of QuickBooks desktop:
Method 1: Download the Latest Update for Windows OS
You are initially supposed to update windows to the latest version.
After the update process completes, make sure to reboot the system.
Just in case QuickBooks start along with any issue, then you are suggested to open the company file and start the work.
In case the QuickBooks installation is not completed in a proper manner, then ascertain to install QuickBooks again.
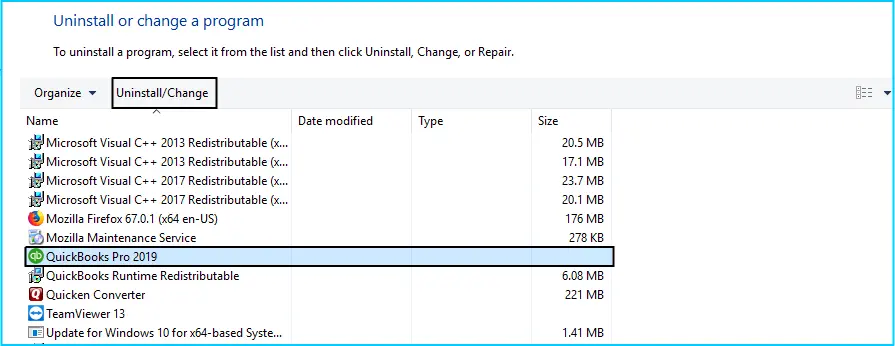
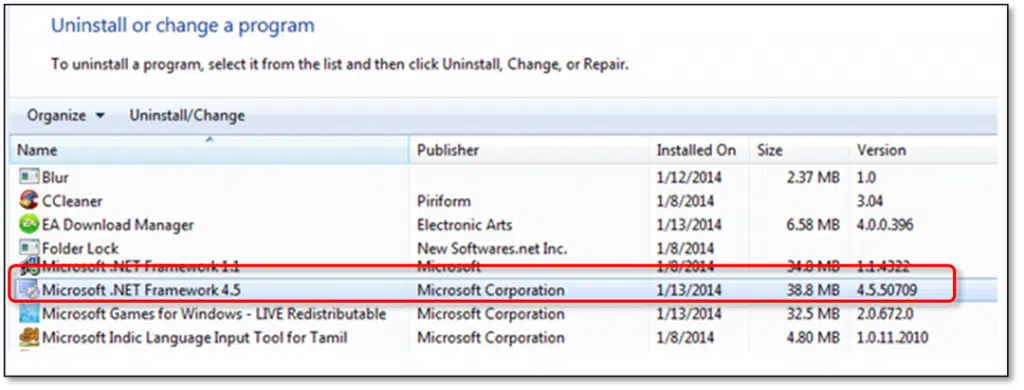
Firstly, hit on the Windows Start menu and then find the control panel and open it.
After that,t choose the Programs and Features option
Now, hit on the Uninstall a Program option.
From the list of programs, opt for the version of QuickBooks Desktop that you want to uninstall.
Lastly, choose to uninstall or change and then Remove the program.
If the error still occurs, then there might be an issue with your operating system or computer.
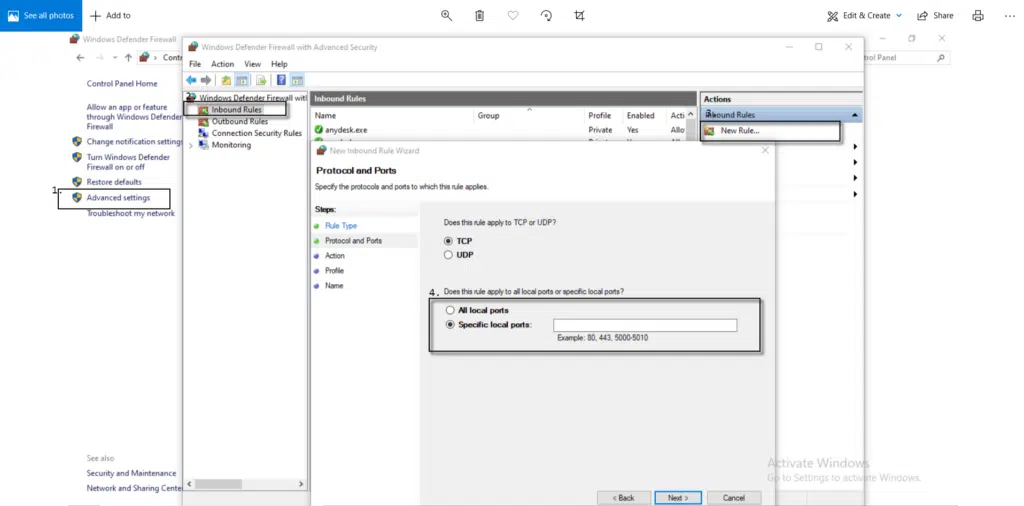
Method 3: Check your Firewall Status
You need to check your computer firewall settings. This will help your to set-up the company file that is accessible from a hosted device. It gives the proper information on the Firewall
Important Note:
After running the tool there might be a chance to reactivate or re-register the QuickBooks Desktop.
If still the problem persists and there is an error, then consult a QuickBooks expert.
If there is an error while installing QuickBooks updates, then you need to run the QuickBooks Install Diagnostic Tool one more time or contact a professional.
We hope that you find this article helpful to understand all about QuickBooks Install Diagnostic tool. If you still are facing the installation errors and are in need for an expert advice then, contact with our support line and speak to our certified QuickBooks desktop support technicians. We wrap up the article, yet our support will always remain. All you need to do is call our technical experts who are adept in QuickBooks and let them fix the issue.
Here is how you can go for clean installation of QuickBooks(or re-install) for your Windows computer
QuickBooks Clean Install is a valuable tool employed for fixing a wide range of issues that may have the potential of damaging the performance of the QuickBooks Desktop or company file issues. However, just a basic re-install doesn’t address these technical issues. To fix these errors, one needs to uninstall QuickBooks desktop for windows and then rename the company files, and afterward, Re-install the program. This whole procedure is known as Clean Install or Clean Uninstall of QuickBooks.
Please note that to perform the clean installation of the QuickBooks desktop you must have the QuickBooks desktop downloaded .exe file or QuickBooks installation CD alongside the license number accessible before you proceed with the ‘Un-establishment‘ process.
QuickBooks clean install tool is basically a repairing tool that is generally used to fix damage in the QuickBooks Company file. There can be issues that might not get resolved by a mere re-installation of the QuickBooks Desktop. Such issues are generally addressed by uninstalling QuickBooks, retitling the installed files, and then reinstalling the same again. This complete process is named clean installation of QuickBooks desktop and can be performed either manually or by taking the help of the clean install tool. Considering the complexities involved in the manual process, users often conform to using the QuickBooks Clean Install Tool.
Points to remember
Before you uninstall the QuickBooks software, there are specific points that you need to keep in mind.
The points to remember are as follows:
Having the installation CD and license number or the QuickBooks .exe file downloaded on your system is one of the essential points.
Also, you need to back up the company data file because there are chances of data loss.
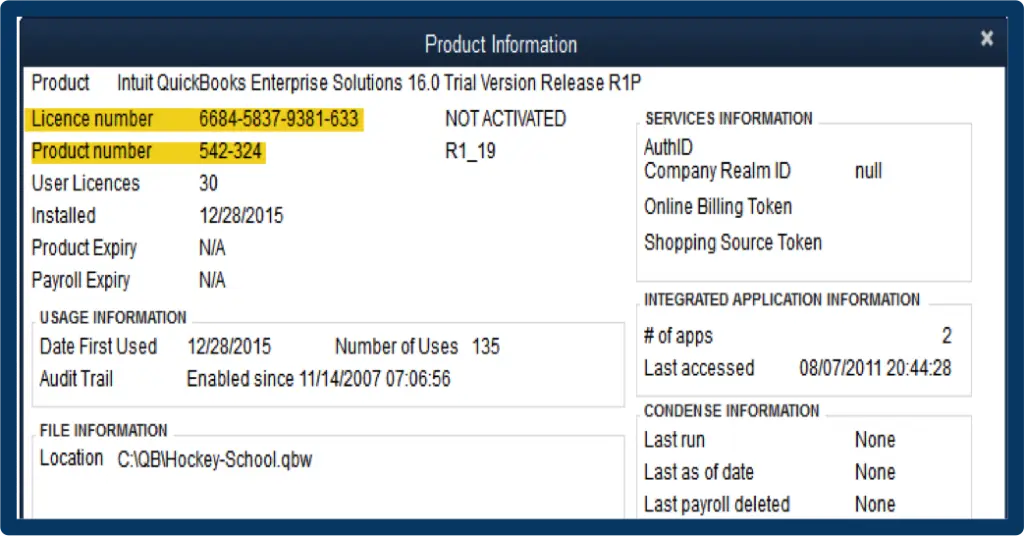
Make sure that you take note of your Product and License keys before proceeding with the clean install process. Just open QuickBooks and then hit on the F2 key to reveal the Product Information Window. Your license keys and all relevant details are contained in this window.
Prior steps to be performed
Before you start with the actual steps for running a clean install tool. Make sure to perform the below steps:
Step 1: Ascertain that a clean installation of QuickBooks is the right option.
In case you haven’t already, then you simply have to do a basic reinstall of the QuickBooks desktop. A basic re-install is a simple process that might resolve the issue in a few cases. If that doesn’t work, then you need to perform a clean install of QuickBooks desktop on each system you are facing issues with. Note that a clean installation of QuickBooks generally does not affect the company data.
Step 2: Gather information and backup the data
You need to initially download a new install file for your version of QuickBooks. This way, you might be sure to get the latest updates for your version.
Ensure to have a license number handy. Note that on the original packaging or the purchase confirmation email, if you bought a digital version.
Note down the product year and version.
It is recommended to get all the info from your account management portal.
In case you haven’t already, then ascertain to back up the company file to save the work.
Methods to perform a clean install of QuickBooks Desktop for Windows
The repair tool for the complete Clean Install of QuickBooks procedure subsumes ‘Uninstalling, renaming QuickBooks company file(s), and then Re-installing QuickBooks Desktop. Following is the step-by-step guide to performing uninstalling and reinstalling of the QuickBooks Desktop software:
At first, hit the Windows+R keys on the keyboard to show up the RUN command window.
After that, type in Control Panel and then hit on OK.
Now opt for the Program and Features option.
Open the Programs list, hit click on QuickBooks, followed by opting for the option to Uninstall.
Next, follow the online instructions to complete the procedure.
Method 2: Rename the QuickBooks installation folders
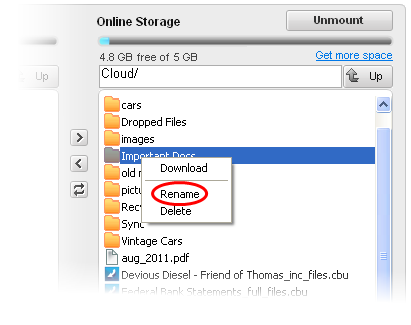
Post uninstalling QuickBooks, the next step involves renaming the folders by using the Clean Install Tool. You can also rename the QuickBooks Installation folders manually by navigating to the QuickBooks folder and then right-clicking on it to opt for Rename option,
Step 1: Download and RUN the QuickBooks clean Install tool.
After you have renamed the folders, download and run QuickBooks clean Install tool. Here is how you can perform this procedure.
Download QuickBooks Clean Install Tool from the QuickBooks tool hub program. This tool can be downloaded from the official website of Intuit.
Soon after, launch the downloaded QuickBooks Clean Install.exe file.
Choose the I Accept option on the license agreement page.
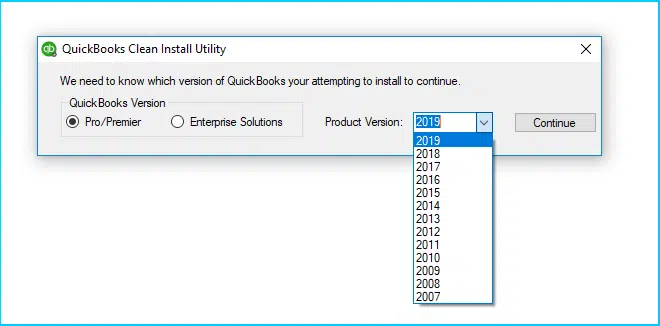
Now, pick the QuickBooks desktop version and then check the option to Continue.
Now, hit on the OK button when a message box that reads QuickBooks is prepared to complete a Clean Install, appears and you can install this to the default index.
Next, you can rename the QuickBooks Desktop Installation folders to show the hidden files, and after that, rename the ‘folder location,’ listed for the MS Windows version. Add ‘OLD’ at the end of the name of the folder. With this activity, you will maintain a strategic distance from QuickBooks from perceiving the folder while you make another one.
Step 3: On the off chance that you see the error message stating – ‘The Access Denied while Renaming the folders’, perform the following steps:
The following steps will assist you to get rid of the above situation:
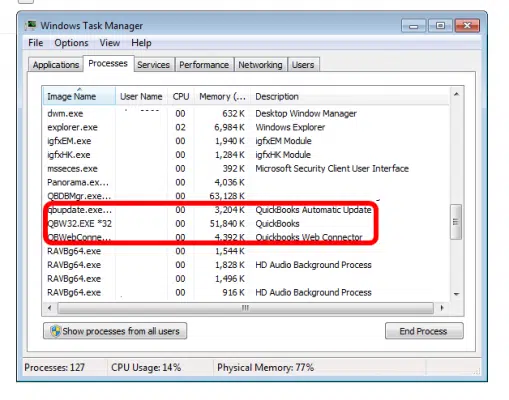
On the Windows Taskbar, right-click and choose Task Manager. You can alternatively access the Task manager by clicking on the Ctrl + Alt + Delete keys.
Within the Task manager, head to the Processes tab and choose the Image name column header to unravel the processes alphabetically.
At this stage, you are required to pick the following processes: QBDBMgern.exe, QBDBMr.exe. , QBCFmonitorservice.exe, qbw32.exe. Click on these processes one by one and then tap on the option to End Process.
Opt for YES when you receive a warning message box.
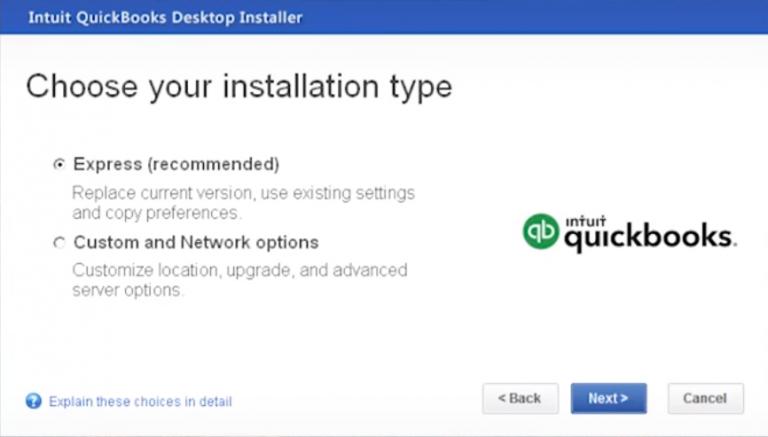
The final step is to go for the uninstall and reinstall process. After uninstalling the accounting application, head forward to download and install QuickBooks desktop. You will need your license and product keys to authenticate the installation process.
Winding Up!
We hope this article helped to brief you on the complete procedure for clean installation of the QuickBooks desktop for Windows. But if you face any issues, you can always contact our 24×7 QuickBooks Support team and speak to certified experts at the helpline 1-888-368-8874. Our certified experts are always ready to offer you any kind of assistance that aims at fixing the numerous issues confronted while using the QuickBooks accounting software.
Learn how you can disable Merchant Services in QuickBooks MAC in simple steps
QuickBooks is robust accounting software that works fine on both Mac and Windows computers. The functioning of the software, however, on the two operating systems may be different. The process of disabling merchant services in QuickBooks Mac is also pretty much different but not complex or complicated. This blog post consists of instructions that will allow you to do that on your own. This post will also teach you to disable merchant services in QuickBooks MAC so that you are not asked to furnish Credit Card details when you create an invoice.
The steps provided here are simple and do not take much of your time. If you require further information, feel free to contact our dedicated support team and ask your doubts directly to a certified professional. You can also make a call us and discuss the issue with our support team. We will be happy to help you!
Points to Remember Before Disabling Merchant Services in QuickBooks MAC
Before you begin with the process of disabling Merchant services in QuickBooks desktop for MAC, there are certain points to be kept in mind:
You should refresh and restart QuickBooks MAC.
Ascertain that any file will not get vanish while refreshing or restoring QuickBooks MAC.
Close the company files and versions before refreshing QuickBooks MAC.
The last thing to keep in mind is that by refreshing or restarting QuickBooks MAC, the issues related to the same might get rectified. If not so, then you can check the version of QuickBooks in use and ensure to update it to the latest one.
Easy Steps to Turn Off Merchant Services in Your QuickBooks MAC
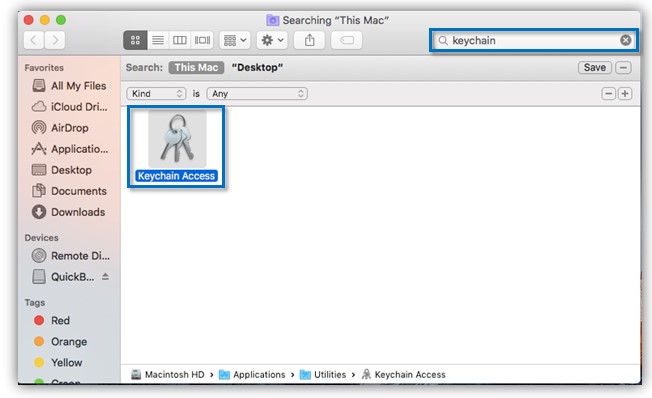
Step 1. Access your MAC computer. Once the screen is up, hit the Command ⌘ + F keys together.
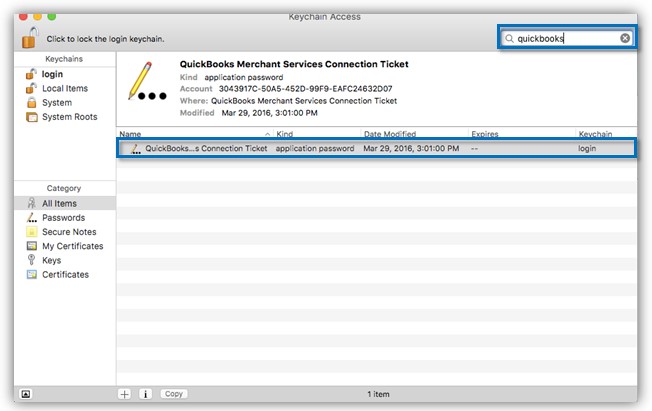
Step 2. Search for Key-chain and hit on Key-chain Access.
Step 3. In the search field, search for the keyword QuickBooks and tap on the Connection ticket(s) for the QB merchant service.
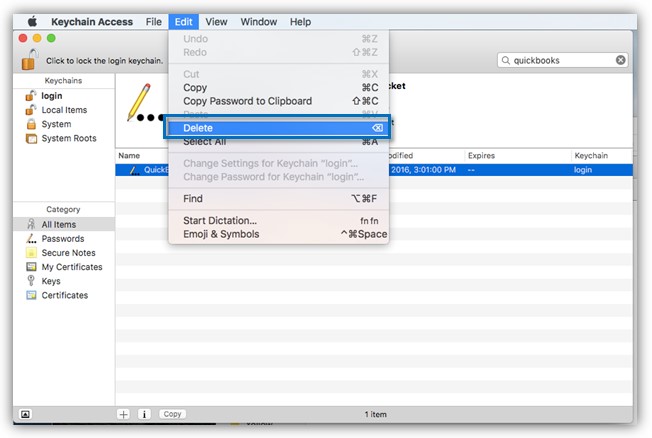
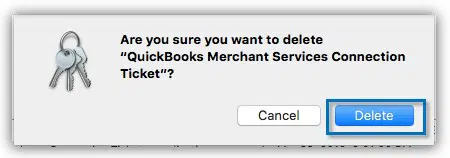
Step 4. Choose Edit and then hit on the Delete button. A box will pop up asking you if you really want to delete the Connection ticket.
Step 5. The above step will disable Merchant service. Log out of QuickBooks and close it to make sure that all the merchant service remnants are removed. You can also restart the computer.
More often than not, there may be multiple key chains listed for a variety of applications (such as the updates in Windows Programs & Features) so it is simpler to pull up the correct keychain by just entering its name in the search field.
Alternate Method to Unlink Merchant Services in QuickBooks Mac
The automatic highlight available on Mac will obtain these updates and then put it on your MAC, which will support to disable the merchant services in QuickBooks Mac. It is an easy process to install QuickBooks in Mac. Disabling merchant service in QuickBooks MAC is pretty much a do-it-yourself task and we hope by reading this post it will be an even easier thing for you.
Winding up!
In case you face any issue with this topic or have any other QuickBooks related issue, you can reach us at our QuickBooks desktop support number and rest assured of quick and precise solutions.
Know the latest features of QuickBooks Desktop 2021:
QuickBooks rolls in with newer versions each year, even the 2021 version of QuickBooks rolled in with some fabulous features. The features of QuickBooks desktop 2021 is all about automation to save time and boost productivity. This segment is compilation of just a few new features of QuickBooks desktop 2021. These features to help you get paid faster, while making the date your employees see more effective for their role in the company. Get a better insight about QuickBooks desktop 2021, with this piece of writing.
New and Improved Features in QuickBooks Desktop2021
Not only the old features of QuickBooks are revamped in the 2021 version, some new features are also introduced. Let us explore all together:
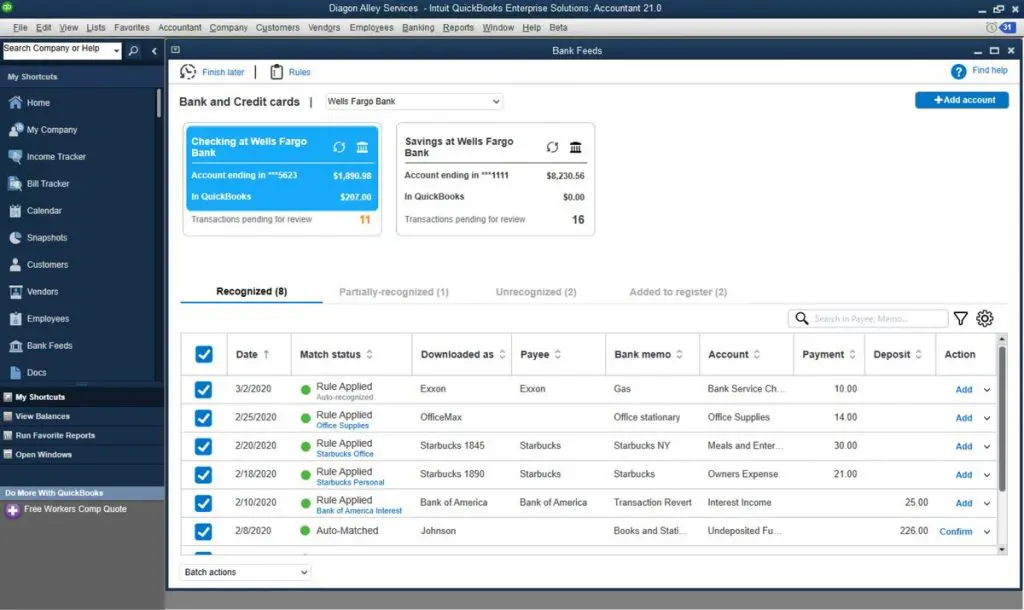
1. Streamlined Bank Feeds
Now you get advanced online banking, which would help you to review the bank transactions, match them to the existing ones in your books or quickly add new ones. Importing bank feeds faster is now possible with this feature and by automatically categorizing or batch editing the bank transactions by payees, accounts, and classes.
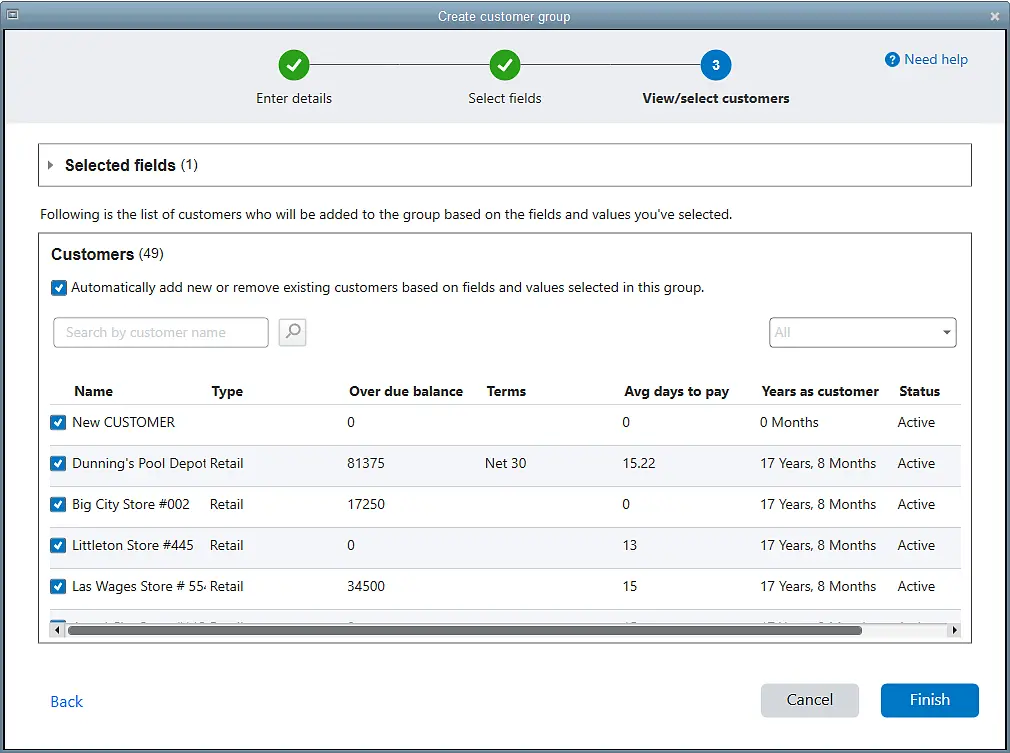
2. Rule-based Customer Groups Integrated in QuickBooks Desktop 2021
You can now create rule-based customer groups based on fields such as customer type, status, location, and balance. This will help you in easily managing them and using them across multiple features.
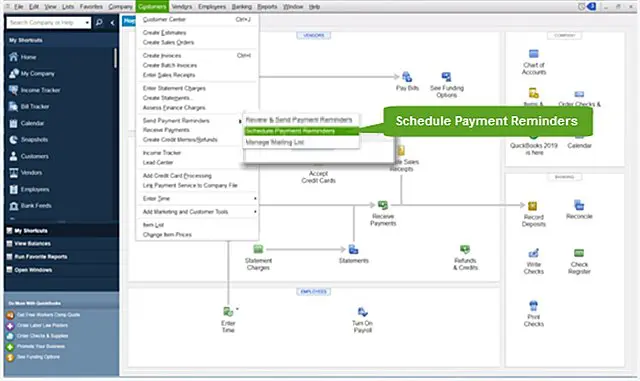
3. Automated Statements/Payment Reminders
No more manually reminding your customers of their overdue balances is required, you can now automate frequently sent statement emails, tailored to different customer needs. Send the statements with payment links that encourage customers to instantly settle their dues using online payment portals.
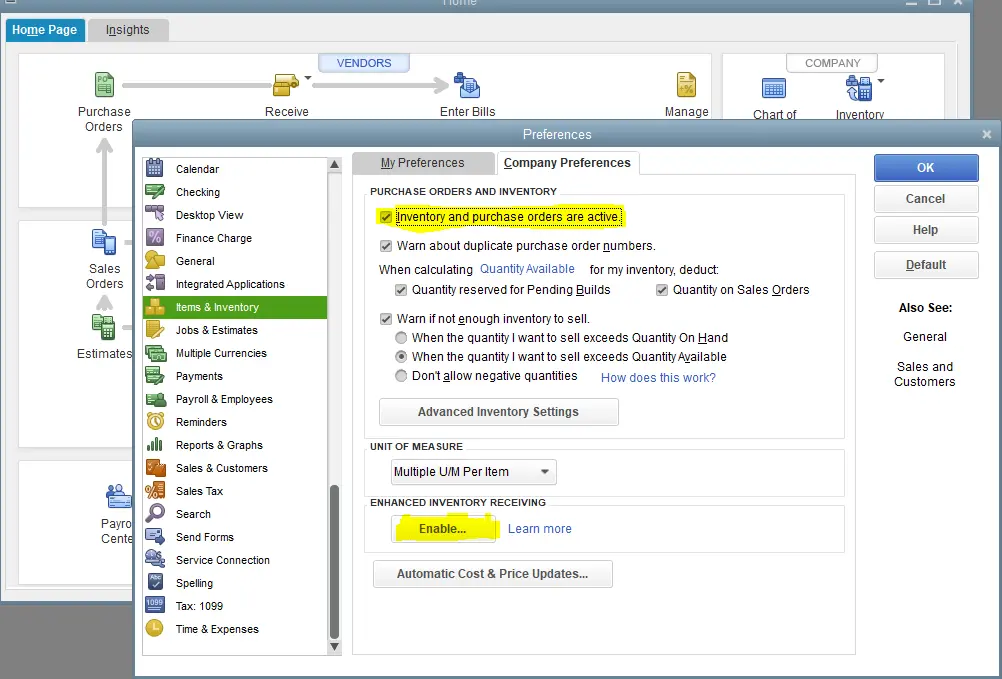
4. Advanced Inventory Improvements in QuickBooks Enterprise
The software continues to build upon the new inventory features. These features released in 2018, 19, and 20. This new release makes it much easier for business owners to manage their warehouse inventory in QuickBooks desktop. This also improves security and confidentiality by limiting access.
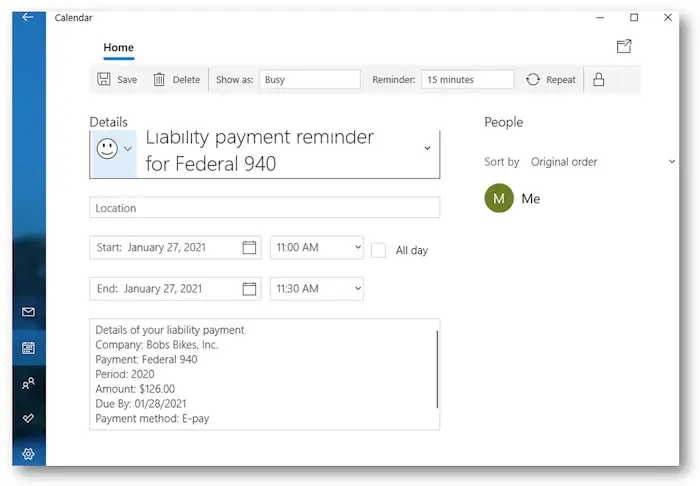
5. The QuickBooks Desktop 2021 Comes with Payroll Liability Reminders
Small and medium business owners can set up calendar notices. These notices shall ensure that they are reminded of the upcoming payroll tax and liability payments. You can also track the different deadlines to pay liabilities and get reminders in a timely way.
6. Customized Payment Receipts in QuickBooks Desktop
You can also have a consistent, professional look across all of the customer’s communication with this particular feature. Sending detailed, customizable, and professional looking payments receipts with all the relevant information fields, is now easy.
This feature will ensure improved matching workflow for QuickBooks payments. And would help you in matching all the payments to your accounting automatically, every time. The best part about this feature is that the majority of the payments and transactions are automatically reconciled.
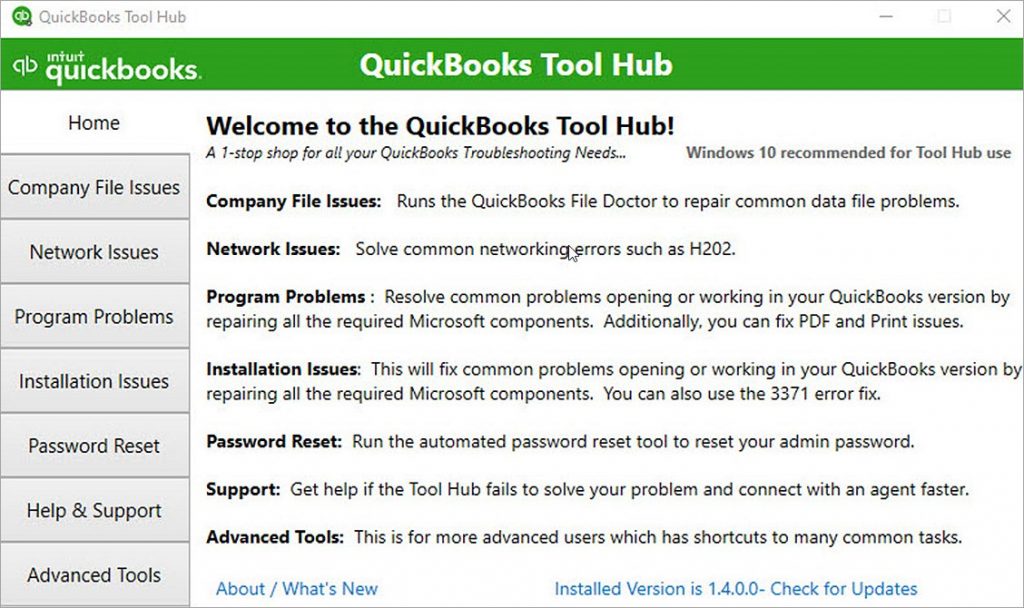
8. QuickBooks Tool Hub Program
QuickBooks Tool hub has always been a saviour for assistance with common QuickBooks related issues. You can simply fix common issues using this one stop solution.
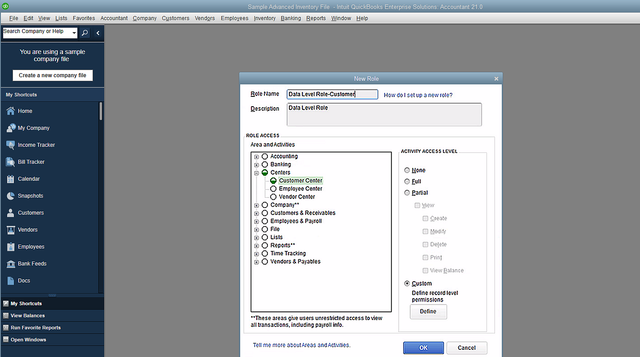
This is whole new feature in QuickBooks enterprise 21.0 that permits you restricted access for your users and roles created. This lets the admin to create users and roles with access permissions at record level for customers and vendors. You can create data level permissions by performing certain set of steps.
Final Note..! We hope that the article apprised you of all the necessary information
This is the list of top 10 features that rolls in with QuickBooks desktop 2021. However, If you have any questions, comments, or concerns, feel free to contact us! Our QuickBooks desktop support team will be more happy to help you out with your accounting related concerns.
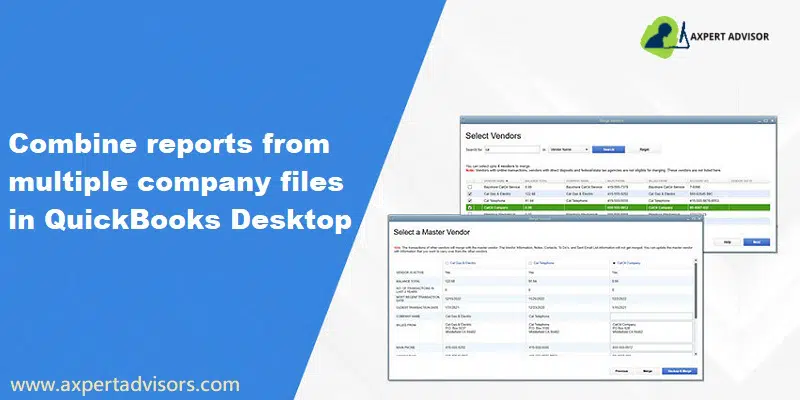
A Guide to Combine two or more QuickBooks reports from multiple QuickBooks desktop company files:
QuickBooks is the most adopted accounting program used in contemporary era. Most businesses, be it small scale or medium scale, conform to this program owing to its multitudinous features. This accounting program comes up with the feature to integrate reports, thereby making it very interesting to use. On top of it, the user-friendly feature is worth mentioning. One of the highly appreciated features of QuickBooks is that it allows the user to merge two or more QuickBooks company files. But for that, you need to know how to do so. You can combine financial reports of different company files.
In this article, we are going to explain the ways for merging/combining the reports from multiple company data files in QuickBooks. It is highly reliable to combine the reports from multiple companies features enable a user to create a report for combining several balance sheets which you can transfer to the Microsoft Excel spreadsheet file. If you have any questions about this topic, feel free to send a support request from here or you can contact to our dedicated technical support team.
How to Customize QuickBooks Desktop Custom Reports?
Some basic part for the simple data about reports in QuickBooks Desktop is below described:
Understanding Between Two or More Several Accounts:
One of the main tasks for performing the combined reports is completely understandable. If you are acquainted with this or you can simply understand the several data then you can simply check the needed information for the completion of a task.
Maintain Report for Orientation:
After checking the whole information, the next thing is to organize the data as it is needed.
Modify Reports:
If you are willing to make any kind of changes in the information as per the requirement then it is an imperative part.
Mark Comment:
To make your information effective as well as favorite then you can simply comment.
Built and Organize Regular Reports:
One of the most imperative things is to classify the data and it also needs to be scheduled.
Important Points to Note
To combine the reports some of the below points are required to remember:
The report is required to be much simple for reading as well as in creating a profile in several company files as almost similar.
The reports are required to be combined if they contain appropriate data in an identical way such as name, type, and alike gradable level.
Below are some valuable points which tell that accounts will not be combined if:
If they contain dissimilar property and assets.
There is some difference in alphabetic character.
Account mismatch.
If one user has a dissimilar report and the other has distinct data.
Reports are categorized into different types. The Details are to be selected in some order of what has been done in the chosen company file within each report. If the account appends by others in sequence after that they are encountered.
If you chose to log in to your file and also want to switch them to various users so as to accommodate the merging routine.
The types of data which cannot be merged include the following:
Memorized Transactions from secondary files.
Bank reconciliation.
Negative inventory and assembly builds.
Payroll checks cannot be displayed in payroll reports
Files having sales tax groups and items
Customer notes and to-do lists.
Customer fields brought from transactions.
Steps to Combine Two Companies Into One in QuickBooks Desktop
Option 1: Combine Reports in QuickBooks Desktop Enterprise (Built-In)
A few main features of built-in combines reports in QuickBooks desktop enterprise:
If you are having any built-in function in any of the fields then you can simply perform several complicated tasks with utmost ease. Likewise, QuickBooks enterprise also offers a built-in feature for merging various company files.
Note that, QuickBooks enterprise allows you to combine reports from multiple company files. These include:
Standard of record
A conclusion of the balance sheet
Financial loss amount and profit
Category of profit and loss
Comment on the cash flow
Check on balance
For Combining the Reports:
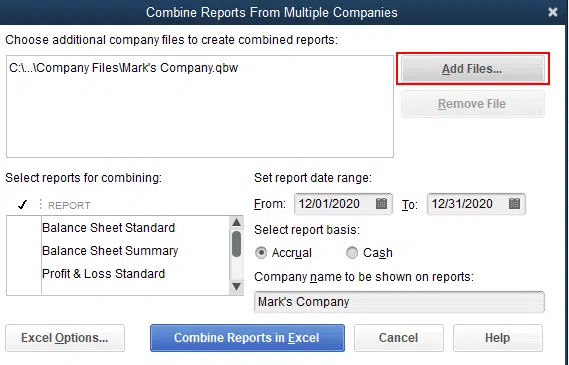
Initially, you need to choose combine reports from multiple companies from the reports menu.
Moreover, opt for add files option, then locate the other company file and choose open. Repeat the same process for additional files.
Now, underselect reports for combining, choose the reports you wish to combine.
Heading forward, pick the report from and to date range and also go for a report basis.
You now have to hit on combine reports in excel. A Microsoft Excel spreadsheet will show up with the combined information.
Option 2: Use a Third-Party Software
If you agree to use third-party software then you can simply pinpoint various programs that work with QuickBooks. Some of these programs offer important information to make the additional data from various corporate files.
Option 3: Manually Export Reports From Each File and Combine them Using Microsoft Excel
You can simply transfer the reports by following some of the given steps and merge reports through Microsoft Excel:
You need to initially access the first company file.
Now, on the select Reports, you are supposed to export to an Excel worksheet and Save the workbook.
You are then required to access your second company file.
Furthermore, create the same report and then export to an excel worksheet in the same workbook and also choose the Save tab.
You now have to launch Microsoft Excel and open the workbook.
Later on, combine the Two reports into a third worksheet manually.
We hope that this article assisted you to integrate QuickBooks reports. In case the issue persists or you need further assistance regarding the process to combine two or more QuickBooks reports, you can speak to our 24×7 QuickBooks support team. Whatever, your accounting issue is, our professionals have the capability to root out all the technical problems encountered while using the QuickBooks accounting software.
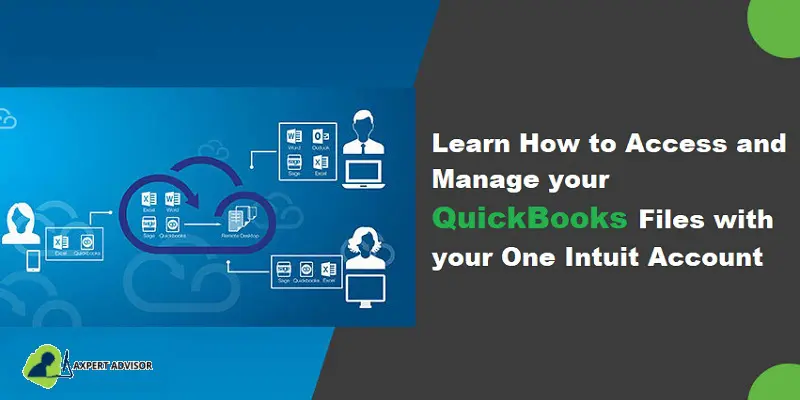
Checkout the quick guide to access Quickbooks Desktop files with One Intuit account:
Are you looking to access and manage your QuickBooks company files with One Intuit account? If yes, then this article will let you know all about this procedure in detail. Thus, sit relax and keep reading this post till the end. Connecting or creating an Intuit account to your QuickBooks desktop company file, you get the following:
An extra layer of security and protection
Secured single login for access to all of Intuit’s products. This also includes payroll, payments, time tracking, and much more.
Access to features and benefits for payroll, payments, time tracking, and much more.
How Important is it to Access QuickBooks Desktop Files with One Intuit Account?
You can ask your client to add you as an external accountant user in their file. And after that, you will be able to sign in with the external accountant credentials and you won’t get Intuit account prompts.
Just in case you don’t use an accountant edition of QuickBooks with a company file you get from the client, then you might see one of the three scenarios, which will be discussed later in this piece of information. You might see the first two scenarios if you sign in to the client files as the admin.
Steps to Accessing QuickBooks Desktop Files with One Intuit Account and Manage Them
You have to pass the below given 3 Scenario when you are accessing or managing your QuickBooks files with One Intuit Account:
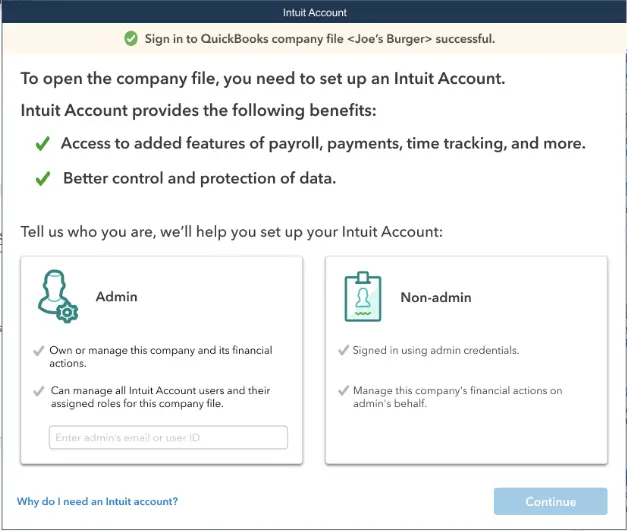
Scenario 1: No Prompt for Intuit Account Setup or Login
In case you aren’t asked for Intuit account setup or login, you can continue to make use of the company file as normal.
Scenario 2: Just in case you successfully sign in to the company file with a request to set up the intuit account
If you encounter this option, then your client will have to link their account to their company file.
Non-Admin
In case you are an accountant reviewing the client’s file, then you will have to select non-admin. Choose non-admin only if you manage the company’s financial actions on the admin’s behalf and choose the continue tab. QuickBooks will close the intuit account promptly. Once 14 days’ time passes away, you would have to sign in to the file again in order to work on it.
Admin
Whereas, if you are an accountant that does everything for the client, then you might have to pick the admin option. This isn’t the standard through. Thus, only pick this option if you own/manage the company and its financial actions. Pick the admin option, in case you manage the company and its financial actions. Furthermore, enter the email address and hit on the continue tab. Enter the Intuit account password later on and hit the OK tab. All these steps would allow you to work in the file.
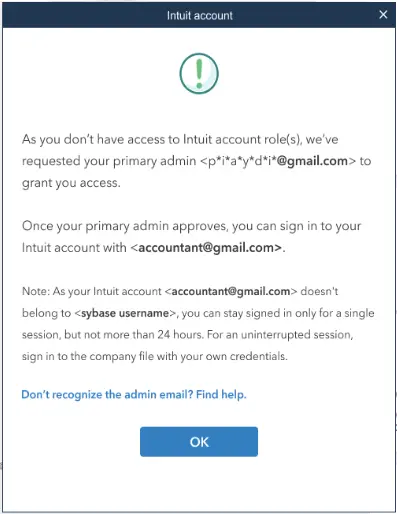
Scenario 3: Just in case you are asked to sign in to the Intuit account after you sign in to the company file
You are recommended to ask your client to approve your QuickBooks access if you want to access your client’s info. You will be able to see the User ID prompt, in case the client has already linked their intuit account to the company file. Whereas, if the email address you find isn’t yours, then replace it with the appropriate one. Pick the continue tab and enter the password.
If you are signing in with your Intuit account credentials for the very first time, then your client will have to approve the access. Pick the OK tab and tell your client to approve the access.
This is all you should know about how to access QuickBooks desktop files with one Intuit account. As always, if you have any queries, comments, or concerns, kindly connect with us! Our dedicated QuickBooks desktop support will be always there to assist you in a better way.