A Comprehensive Guide to Fix QuickBooks Payroll Internal Error 30102
As a QuickBooks user you may have come across error codes of different forms. QuickBooks Payroll Error 30102 is a new entrant in the error codes which is typically encountered while attempting the direct deposit slip. This issue might also be faced by users when trying to move their payroll data across two computer systems. This payroll error shows up in the form of the following error descriptive notifications:
Error
Description
16052
Error 30102: QuickBooks has encountered a problem and requirements to shut.
Payroll server error. Try after some time or the payroll connection error.
This article shall explain the multiple causes triggering this error as well as the viable troubleshooting methods to get this unexpected payroll error 30102 in QuickBooks sorted out permanently.
Potential sources of QuickBooks Payroll Error 30102
This issue in QuickBooks Payroll can be attributed to different sources. Some notable sources of this payroll error are:
Invalid Security software
When files transferring switch to the multi-user mode.
QuickBooks Desktop program unable to get the server because of the PC time-out
Improper Internet connectivity
A firewall application blocks the processing when the user tries to move the data from one file to another.
Incorrect settings of time and date are one of the causes of this error.
A system time-out keeps QuickBooks Desktop program from getting to the server.
Workable Solutions to Troubleshoot QuickBooks Payroll Error 30102
Here are a few steps you can take to resolve this QuickBooks error message 30102:
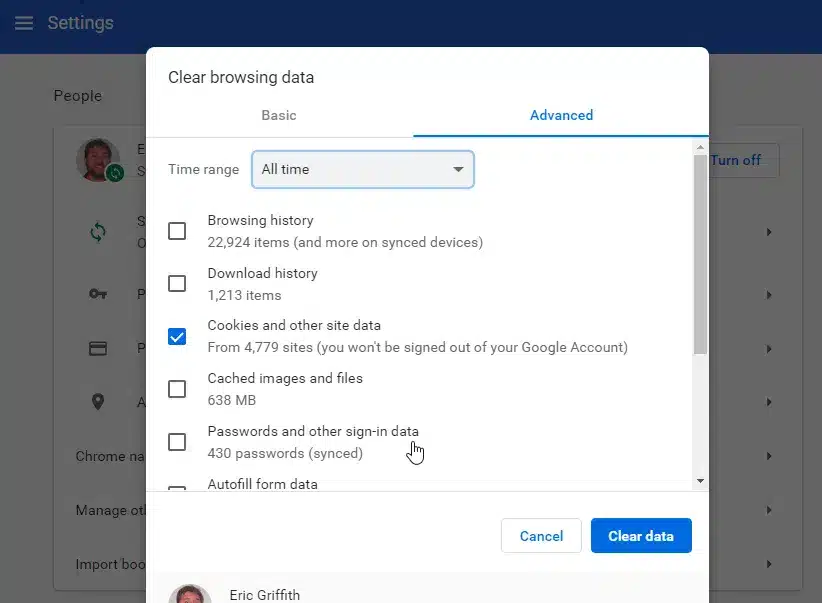
Solution 1: Delete Temporary Internet files
Excessive accumulation of the temporary files should be taken care off at regular intervals of time. The steps for the same are:
At first, you need to open Internet Explorer browser and then move on to the Tools tab.
After that, the user needs to hit on the Internet options and then go to the General tab.
Now, scroll down to the Browsing History and then hit on Delete key.
Make sure to checkmark the box besides Temporary internet files.
In the next step, hit on the Delete option to get the temporary files deleted.
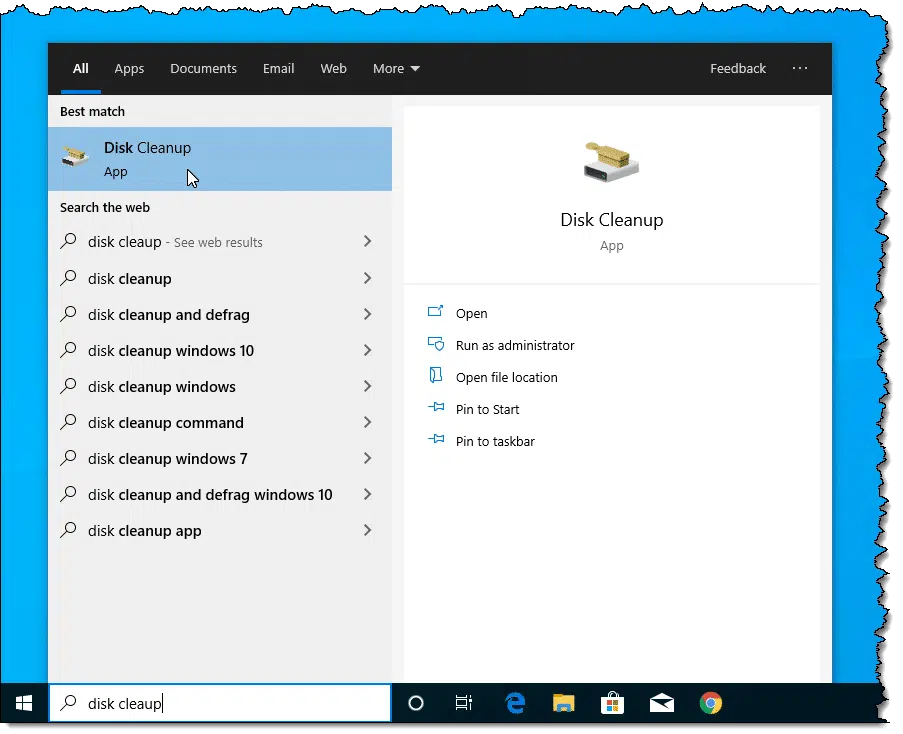
Users should also use the Disk Cleanup tool from the Start menu to free up the space in the local disk.
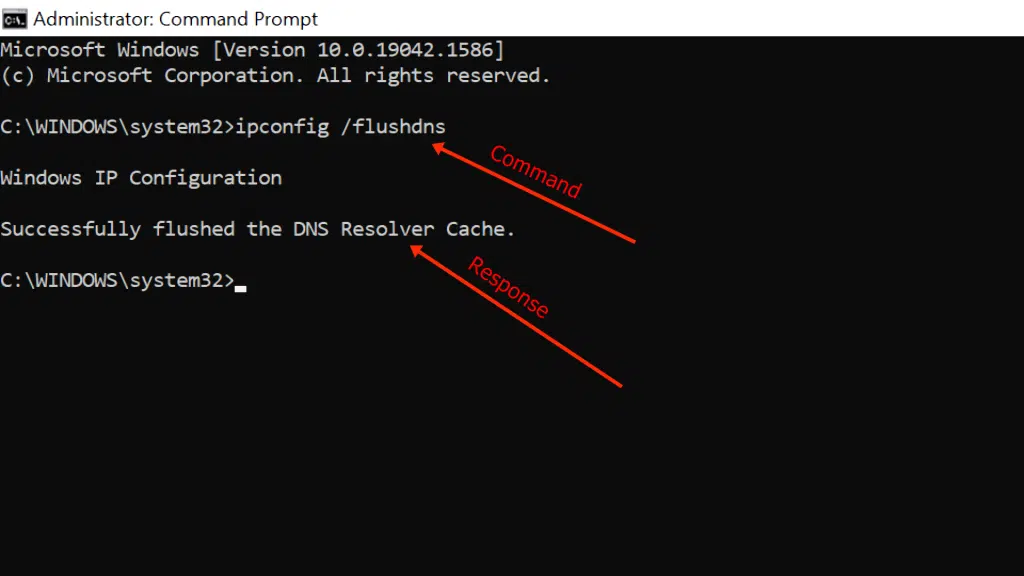
Solution 2: Flush the DNS
Flushing the DNS can effectivelyfix Payroll error 30102 in QuickBooks. To get this done user needs to make use of some commands in the command prompt. The process is enumerated below:
Initially, access the Command Prompt from the Start menu.
Here, type in the command “Ipconfig /flushdns’” and proceed by pressing Enter.
Now, type another command “ipconfig /registerdns” and hit Enter.
Solution 3: Configure TLS Settings in Internet Explorer
Many a times, payroll errors are a result of incorrect TLS and SSL settings in the Internet Explorer. To get this issue sorted out, the user should follow the steps below:
In the beginning, the user needs to open Internet Explorer and then open the Tools tab.
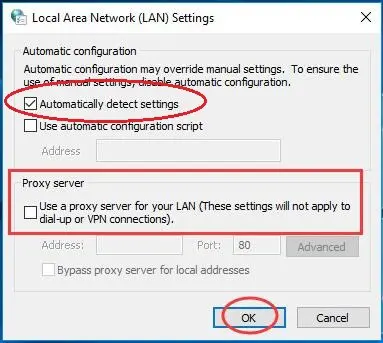
Subsequent step is to click on the LAN settings within the Connection tab.
Herein, click on the option to Automatically Detect Settings and then hit on Ok twice.
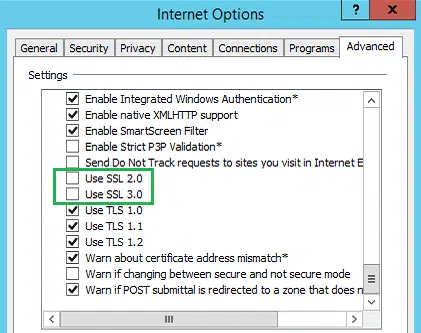
Checkmark SSL 2.0 and SSL 3.0 and make sure that SSL 1.2 is unmarked.
Also, enable TLS 1.2 and hit the Enter key.
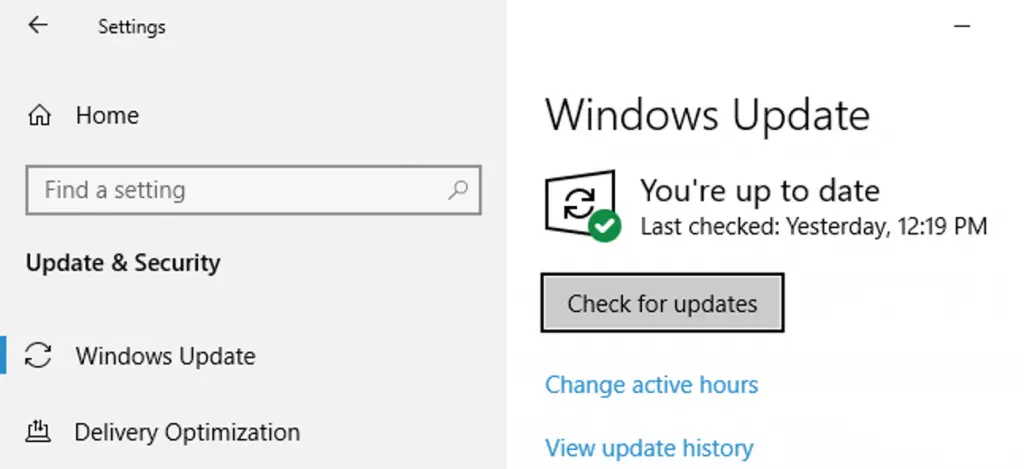
Solution 4: Update QuickBooks to latest release
Although updating QuickBooks desktop should be a frequent practice by users, many tend to overlook it. This in turn keeps them away from the advanced security features that come along with these updates. These act as a bone guard against different errors with Error 30102 being no exception. If you haven’t updated QuickBooks from a long time, there is no need to fret. Just follow the steps below:
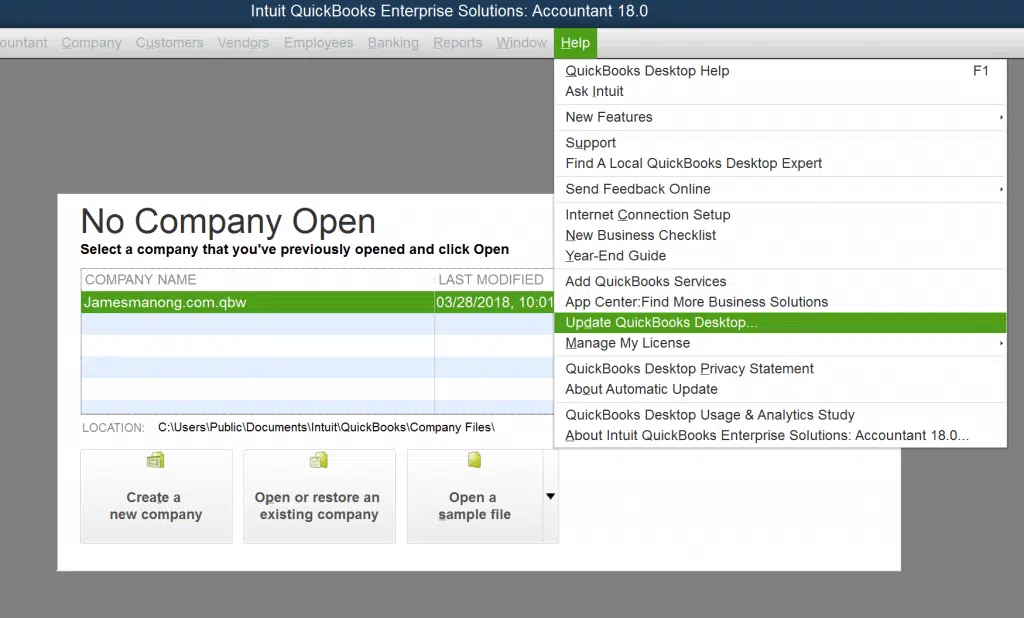
At the first, run QuickBooks as an administrator and then click on the Help tab.
Soon after clicking on the Help tab, tap on update QuickBooks Desktop option.
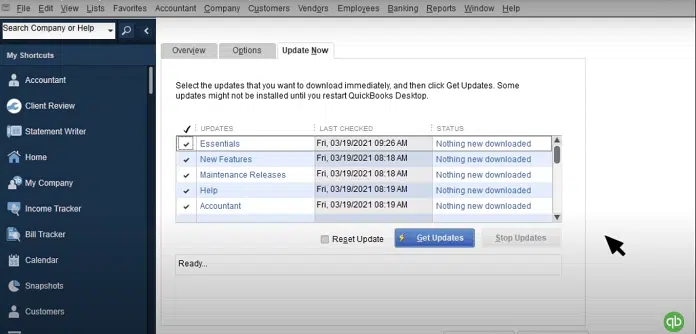
Abide by the onscreen steps and then hit on Get updates tab to start with the update.
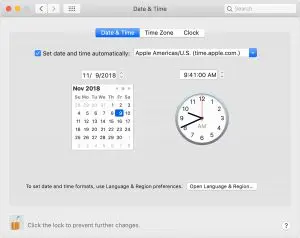
In mere instances, incorrect system date and time could trigger QB Payroll Error message 30102. Although, the chances of this are very rare, the user should double-check the system date and time and fix them at the earliest by using the below-discussed steps:
If the system date and time show some deviation from the actual date and time, the user need to right-click on the Time menu on the Taskbar.
After that hit a click on Adjust date/time to open the date and time window.
Now, make the necessary corrections to the date and time.
Also, choose the correct Time Zone, followed by clicking on Enter key.
Now, re-open QuickBooks and try sending the payroll to check if QuickBooks Unexpected Internal Error (Error 30102) is sorted out.
Concluding!
Having gone through and performed the multiple solutions to troubleshoot QuickBooks payroll Error 30102, our team hopes that the issue got fixed on your system. If you are still stumbling upon this error repeatedly, just give our QuickBooks desktop error support experts a call at the helpline number i.e., 1-888-368-8874.
Checkout the Strategies to Fix the QuickBooks EXEAdapter Installation Error
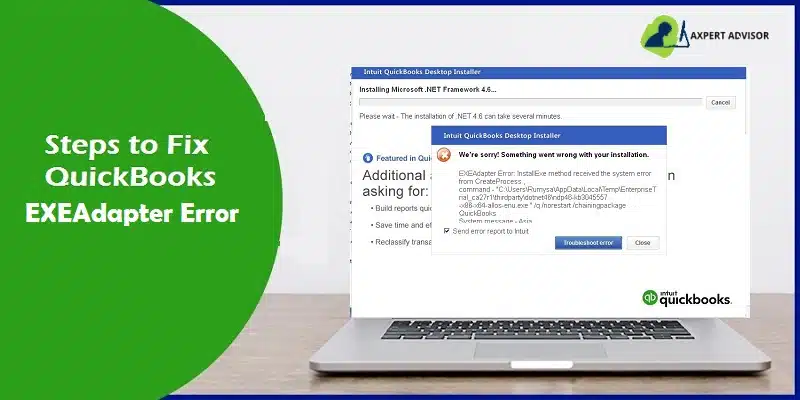
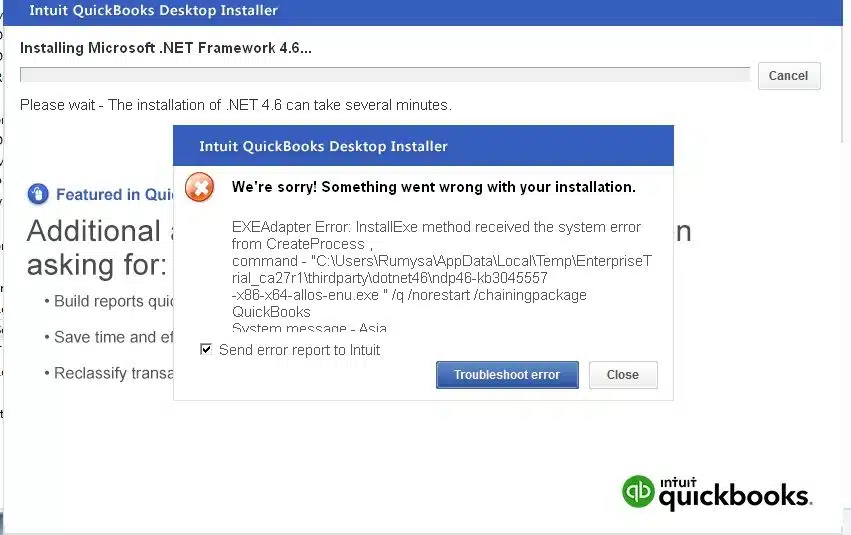
QuickBooks installation can be hampered by different types of technical issues that hamper. QuickBooks EXEAdapter error, or QuickBooks Error 61686 is one such error that has been witnessed by a large number of users lately. This installation error can be attributed to damaged Microsoft components, especially MS .NET Framework. This snag pops up on the screen in the form of the following message:
Something went wrong with your installation. EXEAdapter error: InstallExe method received the system error from create process, command- C:/user/asaeed/appdata/local/temp/premier_us27r1/ thirdparty/dotnet46/ndp46-kb3045557-x86-x64-allos-enu.exe”/q/norestart/chainingpackage QuickBooks system message – The component store has been corrupted.
The installer encountered an error when running “C:\Users\Owner\AppData\Local\Temp\Premier\QBooks” /quiet /norestart INSTALLDIR=”C:\Program Files\Intuit\QuickBooks 2011″ QB LICENSENUM=####-####-####-###
Component: QuickBooks Location: “C:\Users\Owner\AppData\Local\Temp\Premier\QBooks\windowsinstaller-kb93803.exe ” EXEAdapter Error: InstallExe method received the system error from CreateProCess , command – “C:\Users\Owner\AppData\Local\Temp\Premier\QBooks\windowsinstaller-kb93803.exe” /quiet /norestart INSTALLDIR=”C:\Program Files\Intuit\QuickBooks 2011″ QB LICENSENUM=####-####-####-###
Efficacious Solutions to Troubleshoot QuickBooks EXEAdapter Error
If you are encountering this error and are seeking quick and reliable solutions to fix it, the multiple solutions to fix QuickBooks EXEAdapter Error discussed in this section will definitely come to your rescue.
Solution 1: Rename Framework.xml
At first, click on the Start menu.
After that, open “Command Prompt” as an admin.
Herein, type “%temp%”, followed by hitting the Enter key.
Within the Temporary folder, search for the QuickBooks folder namely “QBooks” and open it.
Now, right-click on the “Framework.xml” file.
Hit on “Rename”.
Change the file name from “Framework.xml” to “Framework.xml.OLD”.
Subsequently, download the “Framework.xml”file manually from the internet and paste it in the “QBooks” folder.
After following the steps to rename the xml file. Try the installation process again.
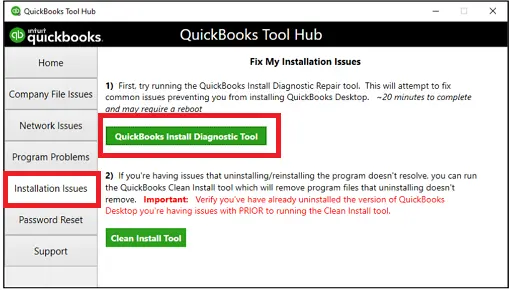
Solution 2: Using QuickBooks Install Diagnostic Tool
Another troubleshooting solution for EXEAdapter Error is diagnosing the QuickBooks accounting program for technical issues. The walkthrough below should help readers:
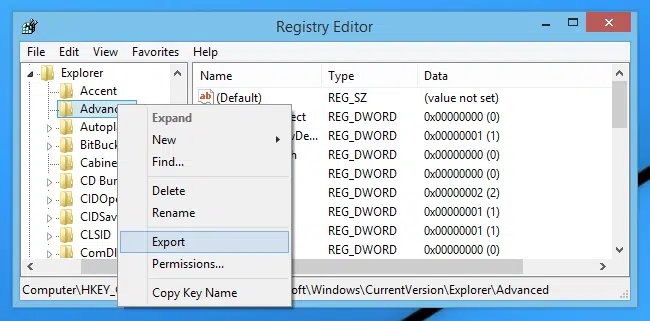
When the Registry editor opens, search for QuickBooks error 61686-related registry key.
Upon choosing the key, hit on the File menu.
After that, click on the Export option.
Save the key with a .reg extension.
Solution 4: Uninstall and Reinstall M.S .NET Framework
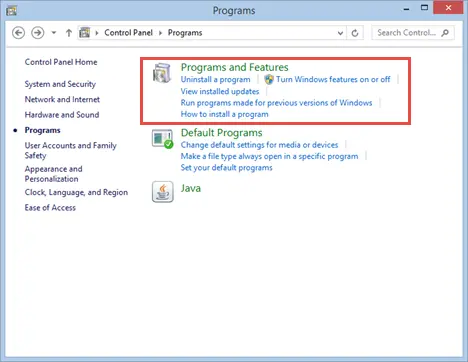
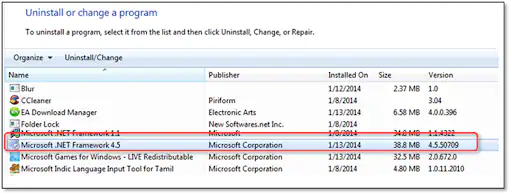
Click on the Start menu.
Open the Control Panel and click on Programs and Features.
Hit on the .NET Framework program and Uninstall it.
Once done with that, advance to the website of Microsoft and install the latest compatible version of the component from the website.
You should also go for Windows Update. For that, click on the Start menu and type “update”. Open the update window and choose the available updates, including the Microsoft components. Proceed with the update process and when done with that, reboot the system. The updates will automatically install on the system.
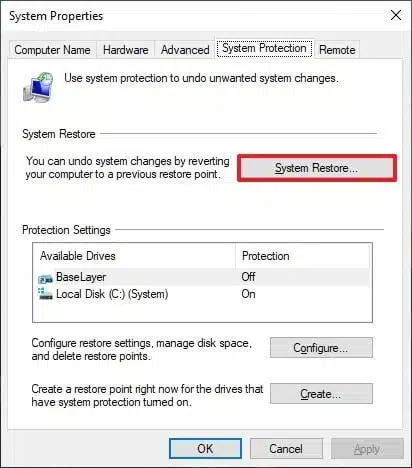
There may be possibility that the some recent change resulted in the corruption of .Net Framework. To ward off this source, restore the system to an earlier state. You can take reference from the steps given below:
Click on the Start button and type “System Restore”.
Choose the latest restore point.
Proceed with the restore process and restart the computer.
Now, try the software installation process again.
Suggested Reads
This discussion unraveled multiple solutions that can help users in troubleshooting QuickBooks EXEAdaper Error. Technical errors in QuickBooks are common and can be easily resolved if effective remedial steps are conformed to. If you are facing any technical intricacy in QuickBooks, you can call our QuickBooks enterprise support experts at the helpline 1-888-368-8874.
QuickBooks Online gives users an open window for accessing and managing their bank accounts. However, there are instances when some users may experience QuickBooks error 109 when logging in to the bank account. This error generally indicates that an old password is being used for logging in to the bank account. An obvious and the most common solution to fix this error requires users to go for updating of the password. To know more, we advise readers to go through the full length of this concise article.
Some notable causes of QuickBooks Error 109
Users should first go through some common causes of QuickBooks Bank Error 109 as this will give an indication of the appropriate set of troubleshooting methods to perform for an all out extermination of this QuickBooks banking error. These include:
Not updating the password from a long time.
Poor internet connectivity might be inciting this error.
Insufficient folder permissions could also provoke the error.
Firewall may be acting as an impediment in the path of seamless connection with the server.
Troubleshooting Steps for Fixing QuickBooks Error 109
Users should follow the simple steps discussed below to fix this banking error 109 in QuickBooks Online without any need of technical proficiency.
Step 1: Update password
Users should first update their password on the bank website. The steps for the same are discussed below:
At first, login to the bank website and update the password.
Subsequent to that, navigate to QuickBooks Online and proceed ahead by logging in to the account.
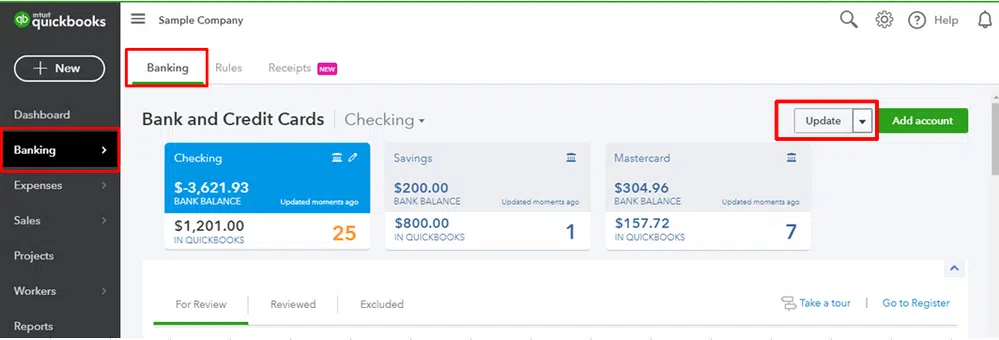
Upon logging in to QuickBooks, advance to the Banking option.
Users can alternatively head to the Bookkeeping option and then follow up by advancing to Transactions. Following that, hit on the Bank Transactions option.
Users are then required to checkmark the box beside the bank account and then click on the Edit option.
After that, click on the Edit sign in Info option.
Upon checking into the option, update the password.
After that, hit on Save and Connect.
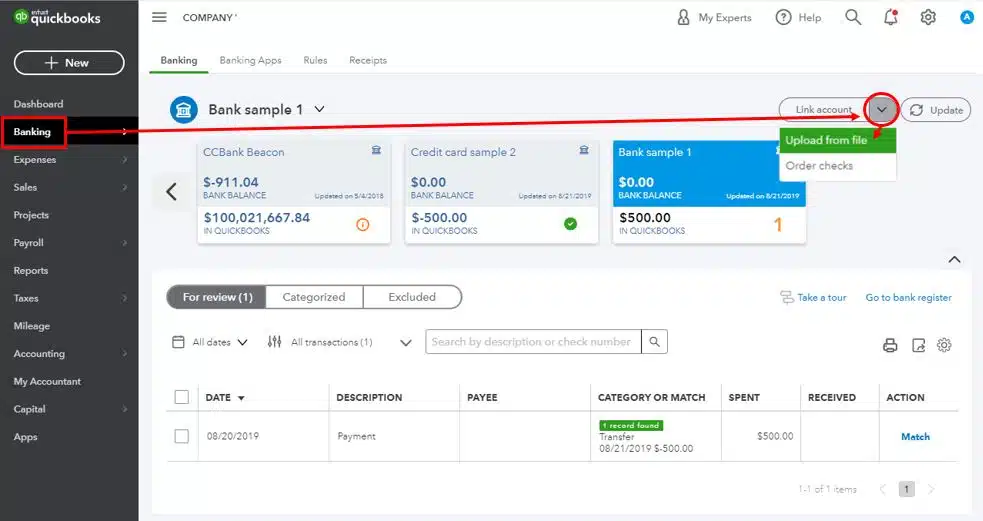
Step 2: Importing the Bank Transactions
Another tried and tested approach for rectifying QuickBooks Error 109 is to import the Bank transactions from the website of the financial institution. Users should follow up the walkthrough enumerated below:
To start, navigate to the bank website on connecting to which Error 109 appears on the screen.
After that, head to the option to download transactions.
Now, tap on the Banking option and following that, click on the Update section drop down.
Herein, user is required to hit on the File Upload option and then tap on the Browse option.
Pick the file for uploading and then click on Open.
After that, user can proceed ahead by hitting on Next.
Subsequent to that, user should proceed by updating the bank information.
Once that is done, proceed by tapping on the account and then hitting on Next tab.
Just in case there is no active account, user can hit on the Add New tab.
Thereafter, choose the columns from the CSV file that show relevance with the banking section.
Once done with the foregoing steps, user should click on Lets Go tab upon retracting to the banking page.
This article entailed easy steps for fixing QuickBooks Error 109. This is a common technical issue in QuickBooks Online and is generally incited due to usage of an old expired password. While the steps above should effectively troubleshoot the issue, if you feel need for technical assistance, feel no hesitation in connecting with our QuickBooks desktop error support experts at the helpline i.e., 1-888-368-8874.
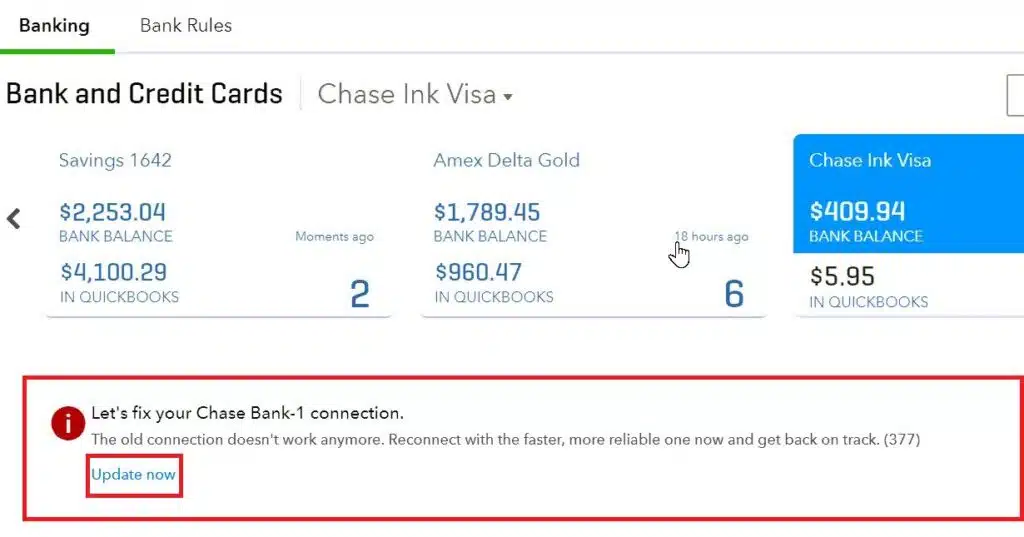
Several QuickBooks users have been getting across a technical issue when downloading transactions from their financial institution. This error typically occurs in the form of QuickBooks online error 377. This error is generally caused when users do not update their bank account in QuickBooks after a recent update. Getting past this error is an easy task and requires that users stick to some basic fixes that are explained within the ambit of this blog. The error message associated with Error 377 usually states:
“The old connection is gone. Reconnect now with the new faster, more reliable one and get back on track. (377)”
“Error 377: QuickBooks has encountered a problem and needs to close.”
What causes QuickBooks Error 377?
This Error is typically encountered by users when they have not updated the bank connection type in QuickBooks after the latest update and shows up while downloading transactions.
Another potential cause of this error could be backend maintenance of the bank server for which the user should wait for a while and then try to download the transaction again.
Poor internet connectivity can also provoke Error 377 in QuickBooks.
The error can be resolved by resorting to the below given fixes. At first, users should try to fix the bank connection by updating the same, and if that does not troubleshoot Error 377, then, it is advisable to use WebConnect for downloading transactions from the bank.
Fix 1: Fix the bank connection
The first step is to Run QuickBooks.
Subsequent to that, advance to the Banking tab.
Here, hit on Lets fix this bank connection option.
Therein, click on Update now.
Fix 2: Download Transactions using WebConnect
If updating did not fix QuickBooks Error 377 when downloading transactions, then, users need to set up the WebConnect and download the transactions using the tool. The steps for the same are:
Login to the Online Banking account through the browser.
Hit on the Date Range.
Click on the option to download the transaction file the bank in a .QBO extension.
Now, login to QuickBooks Online in the browser.
Advance to the Banking tab.
Hit on the Banking option and following that, hit on Update.
Click on File Upload.
First time users are required to hit on the option to Upload Transactions Manually.
After that, hit on Browse.
Choose the downloaded transactionfile option.
Hit on Next tab.
Go to the QuickBooks Account drop down and opt for the account corresponding to which you wish to upload the data.
Users have the leverage to add a new account. This can be done by hitting on the Add New option.
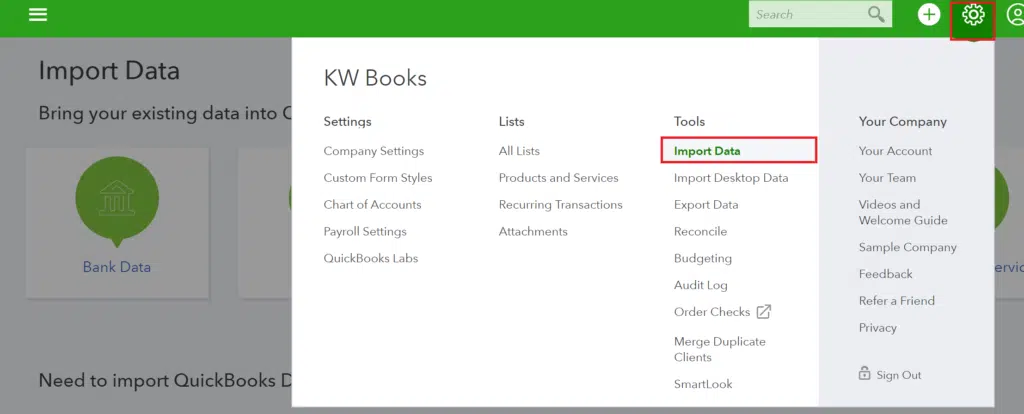
Tap on the Gear icon and go to Tools.
Then, click on Import Data.
Opt for the Bank Data and subsequently hit on Next tab.
Finally, click on Lets Go in order to culminate.
This should effectively resolve QuickBooks Error 377 when downloading transactions.
In this precise article, we have encapsulated all the relevant and practical approaches to fix QuickBooks error code 377 when downloading transaction. If you face the issue even after performing the aforementioned fixes, then it is recommended to reach out to our QuickBooks error support experts via the helpline i.e., 1-888-368-8874.
QuickBooks Online allows its users to access their bank account directly and also offers the leverage to process transactions via the accounting program. However, when users try to update the bank account in QuickBooks Online, they may face peculiar errors like QuickBooks Online Error 590. This error suddenly appears when updating the account and prevents the bank update process. This error has been encountered in case of different banks and the error message that comes associated with this error states:
“Something unexpected happened and we cannot connect to YOUR BANK NAME. Try again in a few hours. (590)”.
It is important to resolve this error promptly to ensure smooth functioning of QuickBooks. The current article shall be evaluating the various factors that lead to online banking error 590 and shall apprise readers of the various methods to fix QuickBooks Error 590.
What causes QuickBooks Error 590?
Some of the major causes that can provoke Error 590 are:
Poor internet connectivity.
There was a connection interruption in the last online banking session.
Important QuickBooks components might be missing.
There could be a message regarding a change of servers, maintenance updates, or added security features, that need to be acknowledged on the bank’s website.
Bank feeds may be causing the issue.
There might be a back end server maintenance going on.
Some malware or Virus may have infected the system and damaged QuickBooks components.
A problem with your Internet connection.
Some major Signs related to QuickBooks Error 590
Use is not able to establish the connection with the bank even after recurring efforts.
The system gets slow and encounters frequent freezing and crashing.
System takes a lot of time to process user inputs.
Solutions to Annihilate QuickBooks Online Error 590
This section contains all the updated solutions that shall help users in resolving this error 590 in QuickBooks Online. So, read it carefully and implement the steps accordingly.
Solution 1: Turning Off the Bank Feed
The steps for disabling bank feeds are:
Open QuickBooks.
Upon opening the accounting program, head to the Banking option.
Choose the bank feed to disconnect.
After that, hit on the Disconnect option.
Hit on Yes on the on-screen prompt.
The user shall then be navigated to a new page.
Herein, choose the Financial Institution and connect to the bank account by typing in the correct login details.
Solution 2: Improve the Functionalities of the program
Users should follow this process if they are certain that the issue is erupted due to issues within the bank server. To get it confirmed, users should try downloading some random bank transactions.
At first, create a backup of the financial data to secure it from any loss.
Now, pick a new company from the File option.
Enter the name of the sample file.
Now, hit on the Save button.
Hit on Finish.
Now, proceed by the addition of the account to the COA.
After that, establish the online banking for that bank account.
QuickBooks Error 590 may also pop up due to poor internet connectivity. As such, users should make sure that they have uninterrupted internet connectivity.
Users should check their internet speed on websites like Fast.com. If the internet speed is showing less, then restart the mode, and check if the speed got recovered.
Users should also inspect the internet cables and make sure that they are properly secured.
Discard any sources of interference from other devices in the vicinity.
Users should also configure the DNS settings. In case of a static IP address, users should ensure that the DNS settings are correctly set.
Solution 4: Adding a New Connection
Navigate to the bank website and provide your login credentials to log in.
Click on the transaction date range.
Opt for the below-given compatible file extensions:
QuickBooks Online (QBO),
Quicken (QFX),
Microsoft Money (OFX), or
Comma-Separated Values (CSV).
Get the file downloaded on the system.
Now, try signing in to the QuickBooks Online account and upload the downloaded file.
The current blog entailed all the updated solutions that can fix QuickBooks Online Error 590. It also listed the various causes that can lead to such error. If you are facing any other problems while working in QuickBooks, just get in contact with our executives at QuickBooks error support team by calling us at the helpline 1-888-368-8874.
If you are a frequent reader of our technical blogs on QuickBooks, you may have gone through an array of Error codes of the format “Error 15xxx”. Update Error 15242 is one such error encountered by users when they try to update QuickBooks or Payroll services. A peculiar aspect about 15xxx series of error codes is that though all of these errors appear while updating the program, the causes of these errors are not always the same. This error is generally associated with a damaged QuickBooks FCS (File Copy Service). This blog shall clear all your confusions related to this QuickBooks Payroll Update Error 15242 and will present multiple resolutions to fix it.
What is QuickBooks Error 15242 and how does it appears?
This error is a common issue that is faced by QB users. This error generally occurs when there are problems with your payroll update. When this error occurs it prevents users from downloading the latest updates. However, in this article you will get several effective solutions in order to rectify this QuickBooks Error code 15242. Thus, keep reading ahead!
This update error is usually observed in the form of the following error message:
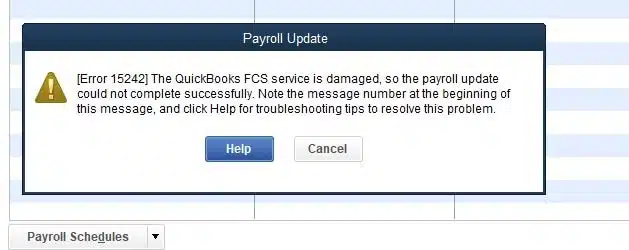
“Error 15242: The update of the payroll is not completed properly. QuickBooks FCS is not responding or damaged.”
Or
[Error 15242] The QuickBooks FCS service is damaged, so the payroll update could not complete successfully. Note the message number at the beginning of this message, and click Help for troubleshooting tips to resolve this problem.
What are causes behind QuickBooks Error Code 15242?
Some of the conspicuous causes highlighted by our experts are:
QuickBooks FCS (File Copy Service) might be corrupted or damaged
The source of QuickBooks update is corrupted or is unauthentic.
Different Tactics to Troubleshoot QuickBooks Error 15242
This section contains all the potential solutions to root out this update error15242 in QuickBooks. So, maintain your focus and perform all the steps mentioned herein with keen observation.
Tactic 1: Check payroll subscription
Run QuickBooks as an admin.
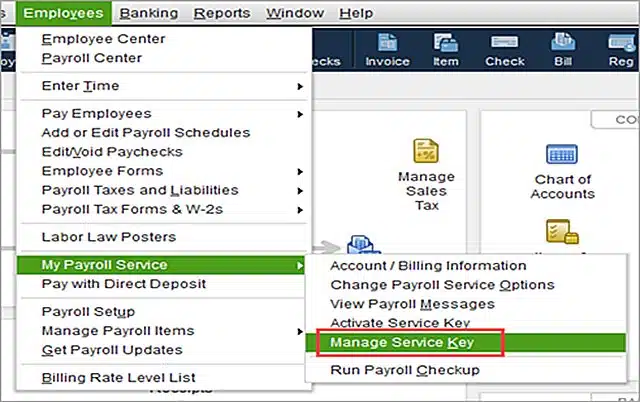
Afterwards, hit on the Employees option and click on My Payroll Services option.
Next, choose the option to Manage Service Key.
Subsequent to that, click on View tab to check the service key status of the payroll subscription.
The service key should be active. If it is inactive, then, hit on the Add button tab.
Type in the correct Service key which should be available in your email received while subscribing to the product.
Hit on Ok.
Try updating QuickBooks Desktop Payroll.
The error should be obliterated. If not, then move to the next tactic.
Tactic 2: Configuring the File Copy Service settings
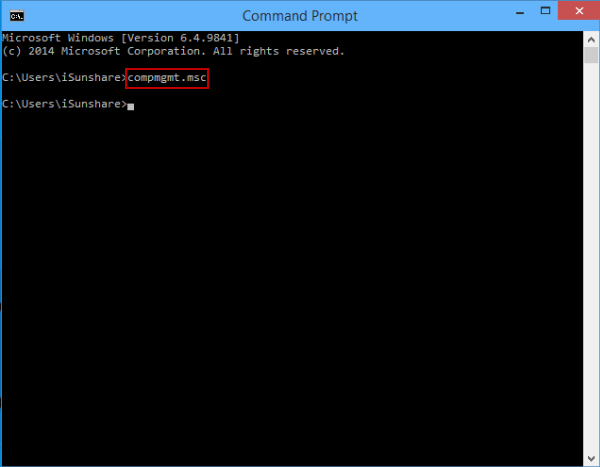
Open the Run Window and type COMPMGMT.MSC in it.
Hit the Enter key.
Go to the Services and Applications option.
Now, advance to the Services option.
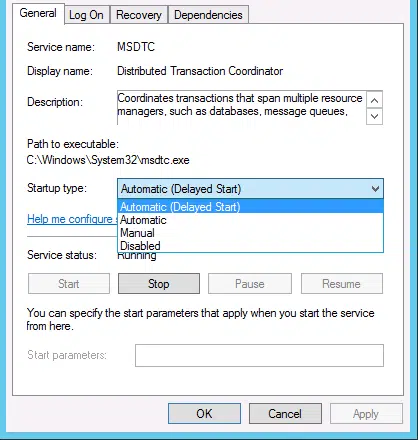
Double-click on Intuit QuickBooks FCS.
Hit on the properties and click on the Startup type and choose Manual opt.
Hit on Apply and then click on Ok.
See Also: How to Fix a Subscription Error in QuickBooks Desktop?
Tactic 3: Reset previous Payroll updates
Run QuickBooks Desktop
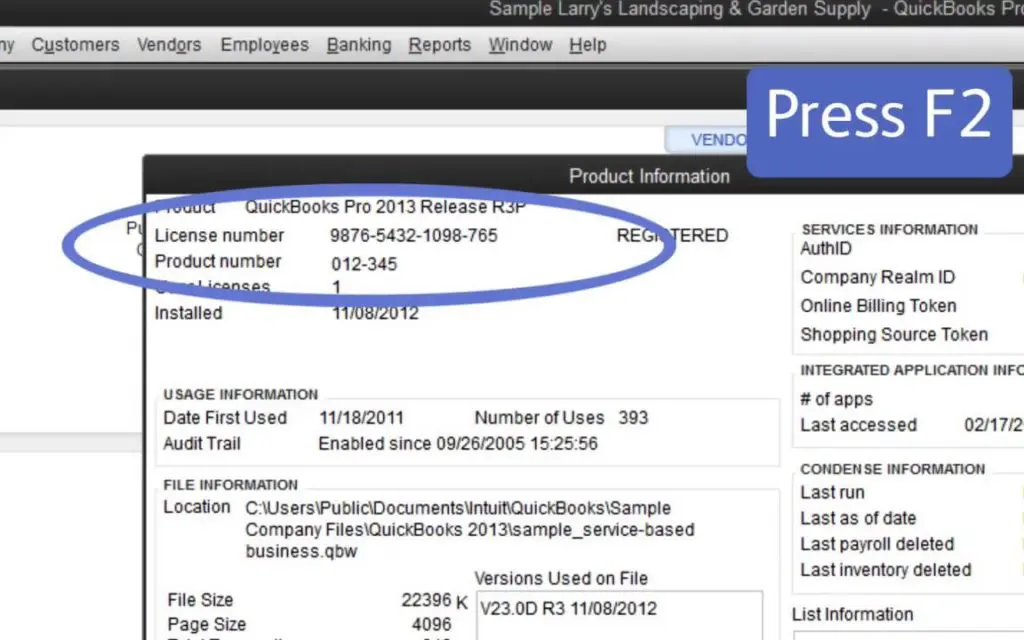
Tap on the F2 key to reveal the Product information window.
Check the QuickBooks version and hit a click on the Help tab.
Go to Update QuickBooks Desktop from here.
Hit on the Update now tab and then click on Reset Update checkbox.
After that tap on Get Updates option.
If the updates get downloaded without showing up any error, install the updates after reopening QuickBooks and once done with that, restart the computer.
Tactic 4: Reactivate the subscription
It is thus imperative that users type in the correct service key and also make sure that the QuickBooks subscription is active. Steps below should help.
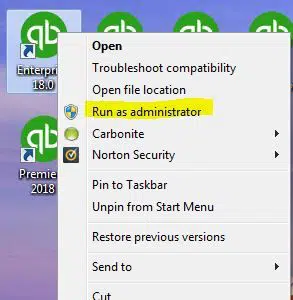
Run QuickBooks as an administrator by right-clicking on the icon and opting for Run as Administrator.
After that open Payroll and go to the Employees tab.
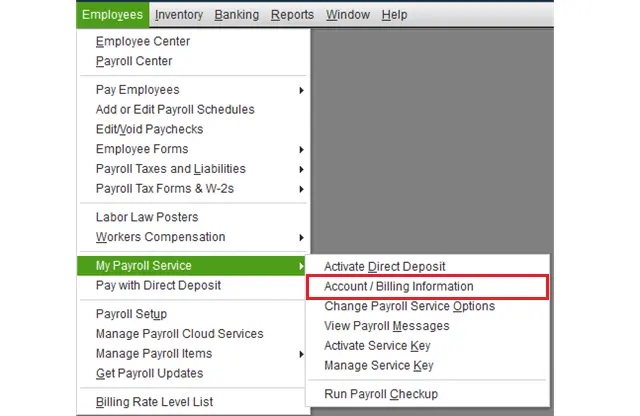
Now hit a click on My Payroll Service.
Choose the Account/Billing Information option
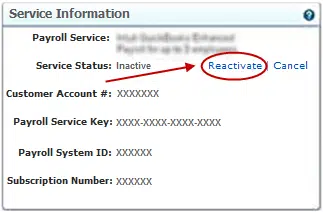
Sign in to the Intuit account by providing the correct credentials
Check if the payroll subscription is verified on the QuickBooks Payroll Account Maintenance page.
If the subscription is inactive, activate the subscription.
Also, make sure that Internet Explorer is the default browser.
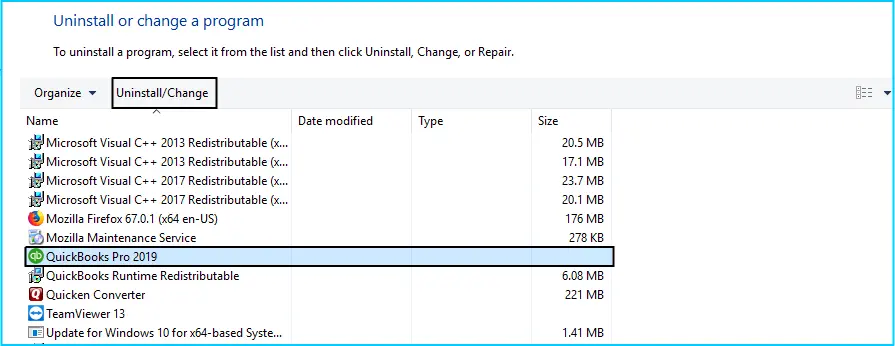
An easy way of bypassing this error without getting into any technical intricacies is to repair QuickBooks. The procedure for repairing the accounting program is stated below:
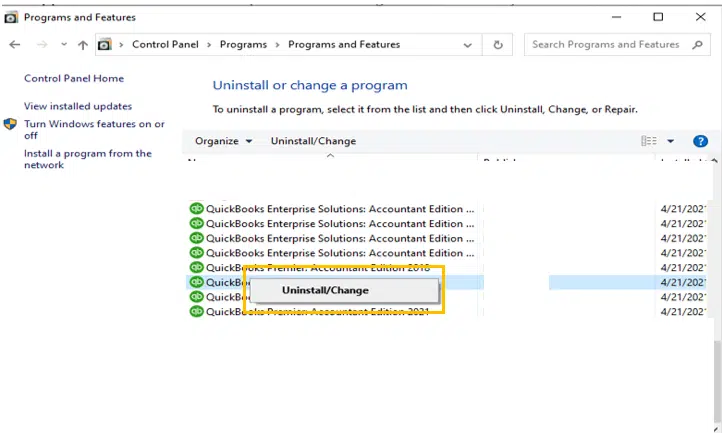
Open the Control Panel from the Start menu.
Then, head for the Programs and Features tab.
Now, click on QuickBooks and then click on the Uninstall/Change option.
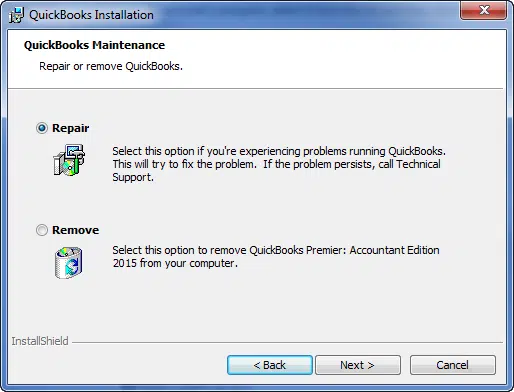
Now, hit on Repair.
Wait for the process to finish and then restart QuickBooks.
Tactic 6: Clean Install QuickBooks desktop
It is required to perform a clean install QuickBooks if the above given steps didn’t work for you. The process involves a complete wipeout of the accounting program and reinstalling it. Below are enumerated the steps for the manual clean install process.
Step 1: Uninstall QuickBooks
Click on the Start button on the extreme bottom left corner of the Taskbar.
From there, open the Control Panel.
Move to the Programs and Features tab.
The next step requires clicking on QuickBooks and then clicking on Uninstall/Change tab.
Follow the onscreen steps and get the accounting program uninstalled from the system.
Step 2: Rename the QuickBooks folder
Upon uninstalling the program, visit the local disk containing QuickBooks and then rename the QuickBooks folder.
Step 3: Reinstall QuickBooks
Use the original CD for reinstalling QuickBooks, or download the .exe file from the website of Intuit. For registration and activation of the product, use the original product and license keys provided at the time of the product purchase.
If Error 15242 in QuickBooks payroll is caused due to a technical issue within the installation files, or Microsoft Windows components are damaged, then QuickBooks Install Diagnostic Tool can come to the rescue.
Run the QuickBooks Tool Hub.
After that, click on the Installation Issues option.
Therein, click on the QuickBooks Install Diagnostic Tool and allow the tool to commence the scan process.
Later, user can re-open QuickBooks and try to update it again.
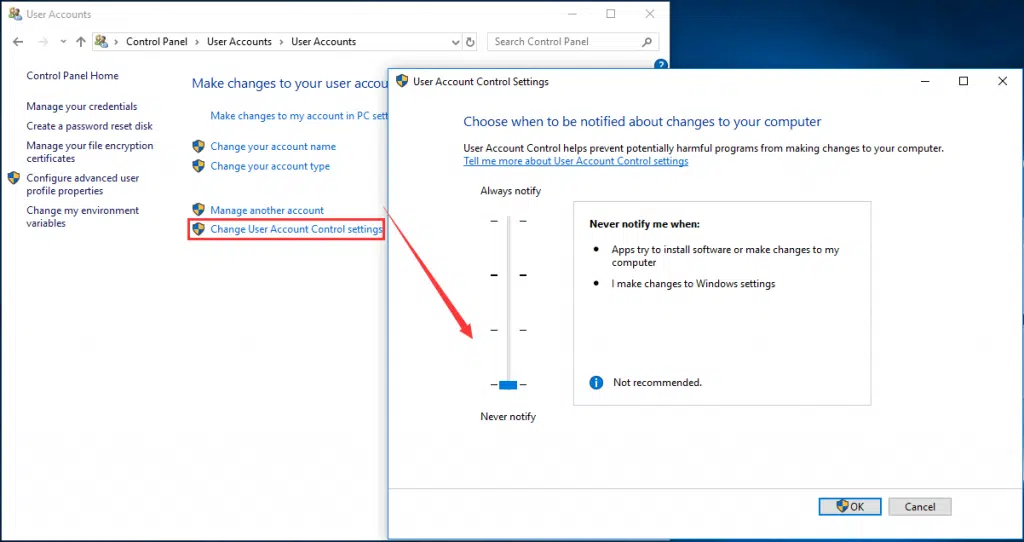
Tactic 8: Disable User Account Control (UAC)
User Account Control (UAC) is a Windows feature that can sometimes interfere with the functioning of QuickBooks & lead to such errors. You can disable UAC account in order to rectify the ongoing payroll error.
At first, you need to press Windows key on your keyboard.
After that search Control Panel.
Now open Control Panel and hit a click on User Accounts.
Also, select Change User Account Control settings.
Now move the slider to the down in order to disable UAC completely.
Hit a click on OK tab and reboot your system.
Lastly, launch your QuickBooks desktop and check if the error is resolved or not.
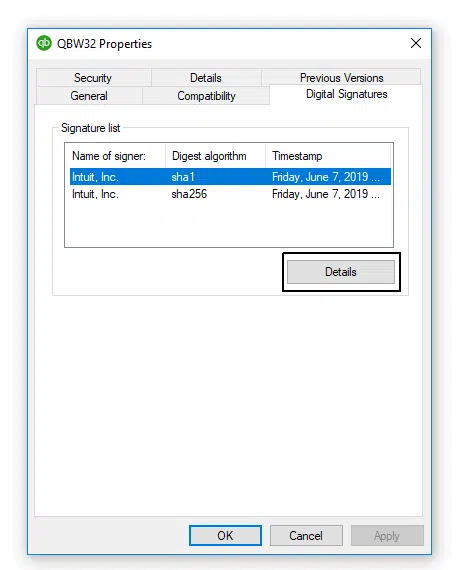
Tactic 9: Set up the Digital Signature Certificate
The procedure to install the digital signature certificate for Intuit is discussed below:
Initially, navigate to the QuickBooks folder. If you are unfamiliar with the location of the installation folder, right-click the QuickBooks icon and click on Properties.
After that, click on Open File Location.
Now, search for the QBW32.exe file in the QuickBooks folder.
Right-click the file and hit on Properties.
Now, opt for the Digital Signature tab.
Choose Intuit and then tap on the Details option.
Proceed by clicking on the View Certificate option.
The user now needs to click on Install Certificate.
Hit on Next tab.
Culminate by clicking on Finish.
Tactic 10: Configure the Firewall
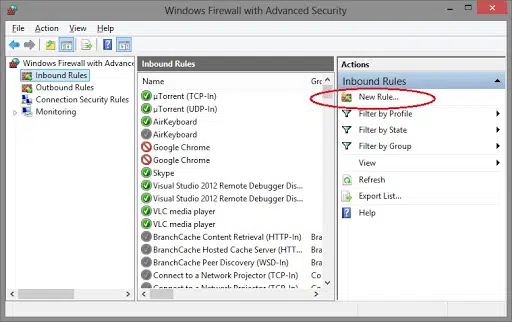
The initial step requires clicking on the Start menu.
Then, open the Windows Firewall.
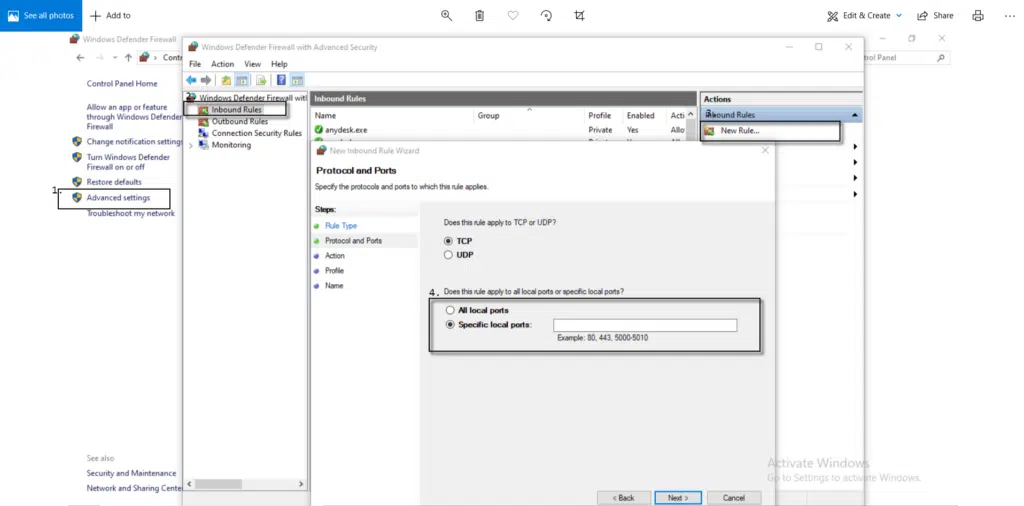
Make a move to the Advanced Settings.
Herein, user should proceed by Right-clicking on Inbound Rules.
Thereafter, hit on New Rule.
Give this rule a name and perform the same set of procedure for Outbound Rules.
Now, hit on Port tab and then, click on Next.
Herein, choose TCP and type in the ports corresponding to the version of QuickBooks installed on your computer. The ports for different versions of QuickBooks are mentioned below:
QuickBooks version
Port
QuickBooks Desktop 2020 and later
8019, XXXXX.
QuickBooks Desktop 2019
8019, XXXXX.
QuickBooks Desktop 2018
8019, 56728, 55378-55382.
QuickBooks Desktop 2017
8019, 56727, 55373-55377.
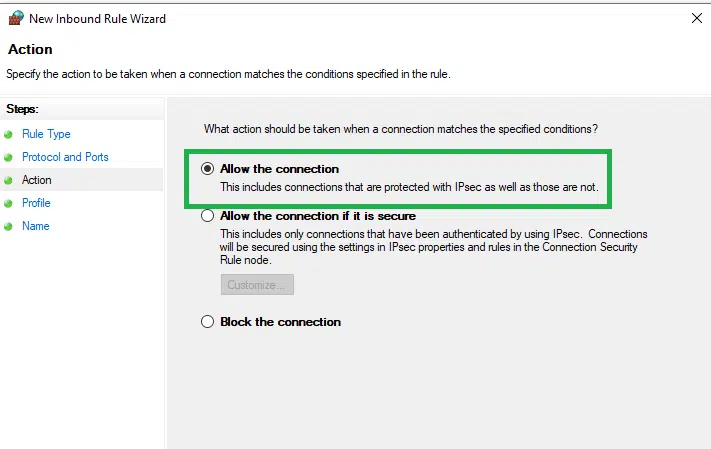
Upon entering the correct port, user needs to hit on Next tab.
Then, click on Allow the Connection.
Click on Next tab.
Give this rule a name and follow up by hitting on Finish.
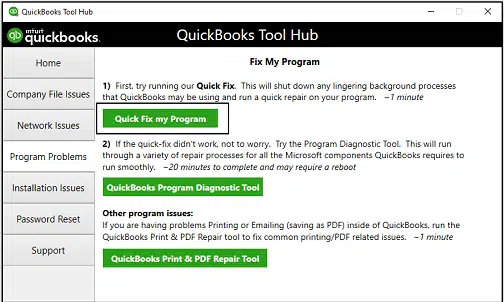
QuickBooks Tools Hub program is incorporated with a multitude of features to ward off the evolving error codes encountered in QuickBooks. One such feature is the Quick fix My Program.
Download the QuickBooks Tool Hub.
Follow up by installing the tool.
Once done with the installation, run the tool as an admin.
Now, advance to the Program Problems option.
The next step requires clicking on the Quick Fix My Program option.
Allow the feature to scan QuickBooks for any existential errors and fix them.
When the walkthrough has been followed entirely, re-open QuickBooks and try to update it again.
Conclusion
The different tactics to fix QuickBooks payroll error 15242 should help users in resolving the issue without much effort. If you face any un-escapable scenario in QuickBooks, just call our QuickBooks error support techies at the helpline i.e., 1-888-368-8874.